Monday, August 30, 2010

A Piece of My Heart...And an Ice Cream Treat


School officially began today!! I sent off my three kiddos...AND a piece of my heart!


Ella is a BIG girl now as she begins Kindergarten! Honestly, I can't even believe that I officially have no more kids at home. It's strange, but exciting in many ways! For the past 9 years I've had at least one, two or three of my kids home with me and now that they are all in school, I'm a little shell-shocked! Of course I have a plan...STAY BUSY! But I also want to take time to just wait and find rest in the Lord and see how He is going to use me this year. I'll miss my one on one time with Ella, but I know she's in good hands AND she has her 2 BIG brothers watching over her!

Go get em Ella!!

So every year since school started for them, I like to surprise them with a little treat. Sometimes it's cupcakes, one year it was a pencil cake and THIS year it's:

ICE CREAM SANDWICHES

Such a treat!!!
Honestly the easiest dessert to make AND if you want to, there are ways to make it even easier! I went to Panera and got some of their HUGE chocolate chip cookies and bought some vanilla ice cream, then looked in my pantry for sprinkles (which I always have a ton of).

INGREDIENTS: Makes 3
  • 6 Large Chocolate Chip Cookies (or ANY flavor you like)
  • Your favorite half gallon of ice cream, softened (I used Vanilla)
  • Sprinkles
DIRECTIONS:
Let Ice cream soften for at least 20 minutes. Spread the sprinkles out in a large pie plate and set aside. Lay out cookies, bottom side up on a parchment lined cookie sheet. Place one LARGE scoop of ice cream on the center of 3 cookies, then GENTLY press the other cookie on top. Once the cookies are "sandwiched", roll them in the sprinkles. If the sprinkles aren't sticking, you can grab a handful and sprinkle them on yourself. Immediately place in the freezer until ice cream hardens back up.

Saturday, August 28, 2010

Raspberry Bars


We love raspberry jam! We usually eat it on sourdough toast in the morning for breakfast, but lately I've been thinking about doing more with that raspberry jam then just spreading it on toast. So, I browsed some recipes the other day, but ended up making up one of my own. Not that this same thing hasn't been made before, but I figured I'd base the recipe on that crumbly topping you make for a fruit crisp. Nothing compares to that buttery, crispy topping!
So, I got out what I had in the pantry (which is why I like this kind of recipe) and went to work.
They smelled soooo good while they were baking and they're WAY too hot to eat right out of the oven...trust me, I tried and I burned my tongue!

Truth be told, I made these on Saturday night so we could grab them on our way to church Sunday morning. They may not be the "healthiest" breakfast, but they do have oats AND whole wheat flour! Make these bars the day or evening before, let them cool then cut into squares and grab one in the morning for breakfast or pack them as a snack for your kiddos!

Raspberry Bars

INGREDIENTS:
  • 1/2 cup whole wheat flour
  • 1/2 cup all-purpose flour
  • 1 3/4 cup old fashioned oats
  • 3/4 cup brown sugar, packed
  • 3/4 cup (1 1/2 sticks) cold unsalted butter, cut in 1 in. cubes
  • 1/2 tsp. kosher salt
  • 1/2 tsp. cinnamon
  • 1 jar (13 oz) Raspberry Jam (I used Bonne Maman Brand)
DIRECTIONS:
Pre-heat oven to 375 degrees. Line a 9 by 13 in. pan with parchment paper, allowing sides to hang over (to easily lift out bars). Butter parchment paper then set aside. Measure ingredients and in a large food processor add flour, oats, brown sugar, salt & cinnamon. Pulse until combined then add in butter cubes; Pulse until small crumbs form.
Set aside 1 1/2 cups crumb mixture. Dump remaining crumb mixture onto bottom of buttered 9 by 13 pan. Press lightly. Open jam jar and heat in microwave for 20 seconds, just to soften the jam a little. Pour the jam onto the bottom crumb mixture and spread evenly. Sprinkle remaining 1 1/2 cup crumb mix on top of jam. Bake in pre-heated oven for 20-25 min. Let cool completely in pan then lift out of pan using the extended parchment paper and place on cutting board. Cut into squares.

Wednesday, August 25, 2010

Hang Loose


So long Summer...hang loose!


It all started with my brother's wedding...to the most beautiful bride, I might add! Now that summer is coming to a close, I take a look back and think "whoa", what a busy, fun-filled 3 months! Thought I'd share a little of what we've been up to this summer. So blessed to have fun memories with the kids and some really fun times with my sweet family! Actually, some of the best times have been right in our own backyard; all of us sitting by the fire pit roasting marshmallows & the boys having weekly campouts with their dad...I think those are memories they'll have forever!

here's me & my bro on his BIG day!

I got to have a special "mother-daughter tea" with my Ella
Ella had her dance recital
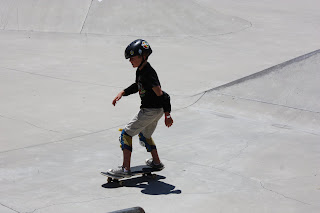
Jaden got to experience his first "skate camp", where he shredded
(at least that's what the instructor told me)
Then it was Maui.
Such an amazing trip I know the kids will never forget...

Jaden on the rope swing

the tide pools were so fun!

Lot's of fun times with our family...


Had many bonfire's in the backyard...
The kids with their cousin Kai in our tree


Tuesday, August 24, 2010

Handmade Soft Pretzels


We love pretzels in our family! Many years back we started taking trips to Lake Tahoe with my family, both in the summer and the winter. There's a beautiful resort on the North Shore we stay at that has an amazing lake-front lodge restaurant. There are panoramic views of the lake and in the winter, it's fun to find a cozy spot to eat breakfast and watch the snow fall onto the lake.
Well, I can't quite remember when it happened, but some years ago my husband began a love-affair with their bread basket. Yes, a bread basket...but not any ordinary bread basket. This basket comes filled with something for everyone: sourdough rolls, garlic rolls, breadsticks and little miniature loaves of PRETZEL BREAD!
All of these come homemade and they are warm & tasty. But something about that pretzel bread won over my husbands heart. From then on, he was determined to find it somewhere, but it was nowhere to be found. That left him begging me to "PLEASE re-create" the pretzel bread!!
Well, I've gotten a few recipes off the web, but have honestly never made it. I guess we'll just have to try to get to Tahoe this winter and find ourselves cozy inside the lodge with a glass of wine and a basket of pretzel bread. That actually sounds like a better idea to me!!

Anyway, I found this recipe from good old Alton Brown...these will have to satisfy for now, but I must say, this recipe is SUPER GOOD and very easy to make!
I used Sea Salt to sprinkle on the top, but next time I think I'll try a little cinnamon-sugar mixture or maybe even a garlic-herb. I'm also thinking I'll make a double batch, bake then freeze some. Try them...the kids will LOVE them and they are a perfect after-school snack!


  • 1 1/2 cups warm water (110-115 degrees)
  • 1 Tbsp. sugar
  • 2 tsp. kosher salt
  • 1 pkg. active dry yeast
  • 2 oz. unsalted butter, melted
  • Vegetable oil, for pans
  • 10 cups water
  • 2/3 cup baking soda
  • 1 large egg yolk, beaten with 1 Tbsp. water
  • Pretzel salt or Coarse Sea Salt

DIRECTIONS:
Combine water, sugar and kosher salt in the bowl of a stand mixer and sprinkle the yeast on top. Allow to sit for 5 min. or until the mixture begins to foam.
Add the flour and butter and, using a spatula OR a dough hook attached to your mixer, mix until well combined. Continue kneading for about 5-10 min or until dough is smooth and elastic. Remove the dough from the bowl, clean the bowl and then oil it well with vegetable oil. Return the dough to the bowl, cover with plastic wrap and sit in a warm place for around 55 min. or until the dough has doubled in size. ***Now, mine didn't quite double in size, but everything turned out fine!
Pre-heat oven to 450 degrees. Line 2 half-sheet pans with parchment paper and lightly brush with oil. Set aside. Bring 10 cups of water and the baking soda to a rolling boil in an 8 quart pan.
In the meantime, turn the dough out onto a slightly oiled work surface and divide into 8 equal pieces. Roll out each piece of dough into a 24 in. rope. Make a U-shape with the rope, holding the ends of the rope, cross them over each other and press onto the bottom of the U in order to form the shape of a pretzel. Place onto the parchment-lined pans.
Place pretzels in boiling water, 1 by 1, for 30 seconds. Remove them from the water using a LARGE flat spatula. (They will be slippery) Return to the sheet pan, brush the top of each pretzel with the beaten egg yolk mixture and sprinkle with the pretzel salt (or any other spice you'd like). Bake until dark golden brown in color, approx. 12-14 minutes. Transfer to a cooling rack for a few min. before serving.


I cut them then shaped into balls

Look how hard they are concentrating!

here's my U shape...perfection is NOT necessary!

looking a little better...

Everyones took a dip in the water, now it's time for the oven

Thursday, August 19, 2010

Pizza...any way you like!


We made pizza's last night & it was FUN! Gotta love the Trader Joe's fresh pizza dough, which makes the thought of homemade pizza's much more fun. I know homemade pizza dough is not difficult and I was actually planning on making some, but when you're short on time and energy...any store bought kind works just fine! I've also gone to my favorite pizza places before and bought some of their dough to make fresh pizza or rolls.
So, we all like different things on our pizzas, which is why I separated the dough for everyone to make their own. That way the kids are happy and I'm happy not having their grubby paws on my pizza!! Go ahead and make your own variety...these are just a few of the ideas that we tried!

So many choices...

INGREDIENTS: (Makes 4-5 personal size pizza's)
  • 2 pkgs. store-bought pizza dough (16 oz. each)
  • 1 jar marinara or pizza sauce
  • Mozarella & Parmesan cheeses, shredded (Sterling & I also added fresh goat cheese)
  • 2 cloves garlic, crushed
  • pepperoni (kids used this)
  • small can black olives, sliced
  • 1 pkg mushrooms, sliced
  • 3 plum tomatoes, sliced
  • artichoke hearts in water, drained & quartered
  • fresh basil
  • other options: sundried tomatoes (sliced), kalamata olives, pesto
Sterling "stuffed" his crust with cheese (on the left)

DIRECTIONS:
Unwrap pizza dough and place on floured surface. Let rest for 20 minutes. Divide 1 of the dough balls into 3 even balls. Divide the other into 2. This made 3 smaller pizzas for my kids and 2 very satisfying pizza's for Sterling and I. If you want to just make 1 large pizza, use 1 bag of pizza dough. let balls of dough sit on floured surface while you are preparing toppings.

Pre-heat oven to 400 degrees. Slice mushrooms and tomatoes. Place on a foil lined baking sheet, drizzle with olive oil and sprinkle with salt & pepper. Roast in oven for 5-10 minutes or until cooked. **This will take out the moisture from the mushrooms and tomatoes, so when you bake them on your pizza, they won't get it soggy. They also give it more flavor when they are roasted! Arrange the remaining toppings in bowls for convenience.
Increase Oven temp. to 450 degrees and get your baking sheets or pizza stones ready. If using a baking sheet, be sure to use cooking spray!
Stretch dough out...be sure that it's thin because it will spring back and cook up thick if you don't stretch it thin enough. Now at this point, if you like a "crispier" crust, I would bake the dough for about 5 minutes prior to adding anything on the shell. If you like a softer crust, go ahead and add your sauce & toppings.
I made mine like this: thin layer of sauce, thin layer of mozzarella, roasted mushrooms and tomatoes, fresh garlic, artichoke hearts, basil, a light sprinkle of fresh parmesan, then lastly the crumbled goat cheese. Before popping into the oven, give the entire pizza a nice drizzle of extra virgin olive oil (making sure to get some on the crust too!)
Bake 10-12 minutes, or until golden and toppings are bubbly.
***Next time I will wait and add the basil after my pizza has come out of the oven.


So, I just HAD to brag about my son! His new hobby...surfing!

Wednesday, August 18, 2010

Zesty Refried Bean & Veggie Burrito


It feels like I haven't blogged a recipe in ages! After that detox thing, I needed a couple weeks to catch up on my eating...gain back some strength too! This is sort of my first week back to cooking since I had a hall-pass last week. We had a "Ultimate Family Week" at church, which included dinner for 5 nights...a mom's dream come true!
We are officially in the home stretch of summer as school starts in a week and a half, so we are living life at the beach this week! Enjoying the spouting Whale's & jumping dolphins as we sit and watch my oldest son at Surf Camp. Today was AMAZING, I mean how often do you see dolphins & whales all in a one hour time period?
Anyway, because of all the excitement this week, meals have been quick and easy. This burrito recipe can be made any way you like, with meat or without. We had leftover Tri-Tip that my husband wanted in his burrito, but I like mine best without meat AND I also really like Black Refried Beans, but I used up what I had in the pantry.


INGREDIENTS:
  • Large Burrito-size Flour Tortillas
  • Sharp Cheddar & Monterey Jack Cheese, shredded
  • 2 Cans Zesty Refried Beans, or Black Refried Beans (I used Trader Joe's brand)
  • 1 pkg. mushrooms, sliced
  • 1 large Bell Pepper, thinly sliced
  • 1 Zucchini, cut in half moons
  • 1 yellow squash, cut in half moons
  • 1/2 red onion, thinly sliced
  • I had 1 cup of leftover corn I added to the veggie mix
  • Sour Cream
  • 1 Avocado, mashed w/ garlic & lime juice


DIRECTIONS:
Heat Beans in saucepan over low heat. In a large skillet, heat 2 Tbsp. olive oil and add cut veggies. Saute' veggies over med-high heat about 5-8 min. You want a nice golden color on the outside of the veggies without them getting too well-done.
Heat your tortilla, add some beans, cheese, sautéed veggies, sour cream & mashed avocado. Wrap up as best you can...they'll be messy, but really good!
ENJOY!

Monday, August 16, 2010

Strawberry Genoise with Whipped Cream


Ok, so your probably thinking "what in the heck is a genoise?" Well, I wasn't too sure myself until I started browsing through my Joy of Cooking cookbook the other day. I was looking for a cake to make and of course, I stumbled upon this one!
JOY of COOKING describes it as: "a rich, moist cake of Italian origin...excellent with fruit fillings and as a roll cake with cream fillings". Don't be afraid by all of the whipping & beating of the eggs...it really wasn't that bad. I had a lot of fun with this recipe and it turned out really yummy! I knew I wanted to use whipped cream, strawberries and lemon curd as my topping, so I sort of muddled my way through the filling/topping part. Not too shabby...

INGREDIENTS & DIRECTIONS for CAKE: Cake recipe from JOY of COOKING
(Makes two 9 inch. layers)

*Have all ingredients at room temp. Pre-heat oven to 350 degrees. Line 2 cake pans (9 in.) with parchment or wax paper. This (i've found) is one of the only ways my cake will release from the pan perfectly every time!

Pretty simple ingredients
Sift together 3 times and return to sifter:
  • 1 1/4 cups cake flour, sifted
  • 1/4 cup sugar
Melt in saucepan:
  • 1/3 cup (5 1/3 Tbsp.) unsalted butter
Set aside. Whisk together in a large heatproof bowl:
  • 6 large eggs (room temp.)
  • 3/4 cup sugar
**Set the heatproof bowl in a skillet of barely simmering water and whisk constantly until the mixture is warm to the touch. Remove the bowl from the heat and beat on high speed until the mixture is lemony-colored and has tripled in volume. *About 5 minutes in a heavy-duty mixer with the whisk attachment, 10-15 minutes with a hand-held mixer.

Whisking like crazy!
In 3 additions, sift the flour mixture over the top and fold in very gently with a rubber spatula. Re-heat the butter until it is hot and transfer to a medium bowl. Fold about 1 1/2 cups of the egg mixture into the butter until completely incorporated, along with: 1 tsp. Vanilla.
Srape mixture onto the remaining egg mixture and fold in. Scrape the batter into the pans and spread evenly.
Bake until cake begins to pull away from the sides of the pans and the top springs back when lightly pressed, about 15 minutes. Let cool in the pans on a rack for 10 mites. Slide a thin knife around edges to loosen from pan, inver the cake and remove the paper liners. Let cool right side up on the rack.

For the Filling:
  • 3 cups strawberries, cut into 1/2 inch slices. **save some for garnish
  • 2 cups heavy cream
  • 2 tsp. powdered sugar
  • 1 jar lemon curd (I found this at Trader Joe's)
**Whip the cream and sugar in a heavy-duty mixer with a whisk attachment until soft peaks form. Place the strawberries in a bowl. Fold about 3/4 of the cream into the berries. Place bottom cake layer on a serving plate. Spread a generous even layer of lemon curd on bottom cake layer. Arrange sliced strawberries around the outer edge of the cake, on top of the lemon curd, then spread the whipped cream with the strawberries in the center of the cake.
Place the top layer on and top with remaining whipped cream and strawberries.
I didn't frost the sides of the cake, but feel free to do so with the leftover whipped cream!

This was my bottom layer...
My little piece of Italy

LinkWithin

Related Posts with Thumbnails