Tuesday, November 29, 2011

Vegetable Chowder


I'm trying my best to use up all of the leftovers in my fridge.  A couple potatoes, half of an onion, some green beans, and some other veggies from Thanksgiving have made the components to this soup.
I literally made this soup off the top of my head.  It was very easy and can be thrown together in no time!  Yesterday I made a turkey soup and today it's a vegetable soup...I'm really hoping my family doesn't mind soup again!  I love soup and could have it every day, especially in the winter!  Just throw some bread in the oven and dinner is good to go.  I'm sure there's a ton of vegetable chowder soup recipes floating around out there, but this is my version...enjoy!  It was VERY tasty :)

Vegetable Chowder 
INGREDIENTS: {serves 5}

  • 2 Tbsp. butter
  • 1/4 cup flour
  • 2 large russet potatoes, diced into 1/2 inch cubes
  • 1/2 onion, diced
  • 2 celery stalks, diced
  • 2 large carrots, diced
  • 1 cup broccoli florets, roughly chopped
  • 1 cup cauliflower florets, roughly chopped
  • 1 cup green beans, chopped
  • 2 cups frozen corn, thawed
  • 4-5 cups chicken stock
  • 1 cup milk
  • salt and pepper
  • 1/2 tsp. fresh thyme
  • 1 cup sharp cheddar cheese, shredded

DIRECTIONS:
  In a large pot, heat the butter to medium-low.  Add the onion, potato, carrot, and celery to the pot and stir; season with salt and pepper.  Let saute for about 5-10 minutes or until vegetables are becoming tender.  Add the flour, stir vegetables to coat and let cook about 1 minute.  Pour in the chicken stock and add the broccoli, cauliflower, and green beans {you want the chicken stock to come just to the top of the vegetables, so add more if it's not enough}.  Bring to a boil, then simmer about 10-15 minutes on low heat, until vegetables are nice and tender.  Add the thawed corn, the milk, and thyme.  Let simmer another few minutes on low heat then add the cheese.  Stir and season again with salt and pepper to taste.


First...saute the potatoes, onion, carrot, and celery in butter
 {don't forget to salt & pepper the veggies}

Next...stir in the flour 

Add...chicken stock and broccoli, cauliflower, and green beans

Last...the thyme, milk, and cheese {don't forget to taste for seasoning}

Thursday, November 17, 2011

My favorite Fall recipe...Pumpkin Bread


In the midst of my busy week, I got to take the time today to go on a field trip with my 3rd and 4th grade boys.  We saw A Christmas Carol.  Once we all got settled I thought, oh this will be nice to relax and sit for 2 hours...no excuses!  I can honestly say, it was REALLY nice to relax, let my guard down and watch a great play.  But the play wasn't just entertaining, it was actually beautiful.  To hear the voices singing about Christ being born to save us from Satan's power.  To hear Scrooge finally profess that he was willing to do what it took to become a changed man, and to see the redemption at the end.  To hear "God bless us".  It's a wonderful thing to hear when so many are afraid to utter those words in that they might offend someone.  It was a great day...

On to the recipe...The smell of this bread baking to me is what Fall is all about.  Being at home, spending time with family, staying inside on rainy days and baking some of this bread, then eating it right out of the oven!  I can honestly say, it's one of those things that when I eat this bread, it takes me right back to when I was a little girl.  My great-aunt and my mom baked this bread all of the time and I can remember my mom putting thick slices into the toaster for me, getting it a little crispy on the edges, then slathering it with butter.  It's comfort to me.  I know it's kinda silly, but it's true.  Such fond memories of holidays growing up and so thankful to have those special memories.


Pumpkin Bread {family recipe}


INGREDIENTS: {makes 2 loaves}

  • 3 eggs
  • 1 1/4 Cup sugar
  • 1 Cup oil
  • 1 tsp. vanilla
  • 1 can {15 oz.) pumpkin puree
  • 3 Cups flour
  • 1/2 tsp. salt
  • 1/2 tsp. baking soda
  • 1/2 tsp. nutmeg
  • 1/2 tsp. cloves
  • 1 tsp. cinnamon
  • 1 tsp. baking powder
  • 1 Cup chopped walnuts {optional...I sometimes make 1 loaf with nuts & 1 loaf without}
DIRECTIONS:
Preheat oven to 350 degrees
Beat together the first 5 ingredients.  In a separate bowl, whisk the next 7 ingredients.  Slowly add the flour mixture to the wet ingredients and mix well.  If desired, add chopped nuts.  
Pour into 2 greased loaf pans and bake for about 1 hour.  Check for doneness at about 50 minutes...toothpick should come out clean.  You don't want to over bake.
Remove from oven, let cool in pans about 10 minutes, then pop out of pan onto a cooling rack.  Now you can take a nice big slice for yourself!  Once they are completely cooled, wrap tightly in foil.  The loaves freeze well too.  I used to freeze one and eat one, but now we eat them both too fast to freeze!  Warm slices in toaster or in microwave.  


Wednesday, November 2, 2011

Caramel Corn...so addicting!


Warning...this caramel corn is highly addictive!!  I've been making this recipe for a while now and when I get the ingredients out to make it, I immediately start drooling.  I crunchy, chewy and everything I love in caramel corn.  It makes a big recipe so it's perfect to take on a trip, or for a birthday party, or just to munch on over a weekend.  I made it last Saturday for my daughters soccer team, then made it again Monday night for a Halloween party.  It's fun and it's sure to please everyone...if not, there's more for you!

Caramel Corn {recipe adapted slightly from Paula Deen }


INGREDIENTS:

  • 2-3 bags microwave popcorn, popped {I use simply salted Orville Redenbacher's Natural}
  • 1 cup unsalted butter
  • 2 cups packed brown sugar
  • 1 tsp. salt
  • 1/2 cup light corn syrup
  • 1 tsp. baking soda
  • 1 tsp. vanilla extract
DIRECTIONS:
  Preheat oven to 200 degrees.  Spray a large baking pan or roaster with cooking spray.
Pop popcorn and pour into a large bowl.  I use a slotted spoon to scoop out any kernels that didn't pop.  
Over medium heat, combine butter, brown sugar, salt and corn syrup and boil for 5 minutes.  Remove from heat and stir in baking soda and vanilla extract.  Stir well.  Pour over the popped popcorn and stir well to coat.  Bake in sprayed baking pan for 1 hour, stirring every 15 minutes.  
Immediately pour into a large clean brown paper bag and shake.  Spread out on waxed paper to cool.  

Saturday, October 29, 2011

Simple Roast Chicken with roasted vegetables


All of my meals lately have been thrown together at the last minute.  This was one of those meals and it turned out so delicious!  We love roast chickens and there's never any leftovers...so next time I'm making two!!  If you have a family of 4 or more, I would definitely suggest making 2 chickens.  I love organic chickens, they are so tender and juicy.  When I'm buying a whole chicken I tend to splurge and spend a few extra dollars to buy the organic kind.  I had all of the vegetables already, so it only turned out to be an $11 meal for the entire family.  Not bad!

Simple Roast Chicken with roasted vegetables { Ina Garten }

INGREDIENTS FOR CHICKEN:

  • 1 Whole Roasting Chicken {about 5 lbs.}
  • 2 Tbsp. butter, melted
  • kosher salt
  • black pepper
  • 1 lemon, sliced in half
  • 1 bunch of fresh thyme sprigs {about 15 sprigs}
  • 1 head of garlic, cut in half
DIRECTIONS:
Preheat oven to 425 degrees.  Remove anything that might have been left inside chicken.  Rinse throughly and pat dry with paper towels.  Sprinkle the inside of the chicken thoroughly with salt and pepper.  Place the 2 halves of lemon, bunch of thyme and head of garlic all in the chicken cavity.  
Spread melted butter all over the chicken and season all over with more kosher salt and black pepper.  
Tie legs together with kitchen twine and tuck wings under the body of the chicken {I didn't tuck the wings under}.

Roasted Vegetables: { you can use any vegetables you like...this is what I had on hand}
  • 4 large carrots, cut in thick chunks
  • 5 medium yukon gold potatoes, cut in large chunks
  • 2 shallots, cut in large chunks
  • 1 small butternut squash, peeled and cut in 2 inch cubes
  • 2 cups sugar snap peas
  • olive oil
  • kosher salt
  • black pepper
Mix vegetables together in a large bowl and toss with a couple tablespoons of olive oil and season with salt and pepper.  Spread vegetables around the bottom of a large roasting pan and place chicken on top{OR you can roast the vegetables alongside the chicken in a separate roasting pan}.  I roasted my vegetables in a separate pan next to the chicken for about 50 minutes.
Roast the chicken for 1 1/2 hours, or until the juices run clear when you cut between leg and thigh.
Remove chicken and vegetables onto a platter and cover for about 10 minutes.   Slice chicken and serve with vegetables.  

Tuesday, October 25, 2011

Fresh Cranberry-Blueberry Crumble Muffins


I love it when the fresh cranberries start showing up in the stores!  Gets me excited for the holidays and I start anticipating what new recipes I'm going to try this year.  I couldn't resist putting a bag of cranberries in my basket the other day, but then I needed to figure out what I was going to do with them.  Muffins are always a hit with the kids, so I figured I'd not only put fresh cranberries in them, but also some big frozen blueberries.  I wasn't sure how that would work, but they turned out super delicious and moist!


Fresh Cranberry-Blueberry Crumble Muffins
{recipe adapted slightly from Keep your diet real}


INGREDIENTS: {makes 12 muffins}

  • 6 Tbsp. unsalted butter, melted
  • 1/3 cup plain yogurt, or milk
  • 1 large egg
  • 1 large egg yolk
  • 2 tsp. vanilla extract
  • zest of 1/2 lemon
  • 1 1/2 cups all-purpose flour
  • 1/4 cup flaxseed meal {optional}
  • 3/4 cup sugar
  • 1 1/2 tsp. baking powder
  • 1/2 tsp. salt
  • 1 cup fresh cranberries, roughly chopped
  • 1 cup frozen or fresh blueberries
  • small amount of flour & sugar to toss berries in
For Topping:
  • 2 Tbsp. cold unsalted butter
  • 1/2 cup flour
  • 4 Tbsp. brown sugar
  • zest of 1/2 lemon
DIRECTIONS:
Preheat oven to 375 degrees.  
Line a muffin pan with paper liners.  Melt the butter in microwave and let cool slightly.  In a medium bowl, combine the chopped fresh cranberries and blueberries and toss with a couple tablespoons on flour and sugar.  This will help keep the fruit from bleeding into the muffin. Whisk yogurt, egg, yolk, and vanilla in a small bowl, then add cooled butter.  Whisk together the flour, flaxseed meal, sugar, baking powder, and salt in a large bowl.  Add the yogurt mixture and stir until just combined {don't stir too much}.  Gently fold in the cranberries and blueberries.  Divide the batter evenly among muffin cups.  
Combine the crumble topping in a separate bowl and rub with fingertips until it resembles "crumbles" then gently press down on muffin tops before placing into the oven.  
Bake for 15-20 minutes or until a toothpick inserted comes out clean.  Cool slightly before serving.

Tuesday, October 18, 2011

Frosted Scotch Bars


My life is a whirlwind!!!  From soccer coach, to baseball fan, to president of Parent Teacher Organization, to mommy, to wife...wow, I'm exhausted just typing that out!  I rarely feel caught up at home anymore, mostly because I'm rarely home.  Yesterday although, I was home most of the day until it was time to pick up my kids.  It was nice.  I ran around the house from room to room trying to get as much done as I could.  I'm pretty satisfied with the results, but there's still so much more to do.  Oh well, I rewarded myself with these outrageously rich, but satisfying treats.  This is a recipe from a long time friend.  The kids adore these, but I have to give a disclaimer...cut them into small squares.  You'll thank me.  I took a big square for myself, ate it all in one minute, then got a major stomach ache.  My eyes were way bigger than my stomach!  But I just love the chocolate, peanut butter, butterscotch combination...nothing quite like it!  The chocolate layer is definitely more frosting-like, which I adore!


Frosted Scotch Bars {recipe by a dear friend}


INGREDIENTS:

  • 1 bag butterscotch chips
  • 1 1/2 cups creamy peanut butter 
  • 6 cups Rice Krispies cereal
  • 1 bag chocolate chips
  • 2 Tbsp. butter
  • evaporated milk {about 2-3 Tbsp.}
  • sifted powdered sugar {about 1/4 cup}
  • 1 Tbsp. vanilla
DIRECTIONS:
  Coat a 9 by 13 dish with cooking spray. 
 Melt together the butterscotch chips and peanut butter in a saucepan over low heat.  
Place rice krispies in a large bowl.  Once butterscotch/peanut butter mixture is melted, pour over the cereal and mix completely.  Place in the sprayed dish and press down with the back of a large spoon that is coated with butter {this helps keep it from sticking to the spoon}.  
Melt the chocolate chips and butter in a small saucepan over low heat.  Add the evaporated milk and the sifted powdered sugar.  Stir to combine.  The consistency should be creamy...if it isn't, add a little more evaporated milk.  Remove from heat and add vanilla extract.  
Spread over the top of the rice krispies in the pan and refrigerate for at least 30 minutes.  
I like them best cold, so I store them in the refrierator.  Pour a big glass of milk and enjoy!


Thursday, October 13, 2011

Recipe Index finally up & Recap of my latest race

I don't have a recipe to share today.  Mostly because it's HOT and I have no desire to cook.  Our summer has finally come to the Coast and it doesn't seem like Fall one bit!  I'm not complaining at all...I love the warmth and I love wearing my tank tops and shorts in October.  But, we don't have AC around here, so firing up the stove or oven doesn't seem like a good option today.  I did, however, finally get a recipe index up and running, so you can now view my recipes by clicking on the "Recipe Index" tab on the side of my blog.  The recipes are categorized so you will have an easier time finding what you need!

For now I will leave you with a picture of me and my kiddos.  I ran our local half marathon this past weekend "City to the Sea"...what a beautiful morning to run and a beautiful finish seeing my family cheering me on!  I had a PR of 1:58:11 so I was even more thrilled!  It's always a fun race to run and I love seeing many familiar faces in the race.  My next half is going to be in Vegas in December...can't wait for that!

Wednesday, October 5, 2011

HUGE Peanut Butter Oatmeal Cookies


Ok, so I made these cookies about one month ago and I'm JUST now getting the chance to put them on here!  Life is crazy busy, but I am still cooking, and now that Fall is upon us, I am baking more too!
Hopefully someday I'll catch up on all of my recipes to share with you, but for now you've GOT to try these!  I got this amazing recipe from In Katrinas Kitchen...she's got some of the most creative, delicious recipes I have ever seen!  I knew these cookies would be a hit with my kids because they adore peanut butter cookies.  Little did they know these cookies have peanut butter goodness running all the way in, out and around them!  The recipe makes a lot too, so they're perfect for birthday parties or school events.
These are definitely a new favorite for us...try them!


HUGE Peanut Butter Oatmeal Cookies {recipe slightly adapted from In Katrinas Kitchen}


INGREDIENTS:  {yield 12-14 HUGE cookies, and 36 regualr-sized cookies}

  • 2 Cups all-purpose flour
  • 2 tsp. baking soda
  • 1/2 tsp. salt
  • 1 cup unsalted butter, softened
  • 3/4 cup creamy peanut butter {I used organic-no sugar added peanut butter}
  • 3/4 cup sugar
  • 2/3 cup brown sugar
  • 2 eggs
  • 1 tsp. vanilla
  • 1/2 cup rolled oats
  • 3/4 cup peanut butter chips
  • Resse's pieces for the top
DIRECTIONS:
  Combine the flour, baking soda, and salt in a bowl and set aside.  
In the bowl of your mixer cream the butter, peanut butter, sugar, and brown sugar until creamy.  
Add the vanilla and eggs one at a time and mix thoroughly.  Slowly add the oats and peanut butter chips.  
Place the dough in the refrigerator to chill for about 15 minutes.  Just put the whole mixing bowl in there!  
Preheat oven to 350 degrees.  
Using a large cookie scoop {or a 1/4 measuring cup} drop dough onto a plate of Reese's Pieces and form into thick disc by smashing down the dough ball a bit.  6 cookies fit to a baking sheet.  
Bake for 10-12 minutes {mine needed to bake at least 15-17 minutes to cook all of the way through}.

**You can make regular-sized cookies with a 2 Tbsp. cookie scoop, just decrease the baking time.

Tuesday, September 20, 2011

The Pioneer Woman's Crash Hot Potatoes


These potatoes are sooooo incredibly good!  The crazy thing is they are sooooo incredibly EASY!  I got this recipe from the one and only Pioneer Woman and they have proven to be one of my families favorite side dishes!  I like to use the yukon gold potatoes because they are sweet and already have a buttery consistency, but you could use any small sized potato you like.

Crash Hot Potatoes { recipe by The Pioneer Woman }
INGREDIENTS:
  • 12 new potatoes {or other small round potatoes}
  • 3 Tbsp. olive oil
  • kosher salt to taste
  • ground black pepper to taste
  • fresh rosemary, or other herbs of your choice, to taste
DIRECTIONS:
  Bring a large pot of water to boil.  Add as many potatoes as you'd like to make and cook until fork-tender; about 15-20 minutes.
On a sheet pan, generously drizzle olive oil.  Place potatoes on the cookie sheet leaving plenty of room between each potato.
With a potato masher, gently press down on each potato until it slightly mashes, rotate the potato masher 90 degrees and mash again.  Brush the tops of each crushed potato generously with more olive oil.
Sprinkle potatoes with kosher salt, freshly ground black pepper, and fresh chopped rosemary.
Bake in a 425 degree oven for 20-25 minutes until golden brown.
serve potatoes with any sort of chicken or beef dish...I served them with this chicken and some delicata squash.

Monday, September 19, 2011

Chicken Cutlets with Bacon, Rosemary and Lemon


I've been trying to be creative with my cooking lately, but I'm failing!  Life has gotten in the way of my motivation and my time to devote to meals.  Maybe it's just a season, but I really am missing my meal-planning and my once a week grocery shopping has turned into daily, running in to pick up a few things, kind of shopping.  I usually can't stand that, but it's surprisingly not bugging me!
I did however, manage to steal an hour at the grocery store the other and stocked up on some meat and staples for my pantry.  Then of course, I had to come up with a plan of what to cook! HA!
Well, I found this recipe, tried it on my family last week, and it was a winner!  It has a few steps, but if you prep everything before you start cooking, then it won't seem bad at all.  Another disclaimer is that there is plenty of garlic in this dish...be prepared!  We love garlic...a lot of garlic, so this didn't phase my family one bit.  Give it a try if you're looking for something new to do with chicken!


Chicken Cutlets with Bacon, Rosemary and Lemon {adapted recipe from Ezra Pound Cake}


INGREDIENTS {serves 4}
  • 5 slices bacon, chopped
  • 1/4 cup flour
  • 4 thin sliced boneless skinless chicken breasts {If you can't find thin-sliced, then just pound the chicken to 1/4 in. thickness between two sheets of plastic wrap}
  • salt and freshly ground black pepper
  • 1 Tbsp. butter
  • 4 garlic cloves, sliced thin
  • 1 Tbsp. fresh rosemary, chopped
  • 1/8 tsp. red pepper flakes
  • 1 cup chicken broth
  • juice of one lemon
DIRECTIONS:  
Pre-heat oven to 200 degrees.
  Fry bacon in a large skillet until crisp, about 5 minutes.  Transfer bacon with slotted spoon to plate lined with paper towels. Spoon off all but 2 Tbsp. bacon fat.
Meanwhile, place flour in a shallow dish.  Pat chicken dry with paper towels and season chicken with salt and pepper.  Dredge in flour, and shake to remove excess.  Add butter to reserved bacon fat in skillet and heat over medium-high heat to melt butter.  Cook chicken until browned on both sides, about 4-5 minutes per side.  Transfer chicken to plate {reserving fat in skillet} and cover loosely with foil.
Reduce heat to medium-low and add garlic, rosemary and pepper flakes.  Cook until garlic is browned and crisp, about 2 minutes.  Add broth and lemon juice, scrape up browned bits from bottom of skillet with wooden spoon and simmer until slightly thickened, about 4 minutes.  
Return chicken and bacon to pan and simmer in pre-heated 200 degree oven about 5-10 minutes.  Sauce will become nice and thick and this is a good way to keep chicken nice and warm and crispy until you need to serve it.  
Serve with these potatoes...YUM!

Tuesday, September 6, 2011

Black-eyed Pea Salad


My best friend turned me on to this salad!  She made it for me a couple of years ago on the 4th of July and it's been a big hit since!  I usually only make it in the summer...it's a great appetizer at a BBQ or could even be served as an accompaniment to grilled chicken or steak.  You can even play with the flavors to make it a little spicier if you like!


Black-Eyed Pea Salad  

INGREDIENTS:
  •  2 C. cooked black-eyed peas
  •  1 C. whole kernel corn
  •  1 stalk celery, chopped
  •  1-2 serrano chiles, seeded and diced {depending on how much of a kick you like}
  •  1/4 cup red onion, chopped {I used a little less than 1/4 cup...I don't like a lot of onion}
  •  1 small tomato, chopped
  •  1 avocado, chopped

Dressing:
  •  1/2 cup vinegar {I used 1/4 cup white vinegar & 1/4 cup seasoned rice vinegar}
  •  3/4 cup olive oil
  •  1-2 Tbsp. fresh basil
  •  1 garlic clove, minced
  •  1 Tbsp. sugar
  •  pinch {or two} of red chili flakes
  •  juice of 1 lime
  •  salt to taste

DIRECTIONS:
 *Mix first 8 ingredients together.  In a separate bowl, whisk together dressing ingredients and pour over salad.  Can be made night before or fresh.  
*Serve with tortilla chips

Friday, September 2, 2011

Where have 10 years gone?


Jaden's birthday is today.  It's a milestone for him and for me.  He's 10.  Yes, 10.  In some ways I feel like I'm way too young to have a 10 year old, I mean, that's a big number!  But in other ways, I feel like I've grown these past 10 years just as Jaden has...yes, I have more wrinkles, but I've also grown in my life, my marriage, and as a mommy.  I couldn't wait to be a mommy, had dreamed of it my whole life, and was honestly overjoyed to hold my 7lb. 14oz. baby boy {who we didn't know was a boy}. Tears streamed down my husband and my face, tears of joy, not realizing that we would be in for a ride...
Jaden is our strong-willed child, he is the oldest, he is determined, brave, thoughtful, inquisitive, fearless, and yes, your typical boy!  He had his first trip to the ER at 18 months old after climbing, falling, and splitting his head open.  I held him as he got stitches.
 He loves adventure, loves being with his daddy, and still loves to know that I'm watching him ride his bike, ride his skateboard, swing a bat, climb a tree, etc.   He still calls me mommy.  I'm his biggest fan and always will be!
  

I'm a little anxious about what the next 10 years will bring, but at the same time, I know that I can't control his life, I know have to pull back and allow him to make choices {good or bad}, not to butt in every time he does something different than the way I would, to encourage him, and most importantly to love on him every second I can.
I want him to know how incredibly proud I am of how he's grown the past 10 years and I want him to know I'm right by his side for the next 10 years...and on!


Happy Birthday my son!


Tuesday, August 30, 2011

Chewy Chocolate Chip Cookie Bars


It looks like we're finally getting down the back to school routine.  Funny how easily we settle back into our routines and honestly it's for the better!  Things run so much smoother in our home when the kids know what to expect and when they have little time for being bored or arguing with one another.
My early mornings are the hardest though...so thankful for strong coffee!

Here's a recipe I made from King Arthur Flour and I have to say, they were delicious, but I think I cooked them about 5 minutes too long.  I like the gooeyness of a cookie bar and I know if I had taken them out sooner they would have been gooey.  They were so good right out of the oven! Perfect with a big scoop of vanilla ice cream and some hot fudge on top :)

Chewy Chocolate Chip Cookie Bars {recipe adapted from King Arthur Flour }


INGREDIENTS: {Makes about 2 dozen bars}

  • 2/3 Cup butter
  • 1 1/2 Cups brown sugar, packed
  • 3/4 tsp. salt
  • 1 1/2 tsp. vanilla extract
  • 3 large eggs
  • 2 1/4 tsp. baking powder
  • 2 3/4 Cup All Purpose Unbleached Flour
  • 2 1/2 Cups chocolate chips
DIRECTIONS:
  Preheat oven to 350 degrees and lightly grease a 9 by 13 pan.  Melt the butter, and stir in the brown sugar.  Add the salt and vanilla, stirring until combined.  Allow the mixture to cool slightly, then add the eggs one at a time, beating well after each addition.  Scrape the bowl and sides halfway through.  
Add the baking powder and flour, stirring to combine.  Stir in the chocolate chips.  Scoop the batter into the prepared pan and, with a wet spatula, or wet fingertips, spread evenly to the edges.
The recipe says to bake for 30-32 minutes, but I suggest baking for 25-30 minutes or until they're risen and they're top is shiny and golden.  A cake tester won't necessarily come out clean, but let them sit in the pan until they are almost cool, then cut and serve.  

Saturday, August 27, 2011

Nectarine Oatmeal Coffee Cake with Brown sugar Topping


Well, we got through our first two days of school!  The kids started school on Thurs. which is really foreign to me, but I have to admit, it was nice to welcome the weekend yesterday!  I now have a 4th grader, 3rd grader, and a 1st grader (sniff, sniff).  It blows my mind to think of how fast my little ones are growing and makes me realize more and more that every day with them counts!
I have bittersweet feelings when school begins, but seeing how much they enjoy their teachers, friends and school, it gives me a huge sense of relief.
Anyway, I figured I'd dust off my cooking skills and make something yummy for breakfast this morning!
I had a few nectarines on the counter and thought a coffee cake would be good and some nice thick cut bacon to go along with it!
I actually altered this recipe quite a bit.  It was originally a muffin recipe, but thought I'd pour it into a 9 inch square pan.  Then I added a brown sugar topping that made this coffee cake extra special!
A couple of tips:  use any fresh or frozen fruit you'd like...blueberries, peaches, raspberries, etc.
Also, if you'd rather make muffins, I think they would turn out great and they'd freeze well too!
Last, be sure not to mix the batter too much.  This was a very fluffy cake, but if you mix it too much it will change the texture.  Just fold lightly!

Nectarine Oatmeal Coffee Cake with Brown Sugar Topping 
{adapted from Easy Breakfast and Brunch cookbook}


INGREDIENTS: {Makes one 9-inch cake or 12 muffins}

  • 1 1/3 cups rolled oats
  • 1 1/3 cups buttermilk
  • 1 large egg
  • 1/3 cup melted butter or vegetable oil
  • 1/2 cup brown sugar, packed
  • 1 1/2 cups all-purpose flour {you can easily substitute 1/2 wheat flour}
  • 1 tsp. baking powder
  • 1/2 tsp. baking soda
  • 1/2 tsp. salt
  • 1/4 tsp. cinnamon
  • 2 almost ripe nectarines, pitted and flesh cut into large chunks 
Brown Sugar Topping:
  • 4 Tbsp. butter, cut into chunks
  • 1/4 cup flour
  • 1/2 cup brown sugar, packed
  • 1/4 tsp. cinnamon
*Mix together with fingers until it becomes a crumbly consistency

DIRECTIONS:
  Preheat oven to 425 degrees.  Grease a 9 inch baking dish {I used my pampered chef stoneware}.  
Put the rolled oats and buttermilk in a large bowl and let soak for 10 minutes.  Add the egg, melted butter, and sugar and mix well.
In a medium bowl whisk to combine the flour, baking powder, baking soda, salt and cinnamon.  Pour the flour mixture into the soaked oat mixture and stir briefly.  Quickly fold in the chopped nectarines.  The batter should look streaky...DO not over mix or the cake will become tough and dry!  
Pour the mixture into the prepared dish and sprinkle the brown sugar topping all over.  
Bake for about 20-25 minutes, checking after 20 minutes with a toothpick.  Let cool for 10 minutes then cut into large slices and serve with some crispy bacon and a big cup of coffee!


Friday, August 19, 2011

Chicken Pozole Verde


My supply of tomatillos has been a little more than I can handle lately!  I've already given huge bags to my neighbors with still many more to pick.  I think these cute little tomatillos are going to be my largest producing crop this season, which means I've been finding more recipes to try!  I absolutely love pozole soup because it's so hearty and comforting.   Instead of the typical way to make it, I found this recipe from Food and Wine that low and behold used tomatillos!  It wasn't a very difficult soup to make at all AND it made a large amount, so it heats up really well the next day.  I was also able to use my abundant supply of fresh cilantro and of course, I threw a couple of zucchini's in there too!  Enjoy!

Chicken Pozole Verde {recipe slightly adapted from  Food and Wine}

INGREDIENTS: {serves 6-8 heartily}

  • 7 cups chicken stock
  • 2 cups water
  • 4 chicken breast halves on the bone, with skin
  • 2 small zucchini, diced into small chunks
  • 1 1/2 lbs. tomatillos, husked and halved
  • 1 small onion, quartered
  • 2 pasilla chiles, cored, seeded and quartered
  • 2 jalapenos, seeded and quartered
  • 4 large garlic cloves, smashed
  • 1/2 cup chopped cilantro
  • 1 Tbsp. fresh oregano
  • salt and freshly ground pepper
  • 1 Tbsp. vegetable oil
  • three 15-oz. cans of hominy, drained
  • garnish: sour cream, diced avocado, shredded jack cheese, tortilla chips, lime wedges
DIRECTIONS:
  In a large stock pot, bring the chicken stock and water to a boil.  Add the chicken breasts, cover and simmer over very low heat until they're tender and cooked through, about 25 min.  Transfer the chicken breasts to a plate and shred the meat; discard the bones and skin. Skim any fat from the cooking liquid and set aside.  
In a blender, combine the halved tomatillos with the onion, pasilla chiles, jalapenos, smashed garlic, cilantro and oregano.  Pulse until coarsely chopped.  With the machine on, add 1 cup of the cooking liquid and puree until smooth.  Season the puree with salt and pepper to taste.  
In a large deep skillet, heat the vegetable oil until hot.  Add the tomatillo puree and cook over medium heat, stirring occasionally, until the sauce turns a deep green, about 10-12 minutes.  
Pour the green sauce int o the cooking liquid in the pot.  Add the hominy and bring to a simmer over medium heat.  Add the shredded chicken to the stew, season with salt and pepper and cook just until heated through.  Serve the pozole in deep bowls and garnish with the above items.

These things are so cute, when they're growing the outer husk looks like hanging paper lanterns!


Look at all that GREEN!!

The Hominy makes this dish...


Thursday, August 4, 2011

Fresh Boysenberry Cobbler


Not sure if I've mentioned it before, but I have a friend who grows the most amazing boysenberries I have ever seen!  They are HUGE and have the most wonderful flavor...my hands-down favorite berries are these boysenberries!  I took the kids out last week and picked a couple basket-fulls of these delicious berries, with the intent of making a cobbler.  The kids had their fair share as we were picking, probably like one for the basket and 4 for them!
Usually when I make a cobbler I use more of a pie crust type topping, but this time I searched some recipes and decided to go with more of a biscuity-type topping.  This recipe came from Williams-Sonoma and it was pretty simple.  We all enjoyed our big servings of cobbler with a nice big scoop of vanilla ice cream.  I'm actually looking forward to some more today for a mid-morning snack!  Also, I would suggest using this topping with any kind of fruit...peaches, apricots, or apples too.


Fresh Boysenberry Cobbler {recipe slightly adapted from Williams-Sonoma}


INGREDIENTS: {serves 8}
  • 2 lbs. fresh boysenberries, or any other mixed berries
  • 2 Tbsp. orange juice
  • 1/2 cup plus 3 Tbsp. sugar {use less sugar if your berries are really sweet...I used 1/4 cup sugar}
  • 2 Tbsp. cornstarch
  • 1/2 tsp. ground cinnamon
For the Cobbler topping:
  • 2 1/4 Cups unbleached all-purpose flour
  • 1/2 Cup firmly packed brown sugar
  • 2 tsp. baking powder
  • 1 tsp. salt
  • 1 tsp. baking soda
  • 6 Tbsp. chilled unsalted butter, cut into 1/2 inch pieces
  • 1 egg
  • 3/4 cup half & half {or heavy cream}
DIRECTIONS:
Preheat oven to 375 degrees.  Lightly butter a 9 by 13 baking dish.  I used an oval dish.  
In a bowl, combine the berries, juice, 1/2 cup sugar, cornstarch, and cinnamon.  Gently toss to combine and pour into the prepared baking dish.
To make the topping in a food processor, combine the flour, brown sugar, baking powder, salt, and baking soda, and pulse briefly to mix.  Add the butter and pulse until the mixture resembles coarse meal. In a small bowl, whisk the egg and cream together.  Pour the egg mixture in the processor and pulse just until the topping holds together.  
Using a large spoon, place dollops of topping evenly over the berries.  Sprinkle the 3 Tbsp. sugar over the topping.  Place the dish on a rimmed baking sheet.  Bake the cobbler until the top is golden and the berry filling is bubbly; about 35 minutes.  Transfer to a wire rack and let cool for 10-15 minutes.  Using a large spoon, scoop cobbler onto individual plates and serve with a big scoop of vanilla ice cream!


Thursday, July 28, 2011

Turkey-Vegetable Meatloaf with Balsamic Glaze


I can't believe I'm actually back blogging again!  The past few weeks have been the most jam-packed weeks...filled with baseball practices, baseball games, out-of-town baseball tournaments, oh, and a lovely week-long trip to San Diego to top it off!  It's all been great, don't get me wrong, but oh how happy I am to be HOME!  I love the feeling of my bed the first night coming home from a long trip, it's so comforting.
Anyway, now that we're home and back to reality, it means I'm back to cooking.  Here's a recipe that I've been making for quite a while and it's become one of our favorite meals.  If you're not sure about turkey meatloaf, you have to try this recipe!  All of the flavors...my favorite is all of the garlic, make it one tasty meatloaf.  I was able to use my garden staples in the meatloaf: zucchinis, fresh thyme, and fresh parsley.  Nothing like fresh herbs! 

Vegetable Meatloaf with Balsamic Glaze {recipe slightly adapted from Bobby Flay}

INGREDIENTS: {serves 6-8}
  • 2 Tbsp. extra-virgin olive oil
  • 1 small zucchini, finely diced
  • 1/2 red bell pepper, finely diced
  • 1/2 yellow bell pepper, finely diced
  • 4 cloves garlic, smashed to a paste with coarse salt
  • 1/2 tsp. red pepper flakes
  • salt and freshly ground pepper
  • 1 large egg, lightly beaten
  • 1 Tbsp. finely chopped fresh thyme {try to use fresh!}
  • 1/4 cup chopped fresh parsley
  • 1 1/2 lbs. ground turkey {90 percent lean}
  • 1 cup breadcrumbs
  • 1/2 cup freshly grated romano or parmesan cheese
  • 3/4 cup ketchup, divided
  • 1/4 cup plus 2 Tbsp. balsamic vinegar, divided
DIRECTIONS:
  Preheat oven to 425 degrees.  Heat the oil in a large saute pan over medium-high heat.  Add the zucchini, bell peppers, garlic paste, and 1/4 tsp. red pepper flakes.  Season with salt and pepper and cook until the vegetable are almost soft, about 5 minutes.  Set aside to cool.
Whisk the egg and fresh herbs in a large bowl.  Add the turkey, breadcrumbs, grated cheese, 1/2 cup ketchup, 2 Tbsp. balsamic vinegar, and the cooled vegetables; mix until just combined.
Gently press the mixture into a 9-by-5 inch loaf pan.   Whisk the remaining 1/4 ketchup {sometimes I add a little more ketchup}, 1/4 cup balsamic vinegar, and 1/4 tsp. red pepper flakes in a small bowl; brush the mixture over the top.  Bake for 1 to 1-1/4 hours.  Let rest for 10 minutes before slicing.  


My new potato-peeler helper

just had to share some pictures of my green bean crop
{they got a little big while we were away for the week}

...and my zucchini/squash crop

Wednesday, June 29, 2011

Double Chocolate-Chip Muffins


My kids love chocolate...they take after their mommy in that way!  My daughter is always asking for chocolate muffins and I'm always telling her I'll make them for her "soon".  I'm not the type of person who cringes at a chocolate muffin for breakfast.  Give me pie, cake, cookies...you name the dessert, I'll eat it for breakfast!  It's a curse, but I've learned to embrace it.
This is the first recipe I came across for chocolate muffins and it was VERY SIMPLE!  She pulled up the barstool and my little Ella helped me make them.  It's one of those recipes that can be put together and baked in less than 30 minutes.  She thoroughly enjoyed the fruits of her labor, as did I, with a nice hot Americano!

Double Chocolate-Chip Muffins {slightly adapted from Nigella Lawson}


INGREDIENTS:  {Makes 12 muffins}

  • 1 3/4 cup all-purpose flour {you could substitute half whole-wheat flour if you like}
  • 2 tsp. baking powder
  • 1/2 tsp. baking soda
  • 1/4 tsp. salt
  • 2 heaping Tbsp. good quality cocoa powder
  • 3/4 cup sugar
  • 3/4 cup chocolate chips, plus 1/4 cup for sprinkling
  • 1 cup milk
  • 1/3 cup plus 2 Tbsp. canola oil
  • 1 egg
  • 1 tsp. vanilla extract
DIRECTIONS:
  Preheat oven to 400 degrees.  Spray a 12-cup muffin tin with cooking spray and set aside.  Combine the flour, baking powder, baking soda, salt, cocoa powder, sugar, and 3/4 cup chocolate chips in a large mixing bowl.  In a small bowl, combine the milk, oil, egg, and vanilla.  Whisk to combine.  Pour the wet ingredients into the dry ingredients and stir just until mixed.  Try not to over-mix batter.   Evenly scoop batter into muffin tin and bake in preheated oven for 15-20 minutes.  


Tuesday, June 28, 2011

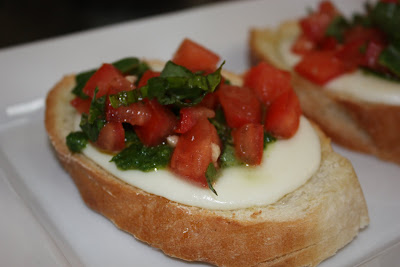
Bruschetta with homemade pesto


I decided to go simple for dinner the other night.  Salvaging through the refrigerator, I found some mozzarella and I immediately felt like bruschetta. I knew I had tons of fresh basil from my garden and I recently planted arugula, so I decided to make a pesto to go with the bruschetta.  The only bummer was that I had to buy tomatoes since my plants are taking a while.
Bruschetta can be served hot or cold, really however you like, but I decided I wanted mine warm.
This is how I made it...


Bruschetta with homemade pesto {serves 4-6 as appetizer}


INGREDIENTS FOR BRUSCHETTA:

  • 3 large tomatoes, seeded and diced
  • 2 cloves fresh garlic, minced
  • 3 Tbsp. fresh basil, torn
  • salt and freshly ground black pepper
  • homemade or purchased pesto {recipe for homemade pesto below}
  • 8 oz. mozzarella, cut into thin slices
  • 1 loaf french bread or baguette, cut into 1/2-inch thick slices
  • 2 Tbsp. olive oil, plus more for drizzling on bread
DIRECTIONS:
 Pre-heat oven to 400 degrees. Gently mix the tomatoes, minced garlic, basil, salt, pepper, and 2 Tbsp. olive oil in a small bowl and set aside.  Slice the bread and place on a foil-lined baking sheet.  Drizzle or brush with some olive oil and bake in oven for 5 minutes, or until crispy.  Remove from oven and place one slice of mozzarella on each slice of bread. Place back in oven for about 4-6 minutes, or until cheese has slightly melted.  Remove from oven and top with 1 tsp. of pesto and 1 Tbsp. of the tomato mixture.  Serve immediately.  


Homemade Pesto anyway you like
*Now arugula is a little bit on the spicier side.  If you prefer a more mild-flavored pesto, then choose basil.  I combined arugula and basil for my pesto.  Some recipes call for pine nuts or walnuts in their pesto recipes, but I decided to leave the nuts out.  Feel free to experiment!


INGREDIENTS:

  • 2 1/2 cups fresh basil OR fresh Arugula {I used 1 cup basil and 11/2 cups arugula}
  • 2 cloves garlic, peeled
  • 1/2 cup freshly grated parmesan cheese 
  • 1/4 cup pine nuts or walnuts {optional...I left the nuts out}
  • 1/4 cup extra virgin olive oil, plus more if desired
  • salt
  • freshly ground pepper
DIRECTIONS:
  Place basil or arugula, peeled garlic, and parmesan cheese in food processor.  Turn on processor and blend for 1 minute.  While processing, slowly add the olive oil and process for 1 more minute.  Season with salt and pepper to taste and pulse for a few seconds.  If the pesto seems to thick for your liking, you may add more olive oil.

Tuesday, June 14, 2011

Frittata Caprese


Frittata's are fun and easy.  Any combination of vegetables, or meat, or cheese can work in a frittata.  There's no rules...which can be really freeing for someone who doesn't do well with following a recipe {like me}.
I wanted to use the basil from my garden, which is growing in abundance, along with my zucchinis.  A little mozzarella cheese, cherry tomatoes, and voila...it tasted like a caprese salad, only warm.  Which is why I named this frittata caprese.  Frittata's are great to make for breakfast, lunch or even dinner.  I made this frittata with my blueberry buckle and it made for a perfect lazy saturday breakfast.


Frittata Caprese {serves 4}

INGREDIENTS: 
  • 8 eggs
  • 1/4 cup milk or half and half
  • 1-2 small zucchini, sliced into thin rounds
  • 1/2 cup cherry tomatoes, cut in half
  • 3 Tbsp. fresh basil, divided and roughly chopped
  • 1 clove garlic, minced
  • 6 oz. mozzarella, cut in chunks
  • olive oil
  • salt and freshly ground black pepper
DIRECTIONS:
  Pre-heat oven to 350 degrees.
  Whisk eggs and milk together in a bowl and set aside.  Heat a 10 inch non-stick {oven-proof} skillet over medium heat, add 1 Tbsp. of olive oil.  Once pan is hot, add zucchini and tomatoes.  Season with salt and pepper and let cook about 2 minutes.  Add garlic and stir until tomatoes have softened, just another minute or so {you don't want tomatoes to get too mushy}.  Remove the vegetables from pan and place on a plate.  Add 1 more Tbsp. of olive oil to hot pan.  Reduce heat to medium-low and add whisked egg mixture.  Let eggs cook for a couple of minutes and then place the sautéed vegetables and mozzarella chunks evenly into the eggs.  Sprinkle with 2 Tbsp. of the fresh basil and then place in oven.  Cook in oven 5-10 minutes or until eggs have fully set and feel slightly firm to touch.  You don't want the top to brown.  Remove from oven and sprinkle with the remaining 1 Tbsp. fresh basil.  Slice into large triangles and serve warm.  If you have leftovers, it also tastes great re-heated for lunch the next day!  


Saturday, June 11, 2011

Blueberry Buckle. Summer is here.


I couldn't resist.  Our first official day of Summer vacation and I'm in the kitchen making breakfast.  I had to celebrate with something that we love...food.  More specifically...breakfast!  I rolled out of bed at the crack of 8:30 {a miracle for me}and came into the kitchen with an idea.  Blueberries and cake. 
Fresh blueberries are one of my favorite fruits.  They have to be nice and firm with a tiny bit of tartness.  I bought a pound of organic blueberries at one of our local grocery stores to use for baking.  
The smells throughout the house were amazing!  I made a frittata {I'll blog about that later}, a big pot of coffee, and sat down with my plate of food.  What a nice way to start off our vacation! 


Blueberry Buckle {recipe adapted from King Arthur Flour}

INGREDIENTS: 

Topping:
  • 1/2 Cup sugar
  • 1/2 Cup flour
  • 1 tsp. cinnamon
  • 6 Tbsp. cold butter, cut into chunks
Batter:
  • 2 Cups All-Purpose flour
  • 2 tsp. baking powder
  • 1/2 tsp. salt
  • 3/4 cup sugar
  • 1/2 stick butter, softened
  • 1 large egg
  • 1 tsp. vanilla
  • 1/2 cup buttermilk {you can use regular milk instead}
  • 2 cups fresh blueberries {you can use frozen too}
Directions:
  Pre-heat oven to 375 degrees.  Butter and flour 9 inch square baking dish or a 9 inch cake pan.  
To make the topping, combine sugar, flour, and cinnamon in a small bowl.  Add cold butter chunks and crumble with your finger tips until the mixture becomes very crumbly.  Set aside.
To make the batter, combine the flour, baking powder, and salt in a medium bowl.  Whisk thoroughly.  In another bowl, or your electric mixer, combine butter and sugar.  Beat until nice and fluffy.  Add egg and vanilla and beat until creamy.  Alternately add the milk and flour mixture to the creamed butter mixture.  Mix gently, just until combined, ending with the flour mixture.  If you used your electric mixer, you will want to do the rest using a spatula.  Add blueberries and gently fold into your batter, making sure not to break up any of the fruit.  
Pour batter into the prepared baking dish.  Sprinkle crumble topping evenly over the entire cake batter.  Bake for 40-45 minutes, or until toothpick inserted in center comes out clean.  Let sit at elate 5 minutes...if you can wait that long!


Tuesday, May 31, 2011

Baked Mac and Cheese


This is a simple recipe.  Probably most everyone has a recipe for mac and cheese that they love.  This is mine.  Well, it's the one my mom used to make when I was growing up and it's the one I still make to this day.  I've tried jazzing it up different ways but honestly, I love it simple.  The only thing that I have changed is that I have added some gruyere cheese.  It gives the mac and cheese such a great kick!
My kids beg me to make this every week and one pan is barely enough for our growing family!  The other night was our only night last week that did not include baseball practice or baseball games, so I cooked for my family and enjoyed our night at home together.


Baked Mac and Cheese {family recipe}

INGREDIENTS: {serves 4-6 as main dish, 6-8 as side dish}

  • 1-lb. box small pasta {I used shells, but I've used everything from elbow to penne}
  • 2 Tbsp. butter
  • 2 Tbsp. flour
  • 2 Cups milk, warmed
  • 3 1/2 Cups sharp cheddar, shredded {try not to use pre-shredded cheese}
  • 1/2 Cup gruyere cheese, shredded
  • salt and pepper to taste
DIRECTIONS:
 Grease a 9 by 13 baking dish and set aside.  Heat oven to 350 degrees.
 Heat a large pot of water to boiling.  Once the water has come to a boil, season with salt and add pasta. Be sure to under-cook the pasta by 1-2 minutes because it will continue to cook when it's baking.  When pasta is cooked, drain and lightly rinse.  Pour pasta into greased baking dish and set aside.  
To make the sauce, heat butter in a medium saucepan over medium heat.  When butter has melted and become bubbly, add the flour and whisk constantly for 1 minute.  Slowly pour in a little milk and continue to whisk, breaking up the flour mixture.  Keep pouring the milk slowly and whisking constantly until there are no more lumps.  Heat this mixture for about 5 minutes, or until sauce begins to thicken and coats the back of a wooden spoon.  Do not let it come to a boil!  Turn heat to low and add about 3 1/2 cups of cheese.  Stir with a spoon until the cheese has melted.  Taste, then season with salt and pepper to taste.  
Pour the sauce over the pasta and stir completely.  Now at this point you can cover with foil and put in the refrigerator to bake at a later time.  Or if you'd like to bake immediately, sprinkle with the remaining half cup of cheese and bake for 30 minutes, or until golden and bubbly.  
Enjoy!!

cheese, milk, and butter...what more do you need?

shredded cheddar and some shredded gruyere

this is the part where I have to resist taking a big bite...

LinkWithin

Related Posts with Thumbnails