Showing posts with label Main Dish. Show all posts

Wednesday, January 9, 2013

Mexican Chicken Bowls


WELL....It's good to be back!  Not that I've really been anywhere, just MIA when it comes to blogging!  I actually think it was a good thing to take a break.  I feel like I have a little more time and energy to devote to some new recipes and almost a renewed excitement for cooking!!  After all of the holidays, baking cookies, eating cookies, and big heavy dinners, I'm ready to lighten things up a bit but without skimping on taste!!  I'm going to try my best to put out some legit healthy & tasty recipes :)
I may add the occasional sweet treat, but hey, everything in moderation right?!?!

This dish was way too easy to prepare and honestly everyone in my family loved it!  I guess you could call it a deconstructed burrito, but I almost enjoyed it better than a burrito.  Give it a try!

MEXICAN CHICKEN BOWL - (recipe adapted from HERE )

INGREDIENTS: (Makes about 4-5 bowls)

  • 4 boneless skinless chicken breasts
  • chili powder, paprika & garlic salt to season chicken
  • 1 jar (16 oz) salsa, your favorite kind!
  • 4 cups cooked brown rice...I used 2 bags of Trader Joes Frozen Organic Brown Rice
  • 1-2 cups frozen corn, heated
  • 1 can black beans, heated & drained
  • shredded cheddar cheese
  • 2 avocados, mashed with fresh lemon juice, garlic powder & sea salt to taste
  • sour cream, optional
DIRECTIONS:
  Preheat oven to 350 degrees.  Place chicken breasts in a baking dish and season with some chili powder, paprika and garlic salt.  Pour the jar of salsa on top of chicken breasts, cover tightly with foil and bake in oven for 1 hour.  Turn oven off and leave the chicken in the oven for another hour (or longer).  The chicken will shred very easily this way. (You can alternately do the chicken in your crockpot, on high for 4 hours or low for 7 hours). I like the oven method the best :)
Leave the chicken in the baking dish when you shred it so it so you can mix it with the salsa that's left in the dish...you will want the chicken to be a little saucy!
Once the chicken is shredded, start prepping all of the other ingredients.  When I don't have time or ingredients to make guacamole, I do more of a "avocado mash", which is avocados, lemon juice, garlic powder and sea salt.  Mash it all together and it's a perfect condiment to any mexican dish!!
To assemble the bowl, place about 3/4 to 1 cup of the rice on the bottom of the bowl, a couple spoonfuls of chicken (with some of the salsa) on top, a scoop of black beans, some shredded cheese, the last but not least the mashed avocado and sour cream if you like.
I gobbled up the first bowl then went back for a little extra chicken and black beans!  If you have some tortilla chips, you can definitely serve those on the side for scooping! 
ENJOY!

Thursday, August 30, 2012

Chicken Lettuce Wraps


I made these last week and they were a HIT with the whole family!  I love watching my kids enjoy a meal that is wrapped in lettuce :) I served my coconut-lemongrass rice on the side and it was a great meal!  I've been cooking like crazy the past couple of weeks and my creativity is coming back.
Been trying to hit the farmers markets and make meals with whats in season.  Our garden is booming with zucchini, yellow squash, sugar snap peas, green beans, fresh basil and of course a lot of tomatoes!!
It's been awesome to not have to buy much produce at the store.  I encourage you to go check out your farmers markets and create a meal with whats fresh & local!

Chicken Lettuce Wraps (serves 5-6) recipe adapted from HERE

INGREDIENTS:

  • 1 1/2 lbs. boneless/skinless chicken breasts, diced into 1/2 inch pieces (or use ground chicken)
  • 1 head Bibb Lettuce or Iceberg Lettuce (look for bibb lettuce at your farmers market)
  • 1 small can water chestnuts, diced (optional)
  • 1 carrot, julienned 
  • 1 small zucchini, small dice
  • 1/2 cup green onion, chopped
  • 1/2 cup roasted cashews (optional)
  • bean thread noodles, fried (optional)
STIR FRY SAUCE:
  • 1/4 cup fresh basil, chopped 
  • 3 Tbsp. low-sodium soy sauce
  • 3 Tbsp. fresh lime juice
  • 3 garlic cloves, fined minced
  • 1 jalapeƱo, chopped fine
  • 1/2 tsp. sirracha or other hot sauce
  • 1 Tbsp. sesame oil
  • 2 Tbsp. hoisin sauce (find it in Asian section at grocery store)
  • 2 tsp. cornstarch
DIRECTIONS:
In a small bowl, combine all ingredients for the stir fry sauce and set aside.
Heat a Wok or large skillet to medium-high heat.  Add some oil to the pan (I used canola) and cook the chicken with salt and pepper until done.  Remove the chicken from pan and set aside.  Add a little more oil and saute the carrot, zucchini, water chestnuts and green onion for about 4-5 minutes.  Add the chicken back to the pan, pour in the stir fry sauce and cook until bubbly and thickened, about 5 minutes.  Serve on top of lettuce leaves and sprinkle with roasted cashews.  I fried up some Bean Thread Noodles to serve on top as well.  My kids really like those!  If you would like to have a "dipping sauce" for the lettuce wraps, here is a recipe below:

DIPPING SAUCE:
  • 2 Tbsp. hoisin sauce
  • 2 Tbsp. hot water
  • 2 Tbsp. soy sauce
  • 1 Tbsp. seasoned rice vinegar
  • 1 Tbsp. lemon juice, freshly squeezed
  • 1/4 tsp. sesame oil

Wednesday, August 15, 2012

Grilled Pineapple-Turkey Burgers


It's August already...I seriously can't believe it!  My kids will be heading back to school next week and I'm already anxious to light my Fall candle!  I know, sounds strange that I'm thinking of Fall while it's still 75 degrees and sunny here, but it's inevitable that once school starts, our summer fun will be over :(
Oh well, we had a such a full summer that it will be nice to be back on a routine, which means I'll be doing a lot more cooking.  I'm actually looking forward to it...trying out some new recipes and having the house full of comforting smells when the kids get home from school.
This burger recipe has been on my "have to try" list for a while!  I'm a huge fan of turkey burgers that are seasoned just right, so they don't dry out.  The grilled pineapple definitely makes this burger a top-of-the-line burger (in my opinion).  You could add cheese or some fresh spinach leaves, but I think it's great as is.  Oh, and my new favorite thing to do with the hamburger buns is, lightly mayo the buns then put them on the grill for just a few minutes.  Honestly, I'm not a fan of mayo at all, but it seriously makes for one great grilled bun :)

Grilled Pineapple-Turkey Burgers 
(recipe very slightly adapted from Confections of a foodie Bride )

INGREDIENTS: (Makes 4 burgers *I made 2 large patties and 3 medium to smaller ones for my kids)

  • 1 pineapple, sliced into 4 rings
  • 1-1/2 lbs. ground turkey (I don't use the super lean turkey)
  • 3 Tbsp. Heinz 57 steak sauce or a little more (trust me, this is SO GOOD)
  • 1/4 cup red onion, finely chopped
  • handful of cilantro, chopped and divided
  • salt & freshly ground black pepper
  • worcestershire sauce
  • hamburger buns
DIRECTIONS:
Heat grill to medium-high.  I used my indoor grill pan this time.  Place pineapple rings on grill and cook about 4-5 minutes per side, or until you get some nice grill marks.  Remove pineapple and set aside on plate.  
In a large bowl, combine turkey, steak sauce, red onion, about 3 Tbsp. chopped cilantro, salt, pepper, and a few dashes of worcestershire.  Mix together well.  *fyi...I left out the cilantro and red onion from my kids burgers.  Place on grill and cook about 5 minutes per side.  After the burgers come off, you can now grill your buns if you like!  Next time I'd also like to grill some red onion rings to place on the burger.  
Serve the burgers on buns with additional steak sauce, grilled pineapple rings, and a little cilantro.  If you have left-over chopped red onion, you can also sprinkle some of that on top if you like, but I left it off.


Tuesday, May 8, 2012

Lemon Chicken Breasts...Barefoot Contessa


I love making this chicken dish!  It's super easy to prepare and is perfect for company.  Just throw everything in a baking dish, bake, then keep warm in oven until guests arrive.  I like to use the thin-sliced chicken breasts when I can find them, or at least cut large chicken breasts in half.  I almost always double this recipe, because the leftovers are SO good!  I usually serve this with toasted orzo and asparagus wrapped in prosciutto.
Enjoy!

Lemon Chicken Breast {recipe by Barefoot Contessa }


INGREDIENTS: {serves 4}

  • 1/4 cup olive oil
  • 3 Tbsp. fresh garlic, minced {about 9 cloves}
  • 1/3 cup dry white wine {like a chardonnay}
  • 1 Tbsp. grated lemon zest {2 lemons}
  • 2 Tbsp. freshly squeezed lemon juice
  • 1 1/2 tsp. dried oregano
  • 1 tsp. fresh thyme, minced
  • kosher salt and freshly ground black pepper
  • 4 boneless chicken breasts {I buy boneless/skinless}
  • 1 lemon
DIRECTIONS:
  Preheat oven to 400 degrees.
In a small saucepan, heat olive oil over medium-low heat.  Add the garlic and cook for just 1 minute, but don't allow the garlic to brown.  Remove from heat and add the white wine, lemon zest, lemon juice, oregano, thyme, and 1 tsp. salt.  Pour the sauce into a 9 by 13 inch baking dish.
Place chicken breasts on top of sauce, brush the chicken breasts with olive oil and sprinkle with salt and pepper.   Cut the lemon into 8 wedges and tuck them among the pieces of chicken.
Bake for 30-40 minutes, depending on the size of the chicken breasts, until the chicken is done and the top is lightly golden.  If you would like the chicken to be more golden on top, then put underneath the broiler for 2 minutes.  Cover the pan tightly with foil and allow to rest for 10 minutes.  Serve chicken with sauce.


Monday, April 2, 2012

Sesame Chicken Pasta Salad


We loved this pasta salad!  It was a fun spin on an asian salad and was great as a main dish, just serve with some french bread.  I think it was the dressing that made this taste so yummy!  It may seem like a lot of dressing, but pour it all on because the pasta will soak up a lot of it.  I added a few extra things to the recipe just to add some crunch.  Next time you head out for a picnic or a potluck, make this!

SESAME CHICKEN PASTA SALAD { recipe adapted from HERE}


INGREDIENTS:

  • 1 {16 oz} package bow-tie pasta
  • 1/2 cup canola or olive oil
  • 1/3 cup seasoned rice vinegar
  • 1/3 cup soy sauce
  • 1 tsp. sesame oil
  • 3 Tbsp. sugar
  • 1/2 tsp. ground ginger
  • 1/4 tsp. black pepper
  • 3 cups cooked chicken, shredded or cut up into chunks
  • 1/4 cup green onions, thinly sliced {I added some of the green parts as well}
  • 1/4 cup sliced almonds, toasted lightly in a dry pan
  • 1/4 cup sesame seeds, toasted lightly in a dry pan
  • 1/2 cup red bell pepper, thinly sliced
DIRECTIONS:
  Heat a medium skillet over medium-low heat; add sesame seeds and sliced almonds.  Toast until golden brown and set aside.  Cook pasta according to package directions, drain and rinse with cold water.  Add pasta to large bowl.
In a small bowl, whisk together the olive oil and next 6 ingredients.  
Add sliced green onions, cooked chicken, sliced bell pepper, sesame seeds and almonds to the bowl with the cooled pasta.  Stir to combine.  Pour in the dressing and mix well.  You can serve immediately or refrigerate for later.

Tuesday, February 28, 2012

Bacon and Mushroom Risotto with baby Spinach


Hello out there!  I haven't been updating my blog at all, but I have been cooking!  Life is just getting busier as baseball is officially beginning.  Didn't you just FINISH baseball season?? you might ask... well, yes about 3 months ago!  But, my boys are geared up and ready for another fun season!!!  I guess I'm ready too, but I'm going to have to get a little more creative with my meals.  My mind just can't go there yet...

Anyway, I made this dish for dinner tonight and it is SO worth every minute of the stirring!!  I got this recipe from my sweet friend and I must say, it's going to become a new favorite in our home.  It's got everything you need for a perfect one-dish meal.  Round it out with a little salad and bread and your good to go!

Bacon and Mushroom Risotto with baby Spinach { original recipe: Cooking Light }


INGREDIENTS: {Serves 5}
  • 4 cups Chicken Stock
  • 6 bacon slices, chopped
  • 1 cup shallots, chopped
  • 1 Tbsp. extra virgin olive oil
  • 1 tsp. chopped fresh thyme
  • 3 cloves garlic, minced
  • 4 ounces crimini mushrooms, sliced
  • 4 ounces shiitake mushrooms, stemmed and sliced {I didn't have these, so I left them out}
  • 4 ounces white button mushrooms, sliced
  • 1 cup uncooked Arborio Rice
  • 1/3 cup dry sherry
  • 4 cups baby spinach
  • 1/2 cup grated fresh asiago cheese {I used romano and parmesan}
  • salt and freshly ground black pepper to taste
DIRECTIONS:
    Bring stock to a simmer in a saucepan; keep warm over low heat.  Heat a large dutch oven over medium heat.  Add bacon to pan, cook 8 minutes or until crisp, stirring occasionally.  Remove bacon from pan with a slotted spoon.  Pour out all but 2 Tbsp. of bacon drippings.  Add olive oil, shallots, thyme, and garlic to bacon drippings in pan; cook 6 minutes.  Stir in mushrooms and cook 8 minutes.  Add rice and cook 1 minute stirring constantly.  Stir in sherry and cook until almost all of the liquid is absorbed.  Stir in 1 Cup of stock.  Cook 4 minutes or until it is almost all absorbed.  Add the remaining stock, 1/2 Cup at a time, stirring constantly until each portion is absorbed before adding the next (takes about 30 minutes total).  Stir in spinach.  Remove from heat and stir in cheese, salt, and pepper to taste.  Sprinkle with bacon.

Tuesday, January 31, 2012

Balsamic Roast Pork Tenderloin


So we made our trip to the snow...a long 6 hour drive and we pull in to the cute little town to find VERY little snow :(   The kids were pretty disappointed, but we made the best of it!  I don't really know what I was thinking, I mean we're in the middle of a super dry winter!  Oh well, it was fun to explore Big Bear and just have a nice relaxing time with my family.
I made this pork tenderloin a couple of weeks back and it was quick and easy!  The flavor was wonderful, probably because of all the garlic, but we're HUGE fans of garlic in this house!
I'd say this was prepped and baked in about 30 minutes!  I served some orzo on the side and it made a yummy dinner.

BALSAMIC ROAST PORK TENDERLOINS {Recipe by Rachel Ray}


INGREDIENTS:

  • 4 1/2 lbs. pork tenderloins {I just used 2 lbs., one package with 2 tenderloins in the package}
  • 4 Tbsp. balsamic vinegar
  • 4 Tbsp. extra virgin olive oil
  • 8 cloves garlic, cracked
  • coarse salt and freshly cracked black pepper or steak seasoning
  • 1 Tbsp. fresh rosemary, finely chopped
  • 1 Tbsp. fresh thyme, finely choppped
DIRECTIONS:
  Preheat oven to 500 degrees.  Trim any connective tissue from the tenderloins with a sharp thin knife.  Place tenderloins on a nonstick baking sheet with a rim.  Coat the tenderloins with the balsamic vinegar, rubbing vinegar into meat.  Drizzle tenderloins with olive oil, just enough to coat.  Cut small slits into meat and insert chunks of the cracked garlic cloves.  Combine salt and pepper {or steak seasoning} with the rosemary and thyme and rub meat with the blend.  Roast in hot oven for 20-30 minutes.  Let meat rest, transfer to carving board, cut meat and serve.


Wednesday, January 4, 2012

Chicken, Black Bean, Corn and Zucchini Enchiladas


I made these for dinner last night and OH MY...they were delicious!!  Everything I was hoping for!  
I saw this recipe on pinterest (my new fav website) and kind of re-constructed it a bit to my own liking.  I've been craving enchiladas and these definitely hit the spot!  They were a big hit with my husband.  I made one pan of 4 large enchiladas for us, and another pan of chicken and cheese enchiladas for the kiddos.  I saved some of the filling so I could make a big burrito for lunch today!!
If you wanted to make these vegetarian, just leave out the chicken.


Chicken, Black Bean, Corn and Zucchini Enchiladas {recipe adapted from Taste And Tell }

INGREDIENTS: {Makes about 8 large enchiladas}
  • 2 chicken breast halves with bone
  • 1 Tbsp. olive oil
  • 1 tsp. chili powder
  • 1 tsp. kosher salt
  • 1/2 tsp. freshly ground black pepper 
Black Bean Filling: 
  • 1 Tbsp. olive oil
  • 1/2 onion, diced
  • 1 large zucchini, cut into 1-inch dice
  • 1 clove garlic, minced
  • 1 {15 oz} can black beans, rinsed
  • 1 cup fresh or frozen corn, thawed
  • 1/2 tsp. chili powder
  • 1/2 tsp. cumin
  • 1/2 tsp. kosher salt
Enchilada Sauce:
  • 1 Tbsp. butter
  • 1 clove garlic, minced
  • 1 jalapeno, stemmed and seeds removed, cut into a small dice
  • 1 Tbsp. flour
  • 1 cup vegetable or chicken stock
  • 1 cup sour cream
  • 1 can {4 oz} fire roasted green chiles, mild
  • 1 cup salsa verde {I like Herdez brand}
  • 1/2 tsp. cumin 
  • 1/2 tsp. chili powder
  • 1/2 tsp. salt
For Enchiladas:
  • 8 {8-inch} flour tortillas {I used fresh uncooked tortillas, but cooked them first...delicious}
  • 3/4 lb. monterey jack cheese, shredded
DIRECTIONS:
  Preheat oven to 350 degrees.  Rub the chicken breast halves with olive oil and season with salt, pepper and chili powder.  Place in a baking dish and bake uncovered for 1 hour.  Remove from oven, cover with foil and let sit until ready to shred. 
To make the filling: In a large saute pan, heat olive oil over medium low heat.  Add the onion and saute about 4 minutes.  Add zucchini and saute another 4 minutes, or until slightly tender.  Add the garlic, black beans, corn, chili powder, cumin and salt. Heat through about 4 minutes.  Pour into a large bowl and set aside.  Take the chicken out of the pan, shred and add to the black bean mixture.

To make the sauce: Wipe the pan clean and over medium-low heat add 1 Tbsp. butter for the sauce.  Stir in the garlic and jalapeno and cook until fragrant and softening, about 4 minutes.  Add the flour and cook for 1 minute.  Whisk in the stock and bring to a boil.  Once at a boil, reduce heat to a simmer and simmer for about 5 minutes or until reduced a bit.  If you have an immersion blender, you can use it right in the pan, if not, transfer the sauce to a blender.  Add the sour cream, green chiles, salt, cumin, chili powder. Blend until slightly smooth (I left a little chunky).  Pour in 1 cup of salsa verde and stir to combine.  
If you decide to use the uncooked tortillas, go ahead and cook those up in a dry pan...I used my double burner griddle and got them done pretty fast.
To assemble the enchiladas:
Coat a 9 by 13 pan with about 1/2 cup of the sauce.  Fill each of the tortillas with a generous amount of the black bean/chicken filling and a spoonful of cheese (I like a lot).  Roll up and place seam side down in baking dish.  Pour the remaining green chile sauce over the top and sprinkle with the remaining cheese.  Bake in the oven for 30-35 minutes or until bubbly and the cheese is beginning to get golden around the edges.  Serve with a side of guacamole and chips!
  
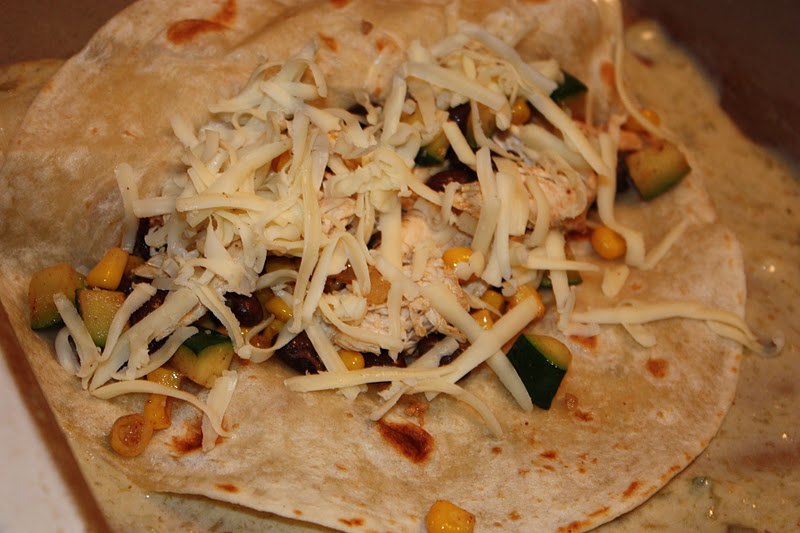
corn, zucchini and black bean filling

oh yea, lots of cheese!

a nice amount of filling and cheese...

ready for the oven

oh yea, nice a bubbly golden brown!

close up!

Saturday, October 29, 2011

Simple Roast Chicken with roasted vegetables


All of my meals lately have been thrown together at the last minute.  This was one of those meals and it turned out so delicious!  We love roast chickens and there's never any leftovers...so next time I'm making two!!  If you have a family of 4 or more, I would definitely suggest making 2 chickens.  I love organic chickens, they are so tender and juicy.  When I'm buying a whole chicken I tend to splurge and spend a few extra dollars to buy the organic kind.  I had all of the vegetables already, so it only turned out to be an $11 meal for the entire family.  Not bad!

Simple Roast Chicken with roasted vegetables { Ina Garten }

INGREDIENTS FOR CHICKEN:

  • 1 Whole Roasting Chicken {about 5 lbs.}
  • 2 Tbsp. butter, melted
  • kosher salt
  • black pepper
  • 1 lemon, sliced in half
  • 1 bunch of fresh thyme sprigs {about 15 sprigs}
  • 1 head of garlic, cut in half
DIRECTIONS:
Preheat oven to 425 degrees.  Remove anything that might have been left inside chicken.  Rinse throughly and pat dry with paper towels.  Sprinkle the inside of the chicken thoroughly with salt and pepper.  Place the 2 halves of lemon, bunch of thyme and head of garlic all in the chicken cavity.  
Spread melted butter all over the chicken and season all over with more kosher salt and black pepper.  
Tie legs together with kitchen twine and tuck wings under the body of the chicken {I didn't tuck the wings under}.

Roasted Vegetables: { you can use any vegetables you like...this is what I had on hand}
  • 4 large carrots, cut in thick chunks
  • 5 medium yukon gold potatoes, cut in large chunks
  • 2 shallots, cut in large chunks
  • 1 small butternut squash, peeled and cut in 2 inch cubes
  • 2 cups sugar snap peas
  • olive oil
  • kosher salt
  • black pepper
Mix vegetables together in a large bowl and toss with a couple tablespoons of olive oil and season with salt and pepper.  Spread vegetables around the bottom of a large roasting pan and place chicken on top{OR you can roast the vegetables alongside the chicken in a separate roasting pan}.  I roasted my vegetables in a separate pan next to the chicken for about 50 minutes.
Roast the chicken for 1 1/2 hours, or until the juices run clear when you cut between leg and thigh.
Remove chicken and vegetables onto a platter and cover for about 10 minutes.   Slice chicken and serve with vegetables.  

Monday, September 19, 2011

Chicken Cutlets with Bacon, Rosemary and Lemon


I've been trying to be creative with my cooking lately, but I'm failing!  Life has gotten in the way of my motivation and my time to devote to meals.  Maybe it's just a season, but I really am missing my meal-planning and my once a week grocery shopping has turned into daily, running in to pick up a few things, kind of shopping.  I usually can't stand that, but it's surprisingly not bugging me!
I did however, manage to steal an hour at the grocery store the other and stocked up on some meat and staples for my pantry.  Then of course, I had to come up with a plan of what to cook! HA!
Well, I found this recipe, tried it on my family last week, and it was a winner!  It has a few steps, but if you prep everything before you start cooking, then it won't seem bad at all.  Another disclaimer is that there is plenty of garlic in this dish...be prepared!  We love garlic...a lot of garlic, so this didn't phase my family one bit.  Give it a try if you're looking for something new to do with chicken!


Chicken Cutlets with Bacon, Rosemary and Lemon {adapted recipe from Ezra Pound Cake}


INGREDIENTS {serves 4}
  • 5 slices bacon, chopped
  • 1/4 cup flour
  • 4 thin sliced boneless skinless chicken breasts {If you can't find thin-sliced, then just pound the chicken to 1/4 in. thickness between two sheets of plastic wrap}
  • salt and freshly ground black pepper
  • 1 Tbsp. butter
  • 4 garlic cloves, sliced thin
  • 1 Tbsp. fresh rosemary, chopped
  • 1/8 tsp. red pepper flakes
  • 1 cup chicken broth
  • juice of one lemon
DIRECTIONS:  
Pre-heat oven to 200 degrees.
  Fry bacon in a large skillet until crisp, about 5 minutes.  Transfer bacon with slotted spoon to plate lined with paper towels. Spoon off all but 2 Tbsp. bacon fat.
Meanwhile, place flour in a shallow dish.  Pat chicken dry with paper towels and season chicken with salt and pepper.  Dredge in flour, and shake to remove excess.  Add butter to reserved bacon fat in skillet and heat over medium-high heat to melt butter.  Cook chicken until browned on both sides, about 4-5 minutes per side.  Transfer chicken to plate {reserving fat in skillet} and cover loosely with foil.
Reduce heat to medium-low and add garlic, rosemary and pepper flakes.  Cook until garlic is browned and crisp, about 2 minutes.  Add broth and lemon juice, scrape up browned bits from bottom of skillet with wooden spoon and simmer until slightly thickened, about 4 minutes.  
Return chicken and bacon to pan and simmer in pre-heated 200 degree oven about 5-10 minutes.  Sauce will become nice and thick and this is a good way to keep chicken nice and warm and crispy until you need to serve it.  
Serve with these potatoes...YUM!

Thursday, July 28, 2011

Turkey-Vegetable Meatloaf with Balsamic Glaze


I can't believe I'm actually back blogging again!  The past few weeks have been the most jam-packed weeks...filled with baseball practices, baseball games, out-of-town baseball tournaments, oh, and a lovely week-long trip to San Diego to top it off!  It's all been great, don't get me wrong, but oh how happy I am to be HOME!  I love the feeling of my bed the first night coming home from a long trip, it's so comforting.
Anyway, now that we're home and back to reality, it means I'm back to cooking.  Here's a recipe that I've been making for quite a while and it's become one of our favorite meals.  If you're not sure about turkey meatloaf, you have to try this recipe!  All of the flavors...my favorite is all of the garlic, make it one tasty meatloaf.  I was able to use my garden staples in the meatloaf: zucchinis, fresh thyme, and fresh parsley.  Nothing like fresh herbs! 

Vegetable Meatloaf with Balsamic Glaze {recipe slightly adapted from Bobby Flay}

INGREDIENTS: {serves 6-8}
  • 2 Tbsp. extra-virgin olive oil
  • 1 small zucchini, finely diced
  • 1/2 red bell pepper, finely diced
  • 1/2 yellow bell pepper, finely diced
  • 4 cloves garlic, smashed to a paste with coarse salt
  • 1/2 tsp. red pepper flakes
  • salt and freshly ground pepper
  • 1 large egg, lightly beaten
  • 1 Tbsp. finely chopped fresh thyme {try to use fresh!}
  • 1/4 cup chopped fresh parsley
  • 1 1/2 lbs. ground turkey {90 percent lean}
  • 1 cup breadcrumbs
  • 1/2 cup freshly grated romano or parmesan cheese
  • 3/4 cup ketchup, divided
  • 1/4 cup plus 2 Tbsp. balsamic vinegar, divided
DIRECTIONS:
  Preheat oven to 425 degrees.  Heat the oil in a large saute pan over medium-high heat.  Add the zucchini, bell peppers, garlic paste, and 1/4 tsp. red pepper flakes.  Season with salt and pepper and cook until the vegetable are almost soft, about 5 minutes.  Set aside to cool.
Whisk the egg and fresh herbs in a large bowl.  Add the turkey, breadcrumbs, grated cheese, 1/2 cup ketchup, 2 Tbsp. balsamic vinegar, and the cooled vegetables; mix until just combined.
Gently press the mixture into a 9-by-5 inch loaf pan.   Whisk the remaining 1/4 ketchup {sometimes I add a little more ketchup}, 1/4 cup balsamic vinegar, and 1/4 tsp. red pepper flakes in a small bowl; brush the mixture over the top.  Bake for 1 to 1-1/4 hours.  Let rest for 10 minutes before slicing.  


My new potato-peeler helper

just had to share some pictures of my green bean crop
{they got a little big while we were away for the week}

...and my zucchini/squash crop

Tuesday, May 31, 2011

Baked Mac and Cheese


This is a simple recipe.  Probably most everyone has a recipe for mac and cheese that they love.  This is mine.  Well, it's the one my mom used to make when I was growing up and it's the one I still make to this day.  I've tried jazzing it up different ways but honestly, I love it simple.  The only thing that I have changed is that I have added some gruyere cheese.  It gives the mac and cheese such a great kick!
My kids beg me to make this every week and one pan is barely enough for our growing family!  The other night was our only night last week that did not include baseball practice or baseball games, so I cooked for my family and enjoyed our night at home together.


Baked Mac and Cheese {family recipe}

INGREDIENTS: {serves 4-6 as main dish, 6-8 as side dish}

  • 1-lb. box small pasta {I used shells, but I've used everything from elbow to penne}
  • 2 Tbsp. butter
  • 2 Tbsp. flour
  • 2 Cups milk, warmed
  • 3 1/2 Cups sharp cheddar, shredded {try not to use pre-shredded cheese}
  • 1/2 Cup gruyere cheese, shredded
  • salt and pepper to taste
DIRECTIONS:
 Grease a 9 by 13 baking dish and set aside.  Heat oven to 350 degrees.
 Heat a large pot of water to boiling.  Once the water has come to a boil, season with salt and add pasta. Be sure to under-cook the pasta by 1-2 minutes because it will continue to cook when it's baking.  When pasta is cooked, drain and lightly rinse.  Pour pasta into greased baking dish and set aside.  
To make the sauce, heat butter in a medium saucepan over medium heat.  When butter has melted and become bubbly, add the flour and whisk constantly for 1 minute.  Slowly pour in a little milk and continue to whisk, breaking up the flour mixture.  Keep pouring the milk slowly and whisking constantly until there are no more lumps.  Heat this mixture for about 5 minutes, or until sauce begins to thicken and coats the back of a wooden spoon.  Do not let it come to a boil!  Turn heat to low and add about 3 1/2 cups of cheese.  Stir with a spoon until the cheese has melted.  Taste, then season with salt and pepper to taste.  
Pour the sauce over the pasta and stir completely.  Now at this point you can cover with foil and put in the refrigerator to bake at a later time.  Or if you'd like to bake immediately, sprinkle with the remaining half cup of cheese and bake for 30 minutes, or until golden and bubbly.  
Enjoy!!

cheese, milk, and butter...what more do you need?

shredded cheddar and some shredded gruyere

this is the part where I have to resist taking a big bite...

Wednesday, May 11, 2011

Chicken Scallopini with Asparagus


I'm pumped to be back!  I can't promise I'll be super consistent until after school gets out though.
This last month before the end of the school year seems to be jam-packed full of activities.  Baseball will be winding down in the next few weeks and that has taken up a lot of time!  With two boys and daddy as coach, we've been eating, breathing and sleeping baseball :)
It's all fun and exciting, but the down time will be much needed come June.  Needless to say, our meals have been quick and easy, leaving no time for experimenting with recipes or blogging.  But yesterday I managed to dust off the pots and pans to make a nice meal for my family.
This type of chicken is very easy, mostly because the thin cut breasts make cook-time very quick and the sauce is super simple.  The chicken can be served on top of pasta {which is my fav}, rice, or mashed potatoes.  You could also use mushrooms in the sauce instead of asparagus, or no veggies at all.
Try this recipe and you'll love the simple but tasty flavors.  Scallopini refers to any cutlets {usually veal or chicken} pounded thin and coated with flour.  So, you could really make many alterations to the sauce itself as long as you have the thin, crispy cutlets.  Enjoy!


Chicken Scallopini with Asparagus {my recipe}


INGREDIENTS: {Serves 4}

  • 1 1/2 lbs. thin sliced chicken breasts {if you can't find these, then pound out your chicken breasts}
  • 1/2 cup flour
  • salt and freshly ground black pepper
  • 2 Tbsp. olive oil
  • 2 Tbsp. butter
  • 1 cup chicken stock
  • 2 small shallots, finely diced
  • 1/2 lb. thin asparagus, cut into 2 inch pieces, rough ends removed
  • 1 lemon, juiced {about 3 Tbsp.}
  • 2 Tbsp. fresh parsley, chopped
  • 1 Tbsp. butter
  • 1 lb. linguine {optional}
*Can be served with pasta, potatoes, or rice

DIRECTIONS:
*Pre-heat oven to 350 degrees.
  I bought the Foster Farms thinly sliced chicken breasts, but if you can't find them go ahead and place your chicken breasts between two sheets of plastic wrap.  Pound until they are nice and thin.  Season all chicken breasts with salt and pepper.  Pour the flour into a pie plate and coat each breasts liberally with the flour, shaking off the excess.  
Heat a large skillet to medium high.  Add the 2 Tbsp. olive oil and 2 Tbsp. butter.  Let the butter melt and become frothy then place a few chicken breasts into the pan and fry {5 minutes} on the first side, turn over and fry 5 minutes more, or until golden brown.   Drain on paper towels then set aside on a baking sheet.  Once all of the chicken is fried, place the baking sheet into the oven while you prepare the sauce.  This will help make sure they are cooked all of the way through.
Pour off all but 2 Tbsp. of oil that is left over in the pan.  If you find you don't have much oil left, then just add another tablespoon of olive oil.  Add shallots and asparagus and season with salt and pepper.  Saute for about 5 minutes.  Pour in chicken broth and let reduce another 4-6 minutes.  Squeeze the juice of one lemon into the sauce and let cook for a couple of minutes.  Turn the heat down to a gentle simmer and finish the sauce with 1 Tbsp. of butter and the fresh parsley.  Season with more salt and pepper to taste.  Remove chicken from oven.
If you are using pasta, I like to add a few Tbsp. of butter to my noodles so they don't stick together.  Pile a big heaping full of pasta on a plate, place a chicken breast on top, then pour a nice ladle-full of the sauce and asparagus.  

Not many ingredients in this dish...I only used one of the lemons!

Season the chicken first then pat into the flour

Trying to be patient and not turn them until they have a nice golden brown color

Here's the shallots and asparagus sauteing in the pan


Here's a little of what we've been up to the past few months...


Go TWINS!                                                      
Jaden's new love...pitching!


Ella turned 6 on Mother's Day
The best Mother's Day gift of all...these 3 kiddos!


Friday, April 8, 2011

Grilled Stuffed Chicken Breasts Wrapped in Prosciutto


I buy a lot of food magazines.  Not as many as I used to buy, but definitely more than I can keep up with.  I'll usually scour through them really quick, pick out a couple of recipes that I like, then put it away with great plans to make something from the magazine later.  Well, months go by and I'll forget about the magazine and it will just pile up along with the other ones!
So recently I've been determined to either try the recipes from the magazines that I buy, or throw the magazines away.  The other day I picked up a really good Fine Cooking Grilling magazine {from last year} and found this recipe.  It looked very easy, with simple ingredients, so I tried it out on family and friends!  They're always my guinea pigs and they usually tell me the truth about the recipe.
It turned out to be a keeper!

Grilled Stuffed Chicken Breasts Wrapped in Prosciutto 
{adapted from Fine Cooking, Grilling 2010}


INGREDIENTS: {serves 4}

  • 4 boneless, skinless chicken breasts halves 
  • 8-10 large fresh basil leaves
  • 1/4 lb. fontina cheese, cut into 4 long sticks
  • 4 Tbsp. mozzarella cheese, shredded
  • 4 thin slices prosciutto
  • 1 Tbsp. olive oil
  • salt
  • freshly ground black pepper
DIRECTIONS:
  I prepared these chicken breasts much earlier in the day and kept them in the refrigerator in a glass dish covered with plastic wrap.  
To prepare the chicken breasts, cut through each one horizontally almost all the way through and open like a book.  Sprinkle the chicken all over with 1/2  tsp. each salt and pepper.  Layer 2-3 basil leaves, one stick of fontina, and one Tbsp. mozzarella evenly on half of each breast and then fold it closed.  Wrap a slice of prosciutto around each breast to hold it closed and then brush lightly on both sides with the olive oil.  
When ready to grill, heat grill to medium high.  Reduce the heat on the gas grill to medium and grill the chichi breasts, covered, until they are well marked, about 4 minutes.  Flip and cook, turning every few minutes, until the chicken is just firm to the touch, about another 10-12 minutes.   

Friday, March 25, 2011

BBQ Chicken Quesadillas


Quesadillas are a quick and easy meal.  You can stuff them with just about anything...which is especially convenient when you have some leftover meat or some veggies to use up.  I decided to go with a bbq chicken quesadilla this time around.  I made up some guacamole to go with it and served some black beans on the side.  I actually think next time I might add the black beans in the quesadilla!


BBQ Chicken Quesadillas {serves 4}

INGREDIENTS:
  • 2 roasted chicken breasts, shredded or cut into chunks
  • 4 large flour tortillas
  • 2 cups fresh corn, toasted in a saute pan
  • bbq sauce {any kind you like}
  • 4 cups monterey jack cheese, shredded {or any kind of cheese you like}
  • fresh cilantro, chopped
  • butter to grill quesadillas
To Garnish:
  • guacamole
  • sour cream
DIRECTIONS:

Have all of your ingredients ready to go so you can assemble and grill a couple at a time.  I really liked roasting the corn in a hot pan for a couple minutes just to get that toasty flavor out of the corn.  
Take a tortilla and butter one side.  Flip it over and sprinkle a layer of cheese on one half then top with some chicken, corn a couple tablespoons of bbq sauce, a little chopped cilantro, and another sprinkle of cheese.  Fold the tortilla in half and place on a hot griddle, grill, or saute pan and brown for 3 minutes.    Repeat with the remaining tortillas.  Flip quesadillas over to brown the other side.  Remove quesadillas from pan and cut in half or in thirds.  Serve some sour cream and guacamole along side.  Enjoy!

Thursday, March 10, 2011

Ultimate Chicken Strips


Ok, so this isn't the best picture of these chicken strips, but time was short and my family was hungry!  Trust me that these will get devoured in no time!  It's a pretty easy Betty Crocker recipe that my friend gave me a few weeks back.  She said her kids loved them and I can definitely see why.  I doubled the recipe to fit our family, but honestly I should have tripled it.  Kinda thought we'd have leftovers so I could pack them in the kids lunches, but that didn't happen!
Oh, and another plus is that these strips are baked, not fried.  I made my sweet potato fries and some sugar snap peas to go along side.
Enjoy!

Chicken Strips {Recipe by Betty Crocker }


INGREDIENTS: {This is the doubled recipe, serves 5}

  • 1 1/3 Cup Bisquick Mix {I used Trader Joe's Buttermilk Pancake Mix}
  • 1 cup grated parmesan cheese
  • 1 tsp. garlic salt
  • 1 tsp. paprika
  • 2 lbs. boneless, skinless chicken breasts, cut into 1/2 inch strips
  • 2 eggs, slightly beaten
  • 6 Tbsp. butter, melted
DIRECTIONS:
Heat oven to 450 degrees and line a baking sheet with foil.  Spray the foil with non-stick spray.
Mix biscuit mix, parmesan cheese, garlic salt, and paprika in a large ziploc bag.  Dip about 4 chicken strips into the beaten egg then drop into ziploc bag.  Shake until coated well and place on baking sheet.  Repeat with remaining chicken strips.  Once all strips are placed on baking sheet, drizzle them all over with the melted butter.
Bake for 15-20 minutes, turning half way through {about 7-10 minutes} with a spatula.  

Tuesday, March 8, 2011

Waikiki Meatballs


I can't remember the last time I sat down at my computer to type out a recipe, but I'm thinking it's been a while.  Life has been busy but good!  With baseball season officially in full swing, both my boys {and their daddy} will be spending many afternoons out at the ball field with practices, and once games begin, us girls will be out there rooting them on!  Which means my nightly meals are going to need to be strategically planned.  
This is a meal that I've made many of times and it's also another one of my childhood meals.  I don't know where my mom got this recipe, but it's a good one!  This has always been winner with my kids and my husband.  
*Do ahead tip*  Shape the meatballs up and put them in the refrigerator until ready to cook.  You could also make up the ingredients for the sauce in a small bowl and put in refrigerator until you need it.  
Serve these meatballs over rice and just add a vegetable to round out the meal.  


Waikiki Meatballs {serves 6}

INGREDIENTS:
  • 1 1/2 lbs. ground turkey {the original recipe calls for ground beef, but I like the turkey}
  • 2/3 cup cracker crumbs {I use saltine crackers}
  • 1/3 cup dried minced onion
  • 1 egg
  • 1 1/2 tsp. salt
  • 1/4 tsp. ground ginger
  • 1/4 cup milk
Sauce ingredients:
  • 2 Tbsp. cornstarch
  • 1/2 cup packed brown sugar
  • 1 can {13 1/2 oz.} pineapple tidbits, reserve juice
  • 1/3 cup white vinegar
  • 1 Tbsp. soy sauce
DIRECTIONS:
  Mix ground turkey and next six ingredients until thoroughly combined and shape the mixture by tablespoon-full into balls.  Place a small amount of canola oil {don't use olive oil, it will burn} in a large pan set over medium-high heat and brown the meatballs on all sides.  Be sure meatballs have cooked most of the way through {about 10 minutes total}.  They will cook some more once they go back in the pan.  Set meatballs aside on a paper towel-lined plate and keep warm.
For the sauce, mix the cornstarch and sugar.  Stir in reserved pineapple juice, vinegar, and soy sauce until smooth.  Pour the sauce into the warm skillet and cook over medium heat, stirring constantly until the sauce thickens and boils.  Boil for 1 minute.  Add meatballs and pineapple chunks.  Heat for another 5 minutes.  Serve over steamed rice.  


Tuesday, March 1, 2011

Chicken Pot Pie


This to me is the ultimate in comfort food.  My mom used to make chicken pot pie and we would scarf that thing down in no time!  I've kind of changed things up a bit from her recipe, but it still reminds me of dinner-time when I was a little girl.
I only use a top crust on my pot pie, mostly because my husband isn't a crust guy, and also it's easier to just roll out one crust instead of two!  I've also swapped in fresh vegetables instead of frozen.  Every now and then I'll make it with frozen veggies, but I try to buy fresh when I can.
If you don't want to buy fresh vegetables, look for the package of frozen veggies you like best, a 10 oz. package will work.

CHICKEN POT PIE


INGREDIENTS:
  • 2 half chicken breasts, bone in
  • 2 cups chicken broth
  • 1 cup milk
  • 2 Tbsp. butter
  • 4 Tbsp. flour
  • 1 cup fresh green beans, cut into small pieces
  • 1 cup fresh corn, cut off cob
  • 1 cup red potatoes {find the tiny ones and cut in half}
  • 2 carrots, cut into large dice
  • 1/2 tsp. fresh thyme, chopped finely {or 1/8 tsp. dried thyme}
  • 2 tsp. salt
  • freshly ground black pepper to taste
*Pie Crust recipe below, or use refrigerated pie dough {works great}

DIRECTIONS:
  Heat oven to 375 degrees.  Place chicken in a roasting pan, drizzle with some olive oil and sprinkle with salt and pepper.  Roast in oven uncovered for 50 minutes, then cover with foil, turn oven off, and let sit in oven for about 30 minutes to an hour.  This will make your chicken nice and tender.  Remove chicken from roasting pan and cut into chunks or shred; discard bones.  Set chicken aside.
In a medium stock pot, heat butter.  Add cut potatoes and carrots.  Saute for 5-7 minutes.  Add corn and green beans.  Saute for another 7-10 minutes, or until veggies are tender.  Add flour and stir.  Once vegetables are coated with flour, pour in chicken broth and milk, and stir.  Heat to medium-high and bring to slight boil.  Reduce heat to a simmer. Add thyme, salt, and pepper.  Stir until thickened, about 5 minutes.  
Remove from heat and stir in chicken.  

To make pie crust:
Combine 1 cup flour and 1/2 tsp. salt.  Cut 1/3 cup cold butter into small chunks.  Add butter to flour mixture and, using your hands, crumble the butter into the flour until the butter turns into tiny pea-sized balls.  Slowly add 3 Tbsp. ICE COLD water.  If the dough seems way too crumbly, add another 1 Tbsp. of water.  Bring the dough together with your hands and turn onto a floured surface.  Lightly turn the dough into a disk, wrap in plastic and refrigerate for 20 minutes.  Roll dough on floured surface to about a 9-inch circle.

To assemble Pot Pie:
Heat oven to 425 degrees.  Grease a 9-inch pie dish.  Pour chicken mixture into pie dish and top with pie dough.  Fold the overhanging dough under the edges to make a nice thick crust.  Cut a couple slits in the middle of the pie to let steam escape.  If you would like you can brush the top of the pot pie with a little egg wash {1 egg yolk beaten with a little water}.  This will give it a nice golden top.
Bake in oven for 35-40 minutes, or until golden and bubbly.  If the edges begin to brown too quickly, cover them with some foil. 

Monday, February 21, 2011

Stuffed Baked Potatoes


In trying to pull off dinner the other night, with very little to work with, I decided to stuff some baked potatoes.  Ever have one of those nights?  I do...very often!  Either I'm not in the mood to think of what to make or I just haven't been to the grocery store, so our options are limited.
Thankfully my sweet husband is NOT picky and he doesn't mind a good old sandwich or top ramen when I'm in a pinch.  Well, the baked potatoes actually worked really well and I'm not too sure why I haven't made them before.  I mean, stuffing a potato with cheese and broccoli and chicken...that's just one of the endless possibilities!  You could stuff any sort of combination of veggies to make a really great meal.  And honestly, it was a really satisfying meal!


Chicken, Broccoli, Cheddar Stuffed Potato {serves 2}


INGREDIENTS:

  • 2 large russet or baking potato
  • olive oil
  • coarse salt
  • 2 Tbsp. butter
  • 1/4 cup sour cream or plain yogurt
  • 1/2 cup sharp cheddar cheese, shredded
  • 1-2 chicken breasts, cooked and cut into chunks {I used the breasts from a rotisserie chicken}
  • 1 cup broccoli, cut into tiny pieces and quickly steamed
  • salt and pepper 
DIRECTIONS:
To bake the potatoes, heat oven to 425 degrees.  Place potatoes on a foil-lined baking sheet and drizzle with some olive oil.  Poke holes all around potatoes with a fork and then season with coarse salt.  Bake in oven for 1 hour or until soft.
Once potatoes are cool enough to handle, cut an oval circle on the top of each potato and scoop out the inside of the potatoes into a bowl.  Be sure to leave about 1/8-inch thickness around the potato so it doesn't break.  
Add the butter, sour cream, 1/4 cup cheese, cut up chicken, and broccoli to the bowl with the scooped out potato flesh.  Season with salt and pepper as desired and stir to combine.  With a spoon, scoop mixture back into potato shells.  Don't be afraid to mound those potatoes high.  
Put back in oven and bake for about 10 minutes more or until heated through.  Sprinkle with remaining cheddar cheese and serve.  

Wednesday, February 16, 2011

Fettuccine Alfredo


This pasta has got to be one of my favorites, although it's also one that I try to stay away from.  It's usually loaded with cream and butter...a full-fat kind of meal.  Sometimes though, nothing else will satisfy but a big bowl of creamy pasta!  I tried to tweak things a little to make it somewhat of a "lighter" version.  From start to finish, it's probably a 15 minute meal.

Fettuccine Alfredo {my version}


INGREDIENTS: {Serves 4}

  • 1 lb. dried fettuccine noodles {I used linguine, because it's what I had on hand}
  • 3/4 cup heavy cream {you could also use milk, it just won't be as thick}
  • 6 Tbsp. unsalted butter
  • 1 1/2 cup freshly grated parmigiano reggiano cheese
  • salt and pepper to taste
  • 1 tsp. lemon zest
  • fresh parsley, chopped
DIRECTIONS:
  Bring water to boil in a large pot.  Add salt and noodles and cook according to package directions.  While noodles are cooking, melt butter in a large saucepan over medium-low heat.  Add cream and stir until sauce begins to thicken {about 3-5 minutes}.  You may need to lower heat so the sauce doesn't burn.  Add 1 cup of the parmigiano reggiano cheese and stir to incorporate.  Turn heat to low and add salt and pepper to taste.  
Once noodles are done, use tongs and lift noodles from the pot directly into the pan with the sauce.  The pasta water will actually help the sauce come together in the end, so don't worry about the noodles being too wet.  Stir noodles to combine and turn off heat.  Add lemon zest and the 1/2 cup of cheese.  Stir to combine.  Heap the pasta into a bowl and sprinkle with the fresh parsley.  Mange!

fresh cream, cheese, and butter

first the butter goes in...try not to burn it like I did!

Next the cream

Once the cream has thickened, add the cheese

This is when I start dipping the spoon in for a taste

Add the hot pasta straight from the pot

LinkWithin

Related Posts with Thumbnails