Showing posts with label breakfast. Show all posts

Tuesday, April 23, 2013

Strawberries and Cream Scones


Man this blog is such a dusty site these days!  Life is full in our neck of the woods and blogging has definitely taken a back seat.  Oh well, I'm happy when I can get on here and write, because it inspires me to get back sooner!  I found this recipe for scones last year and have already made them a lot!
The last time I made them I used boysenberries instead of strawberries and they were SO GOOD!  Definitely a versatile scone recipe, so feel free to play around with fruit or even some chocolate chips...I love a good chocolate chip scone.

I found this recipe HERE and although she calls them Strawberry Shortcake Scones, I played with the name because the main ingredients are Strawberries and Cream...so it only seemed fitting :)
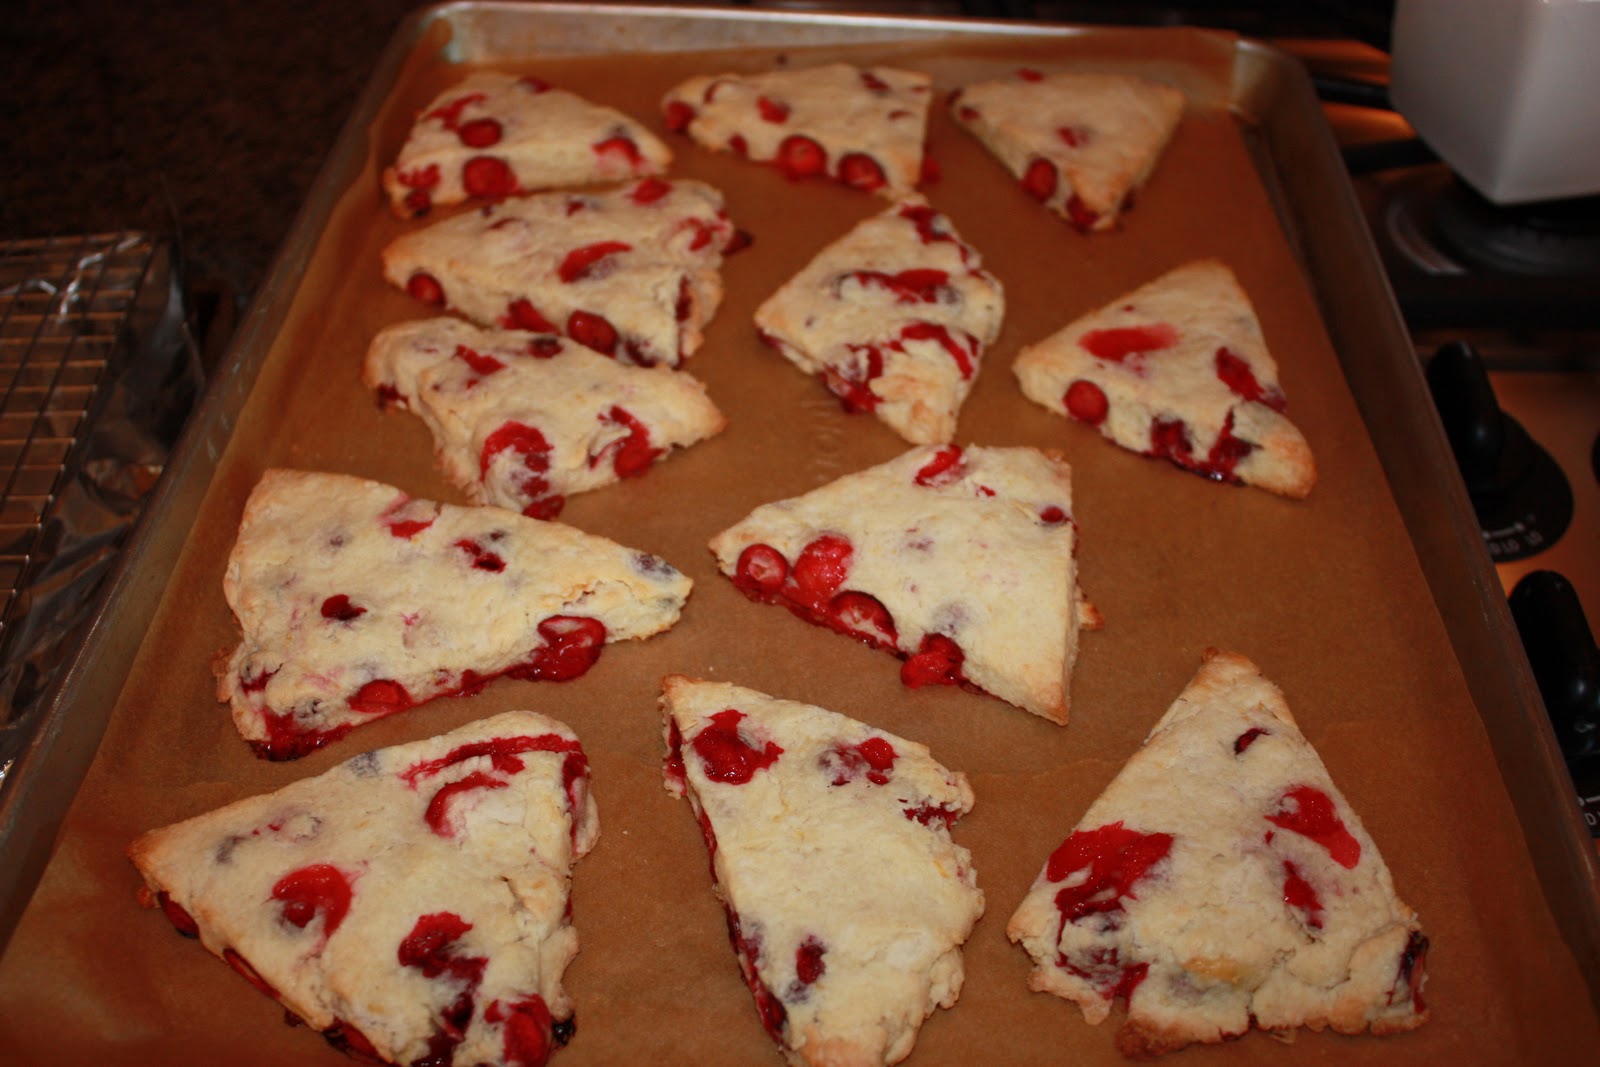
I doubled the recipe which is why in my pictures I have 2 baking sheets of scones!


Strawberries and Cream Scones {makes 12 scones}

INGREDIENTS FOR SCONES: 

  • 2 Cups all-purpose flour
  • 1 T. baking powder
  • 3 T. sugar
  • 1/2 tsp salt
  • 5 T. chilled salted butter, cut into 1/4 inch cubes (freeze butter for 30 min. and it's easier to cut)
  • 2 small baskets of strawberries, hullled and quartered 
  • 3/4 cup cream or half & half 
FOR GLAZE:
  • 3 Cups powdered sugar, sifted
  • 1/4 cream or half & half
  • 1 tsp. vanilla
DIRECTIONS:
  Preheat oven to 425 degrees and line large baking sheet with parchment; set aside. 
(*To freeze scones see note below)
In a mixing bowl, or food processor, combine the flour, baking powder, sugar and salt.  Add butter and cut in with fork, or pulse with food processor until mixture resembles crumbs.  Be sure not to over mix as you don't want the butter to soften.  Toss in strawberries and coat lightly with mixture.  Add cream and fold together gently until mixture just begins to come together.  

Turn dough onto floured surface and gently pat together into a 1-inch thick rectangle.  Using a sharp knife, cut dough into six squares then cut the squarers on the diagonal to make 12 scones.  They don't have to look perfect, because they will taste amazing!!

Place scones on prepared baking sheet and bake for 16-18 minutes or until scones are slightly golden on top.  Place a cooling rack on top of a sheet of parchment or foil.  Once scones are finished, place them on the cooling rack for about 10 minutes.  They don't have to be completely cool before glazing.  
To make the glaze, whisk together the sifted powdered sugar, cream and vanilla.  If the glaze is too thick you can add just a little more cream OR if it's too thin, just add a little more powdered sugar to find the right consistency.  

To glaze, take a large tablespoon and drizzle glaze over each scone, OR you may take each scone and dip the top of the scone into the glaze and return it to the cooling rack to set.  The parchment or foil will catch the drips.  The glaze will set when scones have cooled.  
Serve the scones warm or at room temp.  ENJOY!

*If you want to make the scones the day before, just make the 
dough, cut into shape and place on parchment lined baking sheet.  Place foil on top of scones and put in freezer.  Remove from freezer just before baking and bake for about 18-20 min. or until golden on top.  


Tuesday, April 24, 2012

Carrot Cake Breakfast Cookies


I feel a little like a slacker with this whole blogging thing!  I'm not sure what happened, but if I let a little more than a couple of weeks pass without blogging, then I almost forget about it altogether!
I've made some fun, yummy recipes in the past few weeks, but have not remembered to snap a pic or jot down the recipe.
Can you believe it's nearing the end of the school year already?  I remember thinking the school year was soooo incredibly long when I was little, and now it's either a holiday, inservice day, or some "day off" every time I turn around!  If I was in charge {which I'm not}, I'd get rid of some of those silly days off and shorten the length of the school year so the kids have more summer!!  My kids can't wait for summer and honestly, I'm looking forward to a change of pace as well.  I'm sure it will be here before I know it!

I usually seem to start out really strong at the beginning of the school year with making breakfast for my kids.  Then around this time of year, I'm throwing out granola bars or cereal in a hurry...no planning whatsoever!  So this morning I decided to make these breakfast cookies.  They have very few ingredients and are really healthy.  I added a little powdered sugar glaze to make my kids feel like they were worth eating :) I got the thumbs up from my pickiest little breakfast eater and from my husband!
Try these...they were delicious!


Carrot Cake Breakfast Cookies {recipe slightly adapted from Perry's Plate }


INGREDIENTS:  {makes about 12 cookies}

  • 1 cup flour {I used all-purpose flour}
  • 1 cup rolled oats
  • 2 tsp. flaxseed
  • 1 tsp. baking powder
  • 1 tsp. cinnamon
  • scant 1/2 tsp. sea salt
  • 1/3 cup chopped nuts {I used pecans}
  • 1 cup shredded carrots
  • 1/4 cup coconut oil, warmed just until melted
  • 1/4 cup butter, melted
  • 1/4 cup real maple syrup
  • 3 Tbsp. brown rice syrup *if you don't have brown rice syrup, just add a few more tbsp. of maple syrup
DIRECTIONS:
Preheat oven to 375 degrees.  Line a baking pan with parchment paper and set aside.  
In a large bowl combine the flour, oats, flaxseed, baking powder, cinnamon, and salt.  Whisk to combine. Add nuts and carrots to dry ingredients.  Mix well.

In a small saucepan, heat coconut oil and butter over low heat just until melted.  Add maple syrup and brown rice syrup to the pan. Pour wet ingredients into the dry and stir until well combined.  

Drop by 2-tablespoonfuls on prepared baking sheets and bake for 10-12 minutes or until the cookies are barely golden brown.  I shaped the cookies a little with my hand to make them nice and tight and round.
**To make the powdered sugar glaze: whisk 1/2 cup powdered sugar and about 2 tsp. of milk until the consistency becomes easy to drizzle.  Use more or less milk to adjust thickness.

Wednesday, March 14, 2012

Potato-Crusted Quiche with Bacon, Mushrooms and Spinach


I'm a HUGE fan of quiche!  I could eat it any time of the day...unfortunately my family, not so much.  Which means I only get to make quiche when I'm going to a bible study, or a brunch, or hosting something at my house.  I have seen this potato crust before but never tried it.  Will definitely be doing this again, it was easy and really yummy!  If you're not into making a pie crust or have some extra potatoes lying around, give this a try.  Really sorry about the picture...I was in a hurry to take this to bible study and I didn't have time to take a decent picture!

Potato-Crusted Quiche with Bacon, Mushrooms, Spinach and Sun-Dried Tomatoes
 {recipe adapted from cookincanuck }


INGREDIENTS:
  • 1 lb. potatoes, unpeeled, cut into really thin 1/8 inch slices {I used Yukon gold potatoes}
  • 1 Tbsp. butter, melted
  • 1/4 cup (packed) Parmesan cheese
  • 1/2 tsp. kosher salt
  • 1/4 tsp. freshly ground black pepper
  • 6 slices bacon, chopped
  • 1 cup (packed) fresh baby spinach, torn roughly
  • 1 cup button mushrooms, sliced
  • 4 eggs
  • 1 cup whole milk {I used 1/2 cup low fat milk/1/2 cup half & half}
  • 1/2 cup Parmesan cheese, shredded {I used Parmesan/fontina blend}
  • 1/2 tsp. freshly ground black pepper
  • 6 oil-packed sun-dried tomatoes, cut into 1/2-inch strips
DIRECTIONS:
  Preheat the oven to 425 degrees.  
In a medium bowl, combine the potatoes, melted butter, 1/4 cup Parmesan cheese, salt, and 1/4 tsp. freshly ground black pepper.  
Coat a 9-inch pie plate with cooking spray and arrange the potatoes in concentric circles on the bottom and sides of the dish.  Be sure to overlap the potatoes to avoid gaps between the potatoes after baking.  Bake until the potatoes are light golden brown, about 25-30 minutes.  Remove from the oven.

Reduce oven temperature to 375 degrees.
In a medium skillet over medium heat, cook the bacon, stirring occasionally, until the bacon is crisp.  Using a slotted spoon, remove the bacon from the pan and lay on paper towel.  Pour out all but 1 tbsp. bacon drippings.  To the pan, add the mushrooms and saute about 4-6 minutes.  Add the spinach and cook until barely wilted, about 30 seconds.  
In a large bowl, whisk together eggs, milk, 1/2 cup shredded cheese, and 1/2 tsp. freshly ground black pepper.  Stir in the cooked mushrooms and spinach.  Pour the egg mixture into the potato crust.  Sprinkle the sun-dried tomatoes and cooked bacon evenly over the egg mixture.  Bake the quiche until the eggs are set and golden brown, 30-40 minutes.  

Thursday, February 2, 2012

Fresh Lemon-Blueberry Yogurt Loaf


I've been craving something like this for a while and it did not disappoint!  My parents have an orchard full of lemons, oranges and limes.  Sometimes we get overloaded and I end up having citrus fruit coming out of my ears!!  My mom and I are always searching for citrus recipes and after she made a lemon cake last weekend, she spurred my desire to make this!  I knew this recipe was a keeper the minute I took a bite.  It's moist, not too sweet, and bursting with fresh blueberries.  The glaze on the top just makes it complete.  I modified it just slightly, but the original recipe says it will also yield 12 standard muffins {baking time adjusted}, or the recipe can be doubles and baked in a bundt pan {baking time adjusted}.

LEMON-BLUEBERRY YOGURT LOAF {recipe slightly adapted from Sweet Peas Kitchen }


INGREDIENTS: {yields 1 standard loaf pan}

For the loaf:

  • 1 12/ cups + 1 Tbsp. all-purpose flour, divided
  • 2 tsp. baking powder
  • 1/2 tsp. kosher salt
  • 3/4 cup plain yogurt
  • 1/4 cup sour cream
  • 3/4 cup sugar
  • 3 large eggs
  • 3 tsp. grated lemon zest, set 1 tsp. aside for the glaze {approx. 3 lemons}
  • 1 tsp. vanilla extract
  • 1/2 cup butter, softened
  • 1 1/2 cups blueberries, fresh or frozen, thawed if using frozen {I used fresh}
For the lemon syrup:
  • 1/4 cup freshly squeezed lemon juice
  • 1/4 cup sugar
For the lemon glaze:
  • 1 cup confectioners' sugar
  • 2-3 Tbsp. fresh lemon juice
  • 1 tsp. grated lemon zest
DIRECTIONS:
  preheat oven to 350 degrees.  Spray bottom and sides of 9 inch loaf pan, or butter and flour.  Set aside.
In a medium bowl, sift together the flour, baking powder and salt.  
To a stand mixer or large bowl, cream together the butter and sugar with a paddle attachment {if using a stand mixer}.  Beat in the eggs, one at a time, scraping sides often.  Add the yogurt, sour cream, lemon zest and vanilla.  Mix well.  Slowly add in the dry ingredients.  In a separate bowl, gently toss the blueberries with the remaining tablespoon of flour, remove bowl from stand and gently fold the blueberries into the batter with a spatula.  
Pour the batter into prepared pan and bake 50-55 minutes, or until a toothpick inserted in center comes out clean.  Let cool in the pan for at least 10 minutes before removing loaf from pan to a wire rack on top of a baking sheet.  While loaf is baking, make the lemon syrup in a small saucepan over medium-low heat.  Stir together the lemon juice and sugar until the sugar is completely dissolved.  Once dissolved, continue to cook for 3 more minutes.  Remove from the heat; set aside.
Use a toothpick to poke holes in the tops and sides of the warm loaf {after it's cooled 10 minutes}.  Brush the top and sides of the loaf with the lemon syrup.  Let the syrup soak into the cake and brush again {I didn't quite use all of the syrup}. LET THE CAKE COOL COMPLETELY BEFORE ADDING THE GLAZE.
To make the glaze, in a small bowl, whisk together the powdered sugar, 2-3 Tbsp. of the lemon juice and the lemon zest.  The mixture should be thick but pourable.  Adjust measurements if mixture is too thick or too thin.  Pour the lemon glaze over the top of the loaf and let it drip down the sides.  Let the glaze harden about 15 minutes before serving.  


Saturday, January 21, 2012

Buttermilk Waffles


Made these the other night for dinner.  Served them with a side of bacon and we were all very happy.
I love making homemade waffles and this recipe has just become my favorite!  It was pretty simple even though it required whipping the egg whites. The big plus was that it makes a lot of waffles, so I was able to use up all of the batter and freeze at least 2 ziploc bags full of waffles.  Makes for the perfect quick breakfast on school days!


BUTTERMILK WAFFLES { recipe slightly adapted from And Then I do The Dishes }


INGREDIENTS: {makes about 18-20 waffles}
  • 3 cups all purpose flour
  • 3/4 tsp. salt
  • 3 Tbsp. sugar
  • 2 1/4 tsp. baking soda
  • 2 2/3 cup buttermilk
  • 3 eggs, separated
  • 6 Tbsp. canola oil
  • 1 tsp. vanilla extract
DIRECTIONS:
  In a large bowl, mix the flour, salt, sugar and baking soda.  In another bowl combine the egg yolks, buttermilk, oil and vanilla.
Preheat your waffle iron and if needed, spray with cooking spray.  While the waffle iron is preheating, beat the egg whites with electric mixer until soft peaks form.   Pour wet ingredients into dry ingredients and whisk together.  Gently fold in egg whites.
Ladle about 1/2 cup of the batter into your waffle iron.  Be careful not to add too much...the batter will spread once it hits the hot iron...if you add too much batter, it will spill out the sides of the iron.
I like to preheat my oven to 250 degrees and have a baking sheet ready.  After the first batch of waffles are done, place on baking sheet and put in oven.  Keep making waffles until all batter is used, placing waffles on more baking sheets as needed.  
Serve immediately...we like good old syrup and powdered sugar :)
**To freeze waffles, place on cookie sheet and freeze until firm. Once frozen, put in ziploc bags and place back in freezer.  Waffles should last up to 1 month in the freezer.  
To heat frozen waffles, place in microwave for 30 seconds, then put in toaster to get crispy.


Tuesday, January 3, 2012

Apple Bourbon French Toast Casserole


Happy New Year!  I'm going to try to start off this new year with more recipes than I ended last year with. I took a much-needed break from my computer, but I still did a lot of cooking and baking!
New years day was so relaxing...got up late, turned on the parade and made this easy and delicious french toast casserole for my family.  It can definitely be made the night before and the recipe below shows both ways of preparing it, but it took very little time to whip up that morning!
The brown sugar sauce is a little thin when the casserole comes out of the oven, but let it sit about 10 minutes or so and it will thicken up a bit.  It was super delicious and I will definitely be making it again!  Enjoy!

Apple Bourbon French Toast Casserole ( recipe by Bake.Eat.Repeat )


INGREDIENTS:

  • 1 stick butter
  • 1 cup brown sugar
  • 2 Tbsp. Bourbon
  • 3 large apples, cored, peeled and sliced (I used granny smith)
  • 1 loaf challah, or french bread, sliced in 2-inch thick slices ( I used challah, got about 6 slices)
  • 4 eggs
  • 1 cup milk
  • 1 Tbsp. vanilla extract
  • 1-1/2 tsp. cinnamon
DIRECTIONS:
  Preheat oven to 350 degrees (if baking immediately).  In a small pan melt butter and sugar together.  Whisk to combine and cook until slightly thickened, about 5 minutes.  Add bourbon, whisk and cook about 1 minute.  
Pour butter mixture into a 9 by 13 inch pan. Arrange apple slices on top.  Arrange bread slices on top of apples (**See note below) 
In a large bowl, whisk together the eggs, milk, vanilla and cinnamon.  Pour mixture over bread and slightly push down on bread.  Cover dish and refrigerate overnight.  In the morning, place casserole dish in oven, heat oven to 350 degrees.  Bake for 45 minutes to 1 hour, or until apple slices have softened and bread is golden brown. Let sit for 10 minutes before serving.  Serve by scooping out a piece of bread and flipping over onto plate.
**Note: if you are preparing the casserole the morning you are serving, dip bread slices into egg mixture before putting them into the pan.  Pour remaining mixture over the top of bread slices, bake at 350 degrees for about 40-45 minutes.  Let sit for 10 minutes before serving.  

Thursday, November 17, 2011

My favorite Fall recipe...Pumpkin Bread


In the midst of my busy week, I got to take the time today to go on a field trip with my 3rd and 4th grade boys.  We saw A Christmas Carol.  Once we all got settled I thought, oh this will be nice to relax and sit for 2 hours...no excuses!  I can honestly say, it was REALLY nice to relax, let my guard down and watch a great play.  But the play wasn't just entertaining, it was actually beautiful.  To hear the voices singing about Christ being born to save us from Satan's power.  To hear Scrooge finally profess that he was willing to do what it took to become a changed man, and to see the redemption at the end.  To hear "God bless us".  It's a wonderful thing to hear when so many are afraid to utter those words in that they might offend someone.  It was a great day...

On to the recipe...The smell of this bread baking to me is what Fall is all about.  Being at home, spending time with family, staying inside on rainy days and baking some of this bread, then eating it right out of the oven!  I can honestly say, it's one of those things that when I eat this bread, it takes me right back to when I was a little girl.  My great-aunt and my mom baked this bread all of the time and I can remember my mom putting thick slices into the toaster for me, getting it a little crispy on the edges, then slathering it with butter.  It's comfort to me.  I know it's kinda silly, but it's true.  Such fond memories of holidays growing up and so thankful to have those special memories.


Pumpkin Bread {family recipe}


INGREDIENTS: {makes 2 loaves}

  • 3 eggs
  • 1 1/4 Cup sugar
  • 1 Cup oil
  • 1 tsp. vanilla
  • 1 can {15 oz.) pumpkin puree
  • 3 Cups flour
  • 1/2 tsp. salt
  • 1/2 tsp. baking soda
  • 1/2 tsp. nutmeg
  • 1/2 tsp. cloves
  • 1 tsp. cinnamon
  • 1 tsp. baking powder
  • 1 Cup chopped walnuts {optional...I sometimes make 1 loaf with nuts & 1 loaf without}
DIRECTIONS:
Preheat oven to 350 degrees
Beat together the first 5 ingredients.  In a separate bowl, whisk the next 7 ingredients.  Slowly add the flour mixture to the wet ingredients and mix well.  If desired, add chopped nuts.  
Pour into 2 greased loaf pans and bake for about 1 hour.  Check for doneness at about 50 minutes...toothpick should come out clean.  You don't want to over bake.
Remove from oven, let cool in pans about 10 minutes, then pop out of pan onto a cooling rack.  Now you can take a nice big slice for yourself!  Once they are completely cooled, wrap tightly in foil.  The loaves freeze well too.  I used to freeze one and eat one, but now we eat them both too fast to freeze!  Warm slices in toaster or in microwave.  


Tuesday, October 25, 2011

Fresh Cranberry-Blueberry Crumble Muffins


I love it when the fresh cranberries start showing up in the stores!  Gets me excited for the holidays and I start anticipating what new recipes I'm going to try this year.  I couldn't resist putting a bag of cranberries in my basket the other day, but then I needed to figure out what I was going to do with them.  Muffins are always a hit with the kids, so I figured I'd not only put fresh cranberries in them, but also some big frozen blueberries.  I wasn't sure how that would work, but they turned out super delicious and moist!


Fresh Cranberry-Blueberry Crumble Muffins
{recipe adapted slightly from Keep your diet real}


INGREDIENTS: {makes 12 muffins}

  • 6 Tbsp. unsalted butter, melted
  • 1/3 cup plain yogurt, or milk
  • 1 large egg
  • 1 large egg yolk
  • 2 tsp. vanilla extract
  • zest of 1/2 lemon
  • 1 1/2 cups all-purpose flour
  • 1/4 cup flaxseed meal {optional}
  • 3/4 cup sugar
  • 1 1/2 tsp. baking powder
  • 1/2 tsp. salt
  • 1 cup fresh cranberries, roughly chopped
  • 1 cup frozen or fresh blueberries
  • small amount of flour & sugar to toss berries in
For Topping:
  • 2 Tbsp. cold unsalted butter
  • 1/2 cup flour
  • 4 Tbsp. brown sugar
  • zest of 1/2 lemon
DIRECTIONS:
Preheat oven to 375 degrees.  
Line a muffin pan with paper liners.  Melt the butter in microwave and let cool slightly.  In a medium bowl, combine the chopped fresh cranberries and blueberries and toss with a couple tablespoons on flour and sugar.  This will help keep the fruit from bleeding into the muffin. Whisk yogurt, egg, yolk, and vanilla in a small bowl, then add cooled butter.  Whisk together the flour, flaxseed meal, sugar, baking powder, and salt in a large bowl.  Add the yogurt mixture and stir until just combined {don't stir too much}.  Gently fold in the cranberries and blueberries.  Divide the batter evenly among muffin cups.  
Combine the crumble topping in a separate bowl and rub with fingertips until it resembles "crumbles" then gently press down on muffin tops before placing into the oven.  
Bake for 15-20 minutes or until a toothpick inserted comes out clean.  Cool slightly before serving.

Saturday, August 27, 2011

Nectarine Oatmeal Coffee Cake with Brown sugar Topping


Well, we got through our first two days of school!  The kids started school on Thurs. which is really foreign to me, but I have to admit, it was nice to welcome the weekend yesterday!  I now have a 4th grader, 3rd grader, and a 1st grader (sniff, sniff).  It blows my mind to think of how fast my little ones are growing and makes me realize more and more that every day with them counts!
I have bittersweet feelings when school begins, but seeing how much they enjoy their teachers, friends and school, it gives me a huge sense of relief.
Anyway, I figured I'd dust off my cooking skills and make something yummy for breakfast this morning!
I had a few nectarines on the counter and thought a coffee cake would be good and some nice thick cut bacon to go along with it!
I actually altered this recipe quite a bit.  It was originally a muffin recipe, but thought I'd pour it into a 9 inch square pan.  Then I added a brown sugar topping that made this coffee cake extra special!
A couple of tips:  use any fresh or frozen fruit you'd like...blueberries, peaches, raspberries, etc.
Also, if you'd rather make muffins, I think they would turn out great and they'd freeze well too!
Last, be sure not to mix the batter too much.  This was a very fluffy cake, but if you mix it too much it will change the texture.  Just fold lightly!

Nectarine Oatmeal Coffee Cake with Brown Sugar Topping 
{adapted from Easy Breakfast and Brunch cookbook}


INGREDIENTS: {Makes one 9-inch cake or 12 muffins}

  • 1 1/3 cups rolled oats
  • 1 1/3 cups buttermilk
  • 1 large egg
  • 1/3 cup melted butter or vegetable oil
  • 1/2 cup brown sugar, packed
  • 1 1/2 cups all-purpose flour {you can easily substitute 1/2 wheat flour}
  • 1 tsp. baking powder
  • 1/2 tsp. baking soda
  • 1/2 tsp. salt
  • 1/4 tsp. cinnamon
  • 2 almost ripe nectarines, pitted and flesh cut into large chunks 
Brown Sugar Topping:
  • 4 Tbsp. butter, cut into chunks
  • 1/4 cup flour
  • 1/2 cup brown sugar, packed
  • 1/4 tsp. cinnamon
*Mix together with fingers until it becomes a crumbly consistency

DIRECTIONS:
  Preheat oven to 425 degrees.  Grease a 9 inch baking dish {I used my pampered chef stoneware}.  
Put the rolled oats and buttermilk in a large bowl and let soak for 10 minutes.  Add the egg, melted butter, and sugar and mix well.
In a medium bowl whisk to combine the flour, baking powder, baking soda, salt and cinnamon.  Pour the flour mixture into the soaked oat mixture and stir briefly.  Quickly fold in the chopped nectarines.  The batter should look streaky...DO not over mix or the cake will become tough and dry!  
Pour the mixture into the prepared dish and sprinkle the brown sugar topping all over.  
Bake for about 20-25 minutes, checking after 20 minutes with a toothpick.  Let cool for 10 minutes then cut into large slices and serve with some crispy bacon and a big cup of coffee!


Wednesday, June 29, 2011

Double Chocolate-Chip Muffins


My kids love chocolate...they take after their mommy in that way!  My daughter is always asking for chocolate muffins and I'm always telling her I'll make them for her "soon".  I'm not the type of person who cringes at a chocolate muffin for breakfast.  Give me pie, cake, cookies...you name the dessert, I'll eat it for breakfast!  It's a curse, but I've learned to embrace it.
This is the first recipe I came across for chocolate muffins and it was VERY SIMPLE!  She pulled up the barstool and my little Ella helped me make them.  It's one of those recipes that can be put together and baked in less than 30 minutes.  She thoroughly enjoyed the fruits of her labor, as did I, with a nice hot Americano!

Double Chocolate-Chip Muffins {slightly adapted from Nigella Lawson}


INGREDIENTS:  {Makes 12 muffins}

  • 1 3/4 cup all-purpose flour {you could substitute half whole-wheat flour if you like}
  • 2 tsp. baking powder
  • 1/2 tsp. baking soda
  • 1/4 tsp. salt
  • 2 heaping Tbsp. good quality cocoa powder
  • 3/4 cup sugar
  • 3/4 cup chocolate chips, plus 1/4 cup for sprinkling
  • 1 cup milk
  • 1/3 cup plus 2 Tbsp. canola oil
  • 1 egg
  • 1 tsp. vanilla extract
DIRECTIONS:
  Preheat oven to 400 degrees.  Spray a 12-cup muffin tin with cooking spray and set aside.  Combine the flour, baking powder, baking soda, salt, cocoa powder, sugar, and 3/4 cup chocolate chips in a large mixing bowl.  In a small bowl, combine the milk, oil, egg, and vanilla.  Whisk to combine.  Pour the wet ingredients into the dry ingredients and stir just until mixed.  Try not to over-mix batter.   Evenly scoop batter into muffin tin and bake in preheated oven for 15-20 minutes.  


Tuesday, June 14, 2011

Frittata Caprese


Frittata's are fun and easy.  Any combination of vegetables, or meat, or cheese can work in a frittata.  There's no rules...which can be really freeing for someone who doesn't do well with following a recipe {like me}.
I wanted to use the basil from my garden, which is growing in abundance, along with my zucchinis.  A little mozzarella cheese, cherry tomatoes, and voila...it tasted like a caprese salad, only warm.  Which is why I named this frittata caprese.  Frittata's are great to make for breakfast, lunch or even dinner.  I made this frittata with my blueberry buckle and it made for a perfect lazy saturday breakfast.


Frittata Caprese {serves 4}

INGREDIENTS: 
  • 8 eggs
  • 1/4 cup milk or half and half
  • 1-2 small zucchini, sliced into thin rounds
  • 1/2 cup cherry tomatoes, cut in half
  • 3 Tbsp. fresh basil, divided and roughly chopped
  • 1 clove garlic, minced
  • 6 oz. mozzarella, cut in chunks
  • olive oil
  • salt and freshly ground black pepper
DIRECTIONS:
  Pre-heat oven to 350 degrees.
  Whisk eggs and milk together in a bowl and set aside.  Heat a 10 inch non-stick {oven-proof} skillet over medium heat, add 1 Tbsp. of olive oil.  Once pan is hot, add zucchini and tomatoes.  Season with salt and pepper and let cook about 2 minutes.  Add garlic and stir until tomatoes have softened, just another minute or so {you don't want tomatoes to get too mushy}.  Remove the vegetables from pan and place on a plate.  Add 1 more Tbsp. of olive oil to hot pan.  Reduce heat to medium-low and add whisked egg mixture.  Let eggs cook for a couple of minutes and then place the sautéed vegetables and mozzarella chunks evenly into the eggs.  Sprinkle with 2 Tbsp. of the fresh basil and then place in oven.  Cook in oven 5-10 minutes or until eggs have fully set and feel slightly firm to touch.  You don't want the top to brown.  Remove from oven and sprinkle with the remaining 1 Tbsp. fresh basil.  Slice into large triangles and serve warm.  If you have leftovers, it also tastes great re-heated for lunch the next day!  


Saturday, June 11, 2011

Blueberry Buckle. Summer is here.


I couldn't resist.  Our first official day of Summer vacation and I'm in the kitchen making breakfast.  I had to celebrate with something that we love...food.  More specifically...breakfast!  I rolled out of bed at the crack of 8:30 {a miracle for me}and came into the kitchen with an idea.  Blueberries and cake. 
Fresh blueberries are one of my favorite fruits.  They have to be nice and firm with a tiny bit of tartness.  I bought a pound of organic blueberries at one of our local grocery stores to use for baking.  
The smells throughout the house were amazing!  I made a frittata {I'll blog about that later}, a big pot of coffee, and sat down with my plate of food.  What a nice way to start off our vacation! 


Blueberry Buckle {recipe adapted from King Arthur Flour}

INGREDIENTS: 

Topping:
  • 1/2 Cup sugar
  • 1/2 Cup flour
  • 1 tsp. cinnamon
  • 6 Tbsp. cold butter, cut into chunks
Batter:
  • 2 Cups All-Purpose flour
  • 2 tsp. baking powder
  • 1/2 tsp. salt
  • 3/4 cup sugar
  • 1/2 stick butter, softened
  • 1 large egg
  • 1 tsp. vanilla
  • 1/2 cup buttermilk {you can use regular milk instead}
  • 2 cups fresh blueberries {you can use frozen too}
Directions:
  Pre-heat oven to 375 degrees.  Butter and flour 9 inch square baking dish or a 9 inch cake pan.  
To make the topping, combine sugar, flour, and cinnamon in a small bowl.  Add cold butter chunks and crumble with your finger tips until the mixture becomes very crumbly.  Set aside.
To make the batter, combine the flour, baking powder, and salt in a medium bowl.  Whisk thoroughly.  In another bowl, or your electric mixer, combine butter and sugar.  Beat until nice and fluffy.  Add egg and vanilla and beat until creamy.  Alternately add the milk and flour mixture to the creamed butter mixture.  Mix gently, just until combined, ending with the flour mixture.  If you used your electric mixer, you will want to do the rest using a spatula.  Add blueberries and gently fold into your batter, making sure not to break up any of the fruit.  
Pour batter into the prepared baking dish.  Sprinkle crumble topping evenly over the entire cake batter.  Bake for 40-45 minutes, or until toothpick inserted in center comes out clean.  Let sit at elate 5 minutes...if you can wait that long!


Tuesday, April 26, 2011

Caramelized French Toast


I know I've mentioned before that I have a deep love for breakfast.  The smells, the comfort, it's all there for me!  With this being spring break week for us, the joy of cooking a nice breakfast for my kids is that I don't have to get up at the crack of dawn to prepare it, and we don't have to shove it down our throats before we rush out of the house.  It's more relaxed...the way I like it!
So I bought 2 loaves of Challah bread from Trader Joes over the weekend.  This bread is delicious all by itself, but it makes the perfect french toast as well.  The buttery texture and sweetness of the bread makes it easy, because there's not much that needs to be added to make it a perfect french toast.
I made an overnight baked french toast with the first loaf for Easter morning and this morning I made the caramelized french toast.  Very quick and easy and the raw sugar gives the french toast this wonderful crunchy, chewy, caramely texture.


Caramelized French Toast {my recipe}

INGREDIENTS: {serves 4-6}

  • 1 loaf Challah bread, cut into 1-1/2 inch slices {or any other french bread}
  • 2 eggs
  • 1 cup milk {I used half and half }
  • pinch of salt
  • 2 tsp. vanilla extract
  • 2 tsp. cinnamon
  • 1/4 Cup raw {turbinado} sugar
  • butter for skillet
DIRECTIONS:
In a large pie plate, mix together the eggs, milk, salt, and vanilla.  In another plate, mix the raw sugar and cinnamon.  
Heat a large skillet to medium.  Add butter {generously}.  Dip the bread, one at a time, in the egg mixture, then sprinkle some of the cinnamon sugar mixture onto the bread {both sides} and rub it around with your fingers.  You don't want too much of the sugar mixture on your bread, because it will burn in the pan and give you "burnt sugar" french toast.  Place the bread on the buttered skillet and cook until golden brown {watch to be sure the sugar doesn't burn}, then turn and cook a little longer {about 1-2 min. per side}.  
Place finished french toast side by side on a large plate.  Do not stack them because they will stick to each other.  Serve warm with syrup or berries. 

Challah bread sliced up

eggs, milk, salt, vanilla

Here's the raw sugar and cinnamon mixture

frying em up...

Monday, April 11, 2011

Snack Time! Apricot Oatmeal Bars


I'm a big fan of apricots, especially dried ones.  They make a great snack when you pair them with a handful of almonds.  The only thing I make with dried apricots are my mom's apricot tarts, which for some strange reason, I only make at Christmas-time.
This recipe I've made before but I modified it a little this time around.  It comes from Williams-Sonoma The Kid's Cookbook.  My oldest loves to get this cookbook out every now and then to find something for him and I to make together.  I love that he has an interest in cooking and that he likes to experiment in the kitchen {supervised that is}.  Give these a try with your little ones and I guarantee they'll appreciate them much more when they have a hand in making them!

Apricot Oatmeal Bars {adapted from Williams-Sonoma The Kid's Cookbook}


INGREDIENTS:
  • 1 1/2 sticks butter, melted and cooled slightly
  • 1 cup firmly packed dried apricots 
  • 1/4 to 1/2 cup apricot jam, softened for 30 seconds in the microwave
  • 1 1/2 cup old-fashioned rolled oats
  • 1 cup all-purpose flour 
  • 3/4 cup firmly packed dark brown sugar
  • 1/4 tsp. salt
  • 1/4 tsp. ground cinnamon
  • 1 1/2 tsp. vanilla extract
DIRECTIONS:
  Melt butter in small saucepan over medium-low heat.  Remove saucepan from the heat and set aside to cool slightly.  
Pre-heat oven to 350 degrees.  Line the bottom and sides of a 9-inch square baking pan with a large piece of parchment paper or aluminum foil.  Allow some to hang over sides.  If using parchment paper, spray the bottom of the pan before you lay the paper down.  It will help the paper lay flat.  If using aluminum foil, you will want to lightly spray or butter the foil after placing it in the pan.  
Using kitchen scissors, snip the apricots into about 1/2-inch pieces.  In a mixing bowl, combine the rolled oats, flour, brown sugar, salt, and cinnamon.  Mix until well blended.  
Add the snipped apricots, melted butter, and vanilla to the bowl.  Stir until well blended.  The dough will be moist and crumbly.  
Dump HALF of  the dough into the prepared baking pan.  Press it into the pan with your fingers.  
Next spread the softened apricot jam over the dough.  Finally, dump the remaining half of the dough on top of the jam and press firmly.  
Bake until the top is golden brown, about 30-40 minutes.  Cool completely on wire rack.  
To cut the bars, lift the foil or paper from the pan and place on a cutting board.  Peel away the foil from the sides and bottom.  Using a sharp knife, cut the big square into 18 rectangles.  Store in an airtight container.

NOTE:  I used a small rectangular pan because oddly enough I don't have a 9-inch square pan


Here's the dough all mixed up

  first half of the dough pressed down into the pan


next comes the jam

second half of the dough pressed over the jam


Tuesday, March 15, 2011

Sweet Potato Hash. Breakfast for Dinner.


I was in the mood for breakfast last night.  It's not very often I make breakfast for dinner, but when I do, it goes over really well with my kids!  There's something about the smell of pancakes and bacon that is exciting and comforting.  Aside from the pancakes and bacon I wanted to make a hash with sweet potatoes.  Normally when you think of hash browns, you think of potatoes.  But I switched it up a bit and honestly, those sweet potatoes went really well with the bacon, eggs, and pancakes.  I served a heaping scoop of the hash browns and placed a fried egg on top.  I think next time I'll crumble the cooked bacon into the hash browns, because everything tastes better with bacon!
Honestly though, I think this recipe could be served along side a main dish, like pork tenderloin or even a flank steak.  You're not limited to make it just for breakfast!

Sweet Potato Hash {my recipe}


INGREDIENTS: {serves 4}

  • 2 medium to large sweet potatoes {the orange ones}
  • 1 shallot, sliced
  • 2 green onions, thinly sliced about half way up
  • 2 Tbsp. fresh parsley, chopped
  • coarse salt
  • freshly ground black pepper
  • 2 Tbsp. butter
  • 2 Tbsp. olive oil
DIRECTIONS:
  Peel and cut sweet potatoes into a 1-inch dice.  Slice shallot and green onion.  In a large saute pan, heat oil and butter over medium heat.  Put shallot and green onion into pan and cook for about 1 minute.  Add the sweet potatoes in one even layer.  Season well with coarse salt and pepper.  Pat down evenly and allow to fry for about 5 minutes without stirring.  After 5 minutes, give them a little stir and let them cook for at least another 10-15 minutes, or until they begin to get nice and brown and crispy on the outside.   Add chopped parsley about one minute before the potatoes are finished.  Don't worry about the onions getting too dark...they actually taste good when they're crispy!  Once they have finished cooking, season with a little more salt to taste.  Serve immediately...Enjoy!

Diced up nice and small so they cook evenly and quickly

All in a single layer to get that golden brown crispy outside

starting to brown up...I had to resist stirring and let them brown

All crispy and golden brown


Saturday, February 26, 2011

Saturday Morning Biscuits


Breakfast has always been my favorite meal of the day.  I love the smell of bacon cooking, coffee brewing, and toast in the toaster.  This isn't always a reality in our home, but I do love it when we have a Saturday morning that I can get up and cook a big breakfast for my family.  Actually, what I really love is going out to breakfast, but cooking at home is usually a cheaper option!
This morning I decided on biscuits.  My son adores a good biscuit and he is always asking me to make them.  This recipe came from my tried and true cookbook JOY OF COOKING.  It's an easy recipe and produces a nice fluffy biscuit...absolutely delicious with some raspberry jam!  The one thing I liked about this recipe is that you don't need buttermilk, which I rarely have.  Be sure to handle the dough carefully, not pressing down hard when you roll it out.  Also, when using a biscuit cutter, be sure not to twist the cutter.  Just make one cut nice firm cut without twisting.

Rolled Biscuits {makes 10 biscuits}


INGREDIENTS:
  • 1-3/4 cups all-purpose flour
  • 1 Tbsp. baking powder
  • 1/2 tsp. salt
  • 1 Tbsp. sugar
  • 6 Tbsp. chilled butter, cut into small chunks
  • 3/4 cup milk
  • melted butter to brush on biscuits before and after the bake
DIRECTIONS: 
Preheat oven to 450 degrees.
Be sure to sift flour, baking powder, salt, and sugar together in a large bowl.  This really is a necessary step to be sure all of those ingredients are incorporated well.  Cut in the butter, using a pastry blender or your hands, until the size of small peas.  Make a well in the center and pour in all of the milk.  Stir just until the dough comes away from the sides of the bowl.  Turn the dough out onto a lightly floured board.  Knead GENTLY and quickly, about 8 to 10 times.  Roll out with a lightly floured rolling pin, to between 1/4 to 1/2 inch thick.  *I rolled mine to to 1/2 inch thick just to be sure I was going to get a nice tall biscuit.  Cut with a 2-3 inch biscuit cutter and place with sides touching on an ungreased baking sheet.  Brush tops with melted butter.  Bake until lightly browned, 12-15 minutes.  Brush with remaining melted butter and serve warm!
**To re-roll scraps, just use your hand to gently pat out dough.  I was able to use up all of my scraps in order to get 10 biscuits.**

Tuesday, January 25, 2011

Bread Week! Day 1-Cinnamon Bread


Not sure what made me decide to bake bread this week.  It's like summer in January...not cold at all!  I feel like most bread making gets done when it's cold and rainy out, but oh well!  My goal this week is...Bread making, without the machine, 3 days this week.  Yes, good old-fashioned bread-making without my bread machine.  Now, I have never been super motivated to make bread.  I've probably made a handful of loaves with my bread machine in the past 11 years.  But for some reason, I'm challenging myself to see what I come up with!  The first recipe comes from the book Artisan Bread in Five Minutes a Day.  I don't have the book, but I think I might actually buy it after I made this bread.  I found the recipe HERE.  You have to make the buttermilk dough first, which makes a lot of dough.  I found out the hard way. I think I was supposed to only use a large chunk of dough to make one loaf, but ended up using all of the dough and had to cut it into two loaves.  So, I didn't double the cinnamon filling...which I should have.  Use this bread for toast or even cut it thick for French Toast...YUM!
I really think anyone could make this bread.  Don't think you have to be an expert, I'm definitely not!


Buttermilk Bread Dough {Adapted from Artisan Bread in Five Minutes a Day}


INGREDIENTS:
  • 2 Cups lukewarm water {between 100 and 110 degrees}
  • 1 cup lukewarm buttermilk {between 100 and 110 degrees, I highly recommend heating on stove}
  • 1 1/2 Tbsp. yeast
  • 1 1/2 Tbsp. salt
  • 1 1/2 Tbsp. sugar
  • 6 1/2 cups unbleached all purpose flour
DIRECTIONS:
  Mix the water and buttermilk together, making sure that they are between 100 and 110 degrees {use a candy thermometer if you have one}.  Whisk in the salt and sugar, then sprinkle the yeast on top, letting it develop {get a little foamy} for a few minutes.  Pour the yeast mixture into a large bowl or your stand mixer and mix in all of the flour in one addition.  YOu do not have to knead the bread, but use a wooden spoon {or dough hook if you're using you stand mixer} to make sure the flour is thoroughly incorporated.  Place the container in a warm place with a loose fitting cover and let rise for two hours.  After the dough has risen you are ready to bake, but the authors recommend letting it chill in the fridge first to make the dough easier to work with {I didn't}.


Cinnamon Bread {Adapted from Artisan Bread in Five Minutes a Day}
**Filling amounts are for ONE loaf of Buttermilk Bread**

INGREDIENTS: {SEE NOTE BELOW}
  • 1 1/2 pounds of buttermilk bread dough {about the size of a cantaloupe}
  • 1 1/2 tsp. ground cinnamon
  • 3/4 cup sugar {Next time I will use Brown Sugar!!}
  • 3/4 cup raisins, chopped {kids don't like raisins, so I left them out}
  • 1 egg beaten with 1 Tbsp. water for egg wash
  • Butter for the pan
DIRECTIONS:
  Butter a 9" by 4" bread pan, bottom and sides, and set aside.  Roll out the dough to a rectangle approx. 18" long and 9 " wide.  If the dough is not stretching well, let it rest for 10 minutes and continue to roll.  Mix the cinnamon, sugar and raisins together.  Brush the egg wash over the surface of the dough and sprinkle the sugar mixture evenly over the egg wash.  Roll the dough up, using a bit of egg wash to seal up the ends and the seam.  Place the roll in your bread pan and let sit in a warm place for at least an hour.  20 minutes before baking, heat your oven to 375 degrees.  Bake the bread for 35-40 minutes until nice and golden on the outside.  Let cool slightly before serving {I never do}.  Tastes amazing fresh out of the oven with butter!  Enjoy!

NOTE:  If you want to make two loaves, then double the filling mixture, and roll your rectangle out to 18" long and 12" wide.  Once you've rolled up your dough, cut in half and place in two buttered bread pans.  Also, next time I would put a little egg wash on top of the bread before it goes in the oven, and sprinkle with a little extra cinnamon-sugar mixture.  
**If you don't want to make two loaves, then use the extra dough to make rolls for dinner or a loaf of buttermilk bread for sandwiches.

Saturday, December 18, 2010

Cinnamon Bread Frech Toast

Today is definitely one of those days that calls for comfy clothes, Christmas movies, and a big Saturday breakfast!  The rain hasn't let up all day and it's forced us to RELAX!  I bought a loaf of Trader Joe's Cinnamon Bread with plans to make nice, thick french toast for the kids.
After I made myself a nice hot Americano, I sat down to a lovely Saturday breakfast with my happy family.  These days are what vacation is all about!

Here's my little kitchen helper putting the finishing touches on his french toast


Cinnamon Bread French Toast {serves 5-6}


INGREDIENTS:

  • 1 loaf Trader Joe's Thick Cut Cinnamon Bread {Or any other thick-cut cinnamon bread}
  • 3 eggs, beaten
  • 1 cup milk
  • 1-2 tsp. vanilla extract
  • butter for frying
  • syrup and powdered sugar for topping
DIRECTIONS:
Heat large skillet to medium-high heat.  In a shallow pie plate or bowl, mix together beaten egg, milk, and vanilla extract.  Butter the skillet liberally.  Dip one piece of bread at a time into the egg mixture and gently shake off any excess mixture.  Place on hot skillet and fry 3-4 minutes on one side, or until golden brown, then flip and fry 2-3 minutes more.  Repeat with remaining bread.  Be sure to add butter to skillet before you add remaining bread.
**To keep french toast warm while making the rest, place on cookie sheet and put in a 200 degree oven.  
Top your french toast with syrup and sprinkle with powdered sugar.

Only 4 ingredients!

I LOVE my big skillet!

Wednesday, December 8, 2010

Pumpkin Chocolate Chip Bread


I love pumpkin bread!  I have a recipe that's been passed down in my family that I use a lot, but this time I strayed and tried something new.  I love the fact that this bread is really moist and that it has the wonderful crunchy crumb topping that is irresistible!
NOTE**This recipe says it makes one loaf, but I had a major spill in my oven by an over-flowing batter and it took much longer for it to bake then the recipe called for.  So, next time I will probably either divide the batter into 2 pans, or just leave out one cup of the batter if I want to make one large loaf.


Pumpkin Chocolate Chip Bread {recipe adapted from HERE}


INGREDIENTS:

  • 3 Cups all purpose flour
  • 2 tsp. baking powder
  • 1 tsp. baking soda
  • 3/4 tsp. salt
  • 1 tsp. pumpkin pie spice
  • 1 tsp. cinnamon
  • 1/4 cup canola oil
  • 1 1/2 cups canned pumpkin puree
  • 1/3 cup packed brown sugar
  • 1/3 cup granulated sugar
  • 1 1/3 cups buttermilk
  • 1 tsp. vanilla extract
  • 2 large eggs
  • 1/2 cup mini chocolate chips 
  • 1/2 cup finely chopped walnuts
CRUMB TOPPING
  • 1/4 cup all purpose flour
  • 1/4 cup packed brown sugar
  • 1 tsp. cinnamon
  • 2 Tbsp. chilled unsalted butter, cut into small pieces
DIRECTIONS:
  Heat oven to 350 degrees.  Coat one or two 9-inch loaf pans with cooking spray {see note above}.
In a large mixing bowl, sift together flour, baking powder, baking soda, salt, pumpkin pie spice, and cinnamon.  In a large mixing bowl, whisk together oil, pumpkin, brown sugar, sugar, buttermilk, and vanilla until well combined; whisk in eggs until thoroughly mixed.  Stir in dry ingredients just until incorporated; stir in chocolate chips and walnuts until combined.
Scrape batter into prepared pans {leaving out 1 cup of batter if you decide to bake ONE loaf}.  
To make the crumb topping, in a small bowl, stir together flour, brown sugar and cinnamon until combined.  Cut in butter using either finger tips or a pastry blender, until mixture is very crumbly.  Sprinkle crumbs over the top of batter and gently press down.
Bake 50-60 minutes or until well risen, golden brown, and a toothpick inserted into bread comes out clean.  Cool on a wire rack for 30-45 minutes before removing bread from pan.

Makes 1-2 loaves

Monday, November 8, 2010

Fresh Cranberry-Lemon Scones


  I've been on a scone baking kick lately.  I just can't get over how easy they are to make!  I made these up a coulee days before hosting a brunch at my house.  I did a quick freeze, then put them in a ziploc freezer bag and pulled them out 2 days later when I was ready to bake them.  I'm learning how to manage my time better when I'm having company over, so I can enjoy more of the day and not be so consumed by the mess I'm making!  These are such a great thing to make right now with the fresh cranberries being in season.  

Fresh Cranberry and Lemon Scones {adapted from Smitten Kitchen}

INGREDIENTS: {makes 12-15 scones}
  • 1 1/2 Tbsp. freshly grated lemon zest {from about 2 lemons}
  • 2 1/2 cups all-purpose flour
  • 1/2 cup sugar plus 3 Tbsp. additional for fresh cranberries
  • 1 Tbsp. baking powder
  • 3/4 stick {6 Tbsp.} cold unsalted butter, cut into small chunks
  • 1 1/4 cups fresh cranberries, coarsely chopped if desired
  • 1 large egg
  • 1 large egg yolk
  • 1 cup heavy cream
DIRECTIONS:
  Pre-heat oven to 400 degrees and line a large baking sheet with parchment paper.  Using a zester, remove zest from lemons, reserving lemons for the glaze.  In a food processor, pulse flour, 1/2 cup sugar, baking powder, salt, butter, and zest until mixture resembles coarse meal and transfer to a large bowl.  {You can also do this by hand, fork, or using a pastry cutter}.  In a small bowl toss together fresh cranberries and 3 Tbsp. sugar and stir into flour mixture.  In another bowl lightly beat egg and yolk and stir in cream.  Add egg mixture to flour mixture and stir until just combined.  
On a well-floured surface with floured hands pat dough int a 1-inch-thick round {about 8 inches in diameter} and with a 2-inch round cutter dipped in flour cut out as many rounds as possible, re-rolling scraps as necessary.  {I chose to cut mine into triangles to make the most of the dough}.  Arrange rounds or triangles about 1 inch apart on baking sheet and bake in middle of oven 15-20 minutes, or until pale golden.  
***If you choose to freeze the scones before baking:  Cut out dough and place on parchment lined baking sheet.  Quickly place in freezer until hardened.  Once hard, place scones in a freezer bag and put in freezer until you're ready to bake.  Bake them right from the freezer, adding 3-5 extra minutes baking time.  

To glaze scones:
Remove scones from oven and place on a wire rack with a baking sheet underneath. 
Whisk Together:  1 Cup powdered sugar, 1-2 Tbsp. freshly squeezed lemon juice and enough zest to equal about 2 tsp.  **You don't what the glaze to be too thin, so add more powdered sugar if it becomes too thin.  Using a spoon, drizzle glaze over each scone and allow to harden about 5 minutes.  Serve while still warm!


LinkWithin

Related Posts with Thumbnails