Friday, May 13, 2011

Mediterranean Cucumber Salad


So the picture above was taken on one of my iphone apps, which is why it looks a little different.  Our camera needed a re-charge.
This salad is light and crunchy.  The english cucumbers work best for this salad because they don't have a lot of seeds.  I served this inside a pita filled with falafels, hummus, and sliced avocado.  It's easy and delicious...you could even add a little fresh oregano if you want some herb flavor.  Enjoy!


Mediterranean Cucumber Salad 


INGREDIENTS: {serves 4}

  • 1 english cucumber, sliced lengthwise into fourths, then cut into 1 inch dice
  • 1/2 cup grape tomatoes
  • 1/2 cup feta cheese, cubed or crumbled
  • 1/4 cup kalamata olives, sliced
  • 1-2 Tbsp. olive oil
  • 2 Tbsp. freshly squeezed lemon
  • 1 Tbsp. seasoned rice vinegar
  • salt
  • freshly ground black pepper
DIRECTIONS:
 Sliced cucumber lengthwise in half then slice each half down the middle {I like to cut out any seeds}. Cut 1-inch dice and place in a medium bowl.  Add the tomatoes, olive, and cheese.  Drizzle in the olive oil, lemon juice, rice vinegar, and season to taste with salt and pepper.  Toss gently. Serve alongside any mediterranean dish or stuffed in a pita.  

Wednesday, May 11, 2011

Chicken Scallopini with Asparagus


I'm pumped to be back!  I can't promise I'll be super consistent until after school gets out though.
This last month before the end of the school year seems to be jam-packed full of activities.  Baseball will be winding down in the next few weeks and that has taken up a lot of time!  With two boys and daddy as coach, we've been eating, breathing and sleeping baseball :)
It's all fun and exciting, but the down time will be much needed come June.  Needless to say, our meals have been quick and easy, leaving no time for experimenting with recipes or blogging.  But yesterday I managed to dust off the pots and pans to make a nice meal for my family.
This type of chicken is very easy, mostly because the thin cut breasts make cook-time very quick and the sauce is super simple.  The chicken can be served on top of pasta {which is my fav}, rice, or mashed potatoes.  You could also use mushrooms in the sauce instead of asparagus, or no veggies at all.
Try this recipe and you'll love the simple but tasty flavors.  Scallopini refers to any cutlets {usually veal or chicken} pounded thin and coated with flour.  So, you could really make many alterations to the sauce itself as long as you have the thin, crispy cutlets.  Enjoy!


Chicken Scallopini with Asparagus {my recipe}


INGREDIENTS: {Serves 4}

  • 1 1/2 lbs. thin sliced chicken breasts {if you can't find these, then pound out your chicken breasts}
  • 1/2 cup flour
  • salt and freshly ground black pepper
  • 2 Tbsp. olive oil
  • 2 Tbsp. butter
  • 1 cup chicken stock
  • 2 small shallots, finely diced
  • 1/2 lb. thin asparagus, cut into 2 inch pieces, rough ends removed
  • 1 lemon, juiced {about 3 Tbsp.}
  • 2 Tbsp. fresh parsley, chopped
  • 1 Tbsp. butter
  • 1 lb. linguine {optional}
*Can be served with pasta, potatoes, or rice

DIRECTIONS:
*Pre-heat oven to 350 degrees.
  I bought the Foster Farms thinly sliced chicken breasts, but if you can't find them go ahead and place your chicken breasts between two sheets of plastic wrap.  Pound until they are nice and thin.  Season all chicken breasts with salt and pepper.  Pour the flour into a pie plate and coat each breasts liberally with the flour, shaking off the excess.  
Heat a large skillet to medium high.  Add the 2 Tbsp. olive oil and 2 Tbsp. butter.  Let the butter melt and become frothy then place a few chicken breasts into the pan and fry {5 minutes} on the first side, turn over and fry 5 minutes more, or until golden brown.   Drain on paper towels then set aside on a baking sheet.  Once all of the chicken is fried, place the baking sheet into the oven while you prepare the sauce.  This will help make sure they are cooked all of the way through.
Pour off all but 2 Tbsp. of oil that is left over in the pan.  If you find you don't have much oil left, then just add another tablespoon of olive oil.  Add shallots and asparagus and season with salt and pepper.  Saute for about 5 minutes.  Pour in chicken broth and let reduce another 4-6 minutes.  Squeeze the juice of one lemon into the sauce and let cook for a couple of minutes.  Turn the heat down to a gentle simmer and finish the sauce with 1 Tbsp. of butter and the fresh parsley.  Season with more salt and pepper to taste.  Remove chicken from oven.
If you are using pasta, I like to add a few Tbsp. of butter to my noodles so they don't stick together.  Pile a big heaping full of pasta on a plate, place a chicken breast on top, then pour a nice ladle-full of the sauce and asparagus.  

Not many ingredients in this dish...I only used one of the lemons!

Season the chicken first then pat into the flour

Trying to be patient and not turn them until they have a nice golden brown color

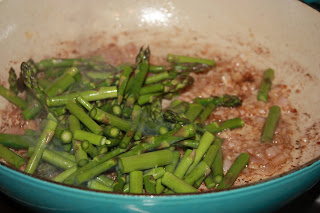
Here's the shallots and asparagus sauteing in the pan


Here's a little of what we've been up to the past few months...


Go TWINS!                                                      
Jaden's new love...pitching!


Ella turned 6 on Mother's Day
The best Mother's Day gift of all...these 3 kiddos!


Tuesday, April 26, 2011

Caramelized French Toast


I know I've mentioned before that I have a deep love for breakfast.  The smells, the comfort, it's all there for me!  With this being spring break week for us, the joy of cooking a nice breakfast for my kids is that I don't have to get up at the crack of dawn to prepare it, and we don't have to shove it down our throats before we rush out of the house.  It's more relaxed...the way I like it!
So I bought 2 loaves of Challah bread from Trader Joes over the weekend.  This bread is delicious all by itself, but it makes the perfect french toast as well.  The buttery texture and sweetness of the bread makes it easy, because there's not much that needs to be added to make it a perfect french toast.
I made an overnight baked french toast with the first loaf for Easter morning and this morning I made the caramelized french toast.  Very quick and easy and the raw sugar gives the french toast this wonderful crunchy, chewy, caramely texture.


Caramelized French Toast {my recipe}

INGREDIENTS: {serves 4-6}

  • 1 loaf Challah bread, cut into 1-1/2 inch slices {or any other french bread}
  • 2 eggs
  • 1 cup milk {I used half and half }
  • pinch of salt
  • 2 tsp. vanilla extract
  • 2 tsp. cinnamon
  • 1/4 Cup raw {turbinado} sugar
  • butter for skillet
DIRECTIONS:
In a large pie plate, mix together the eggs, milk, salt, and vanilla.  In another plate, mix the raw sugar and cinnamon.  
Heat a large skillet to medium.  Add butter {generously}.  Dip the bread, one at a time, in the egg mixture, then sprinkle some of the cinnamon sugar mixture onto the bread {both sides} and rub it around with your fingers.  You don't want too much of the sugar mixture on your bread, because it will burn in the pan and give you "burnt sugar" french toast.  Place the bread on the buttered skillet and cook until golden brown {watch to be sure the sugar doesn't burn}, then turn and cook a little longer {about 1-2 min. per side}.  
Place finished french toast side by side on a large plate.  Do not stack them because they will stick to each other.  Serve warm with syrup or berries. 

Challah bread sliced up

eggs, milk, salt, vanilla

Here's the raw sugar and cinnamon mixture

frying em up...

Tuesday, April 19, 2011

Broiled Zucchini and Potatoes with Parmesan Crust


I'm officially tired!  This stretch from Christmas vacation until now was waaaay too long!  My kids will finally be on Spring Break starting friday!  Not that my week with them is going to be anything like a vacation, but just to not be so "on" will be a nice change for me.  I'm looking forward to lazy mornings and cuddle times with my youngest.  Oh, and having a full cup of coffee without re-heating it ten times...those are the little things that will be so nice!
Anyway, this is all I've got for the week.   I know it's not much, but it really is a great side dish for just about anything.  I served it with my prosciutto wrapped stuffed chicken breasts.  The photo doesn't show the crispy parmesan crust because I literally threw them in the serving dish so we could eat!


Broiled Zucchini and Potatoes with Parmesan Crust { adapted from Giada's Kitchen Cookbook}

INGREDIENTS: {serves 4}
  • 6 small new potatoes {red or white, about 1 1/2 inches in diameter}
  • 2 Tbsp. butter {I used just a little more to get a nice the veggies nice and brown}
  • 2 garlic cloves
  • 1 tsp. chopped fresh thyme
  • 1 tsp. chopped fresh rosemary leaves
  • 2 zucchini, cut in half lengthwise and then in 1-inch pieces
  • salt and freshly ground pepper
  • 1/4 cup freshly grated Parmesan Cheese
DIRECTIONS:
  Bring a medium pot of water to a boil over high heat.  Add the potatoes and cook until just tender, 8 to 10 minutes.  Drain the potatoes and let cool.  When cool, cut the potatoes in half.  
Place a medium saute pan over medium heat.  Add the butter, garlic, thyme, and rosemary and heat until the butter melts, about 2 minutes.  Meanwhile, season the cut surfaces of the zucchini and potatoes with salt and pepper.  Carefully place the zucchini and potatoes cut side down in the melted butter.  Cook until golden brown, 12-15 minutes.  
Preheat the broiler.  Line a baking sheet with foil.  Place the browned zucchini and potatoes on the baking sheet cut side up.  Sprinkle the tops wit the Parmesan.  Broil until the cheese is golden brown, about 4 minutes.  Transfer to a plate and serve.  

Monday, April 11, 2011

Snack Time! Apricot Oatmeal Bars


I'm a big fan of apricots, especially dried ones.  They make a great snack when you pair them with a handful of almonds.  The only thing I make with dried apricots are my mom's apricot tarts, which for some strange reason, I only make at Christmas-time.
This recipe I've made before but I modified it a little this time around.  It comes from Williams-Sonoma The Kid's Cookbook.  My oldest loves to get this cookbook out every now and then to find something for him and I to make together.  I love that he has an interest in cooking and that he likes to experiment in the kitchen {supervised that is}.  Give these a try with your little ones and I guarantee they'll appreciate them much more when they have a hand in making them!

Apricot Oatmeal Bars {adapted from Williams-Sonoma The Kid's Cookbook}


INGREDIENTS:
  • 1 1/2 sticks butter, melted and cooled slightly
  • 1 cup firmly packed dried apricots 
  • 1/4 to 1/2 cup apricot jam, softened for 30 seconds in the microwave
  • 1 1/2 cup old-fashioned rolled oats
  • 1 cup all-purpose flour 
  • 3/4 cup firmly packed dark brown sugar
  • 1/4 tsp. salt
  • 1/4 tsp. ground cinnamon
  • 1 1/2 tsp. vanilla extract
DIRECTIONS:
  Melt butter in small saucepan over medium-low heat.  Remove saucepan from the heat and set aside to cool slightly.  
Pre-heat oven to 350 degrees.  Line the bottom and sides of a 9-inch square baking pan with a large piece of parchment paper or aluminum foil.  Allow some to hang over sides.  If using parchment paper, spray the bottom of the pan before you lay the paper down.  It will help the paper lay flat.  If using aluminum foil, you will want to lightly spray or butter the foil after placing it in the pan.  
Using kitchen scissors, snip the apricots into about 1/2-inch pieces.  In a mixing bowl, combine the rolled oats, flour, brown sugar, salt, and cinnamon.  Mix until well blended.  
Add the snipped apricots, melted butter, and vanilla to the bowl.  Stir until well blended.  The dough will be moist and crumbly.  
Dump HALF of  the dough into the prepared baking pan.  Press it into the pan with your fingers.  
Next spread the softened apricot jam over the dough.  Finally, dump the remaining half of the dough on top of the jam and press firmly.  
Bake until the top is golden brown, about 30-40 minutes.  Cool completely on wire rack.  
To cut the bars, lift the foil or paper from the pan and place on a cutting board.  Peel away the foil from the sides and bottom.  Using a sharp knife, cut the big square into 18 rectangles.  Store in an airtight container.

NOTE:  I used a small rectangular pan because oddly enough I don't have a 9-inch square pan


Here's the dough all mixed up

  first half of the dough pressed down into the pan


next comes the jam

second half of the dough pressed over the jam


Friday, April 8, 2011

Grilled Stuffed Chicken Breasts Wrapped in Prosciutto


I buy a lot of food magazines.  Not as many as I used to buy, but definitely more than I can keep up with.  I'll usually scour through them really quick, pick out a couple of recipes that I like, then put it away with great plans to make something from the magazine later.  Well, months go by and I'll forget about the magazine and it will just pile up along with the other ones!
So recently I've been determined to either try the recipes from the magazines that I buy, or throw the magazines away.  The other day I picked up a really good Fine Cooking Grilling magazine {from last year} and found this recipe.  It looked very easy, with simple ingredients, so I tried it out on family and friends!  They're always my guinea pigs and they usually tell me the truth about the recipe.
It turned out to be a keeper!

Grilled Stuffed Chicken Breasts Wrapped in Prosciutto 
{adapted from Fine Cooking, Grilling 2010}


INGREDIENTS: {serves 4}

  • 4 boneless, skinless chicken breasts halves 
  • 8-10 large fresh basil leaves
  • 1/4 lb. fontina cheese, cut into 4 long sticks
  • 4 Tbsp. mozzarella cheese, shredded
  • 4 thin slices prosciutto
  • 1 Tbsp. olive oil
  • salt
  • freshly ground black pepper
DIRECTIONS:
  I prepared these chicken breasts much earlier in the day and kept them in the refrigerator in a glass dish covered with plastic wrap.  
To prepare the chicken breasts, cut through each one horizontally almost all the way through and open like a book.  Sprinkle the chicken all over with 1/2  tsp. each salt and pepper.  Layer 2-3 basil leaves, one stick of fontina, and one Tbsp. mozzarella evenly on half of each breast and then fold it closed.  Wrap a slice of prosciutto around each breast to hold it closed and then brush lightly on both sides with the olive oil.  
When ready to grill, heat grill to medium high.  Reduce the heat on the gas grill to medium and grill the chichi breasts, covered, until they are well marked, about 4 minutes.  Flip and cook, turning every few minutes, until the chicken is just firm to the touch, about another 10-12 minutes.   

Monday, April 4, 2011

Lemon Ricotta Pound Cakes


I'm always in the mood for something sweet and lemony.  After being super sick for the past week, my appetite has been really poor.  I mean, for the girl who loves to eat, I've been getting by on toast and water to sustain me.  Don't get me wrong, my appetite is definitely coming back, but only little by little.  And honestly right now sweet things are the most appealing.  So, I came across a Barefoot Contessa Orange Pound cake recipe in my cookbook and decided to tweak it a bit.  I substituted lemon for the orange and ricotta cheese for the buttermilk.  It turned out great and I'll for sure make it again!  We ate one of the pound cakes with sliced strawberries and ice cream then a couple of days later I made a trifle out of the second pound cake.

Lemon Ricotta Pound Cakes {recipe adapted from Barefoot Contessa's Orange Pound Cake}


INGREDIENTS:

  • 2 sticks butter, at room temperature
  • 2 cups granulated sugar { I used 1 3/4 cup sugar}
  • 4 extra large eggs, at room temperature
  • 1/4 cup grated lemon zest {4-5 lemons}
  • 3 cups all-purpose flour
  • 1/2 tsp. baking powder
  • 1/2 tsp. baking soda
  • 3/4 tsp. kosher salt
  • 1/4 cup freshly squeezed lemon juice
  • 3/4 cup whole milk ricotta cheese
  • 1 tsp. vanilla extract
Glaze for the loaf
  • 1 1/2 cups confectioners' sugar, sifted
  • 2-3 Tbsp. freshly squeezed lemon juice
DIRECTIONS:
  Heat the oven to 350 degrees.  Grease and flour two 8 by 4 inch loaf pans.  By greasing and flouring the pans it will ensure that the loaves pop out of the pans very easily.  
Cream the butter and sugar in the bowl of an electric mixer for about 5 minutes, or until light and fluffy.  Beat in the eggs, one at a time, and the lemon zest.  Add the ricotta, lemon juice, and vanilla, beating thoroughly.
In a large bowl, whisk together the flour, baking powder, baking soda, and salt.  Add the flour mixture 1 cup at a time being careful not to over beat.  Divide the batter evenly between the pans and bake for 45 to 55 minutes, until a cake tester comes out clean.  
When the cakes are done, let them cool for 10 minutes.  Take them out of the pans and place them on a baking sheet set over a tray.  Allow the cakes to cool completely before glazing.
To glaze:  Combine the confectioners' sugar and lemon juice in a bowl, mixing with a wire whisk until smooth.  Add a few more drops of juice, if necessary, to make it pour easily.  Pour over the top of the cakes and allow the glaze to dry.  I wrapped mine loosely in foil and they lasted for 3 days.  


LinkWithin

Related Posts with Thumbnails