Monday, January 31, 2011

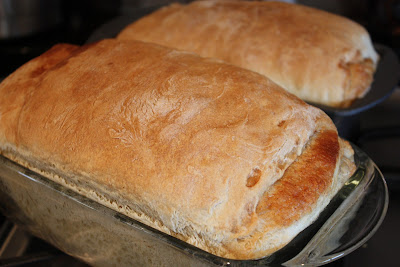
Fresh Bread Day 3-Oatmeal Molasses Bread


Well, it took me a few days to actually get going on another bread recipe.  The thing about bread making is that you kinda have to be around most of the day since there are a few steps to get to the end result.  In between the focaccia bread and this Oatmeal Molasses Bread I actually made some pizza dough.  It started out as a disaster, but ended up surviving, although I didn't get any pictures of it.  It was probably one of the biggest messes I've made in the kitchen...there was a lot of paper towels used and dough is still stuck to one side of my kitchen island.  So, I thought instead of re-creating that recipe for you, I'd give you one that I found to be pretty simple.  It does have a little kneading involved, but it was quite stress-relieving to knead the dough for a bit.  I slathered peanut butter and jelly on some slices today for my kids sandwiches.  I think they'll be happy!  

Oatmeal Molasses Bread {adapted from A Chow Life}

INGREDIENTS:
  • 2 & 1/3 cup water
  • 1 cup old fashioned rolled oats, plus extra for topping
  • 1/2 cup unsalted butter
  • 1/3 cup unsulfured molasses
  • 2 packages active dry yeast
  • 5-6 cups all purpose flour {I used 3 1/2 cups white and 2 cups wheat flour}
  • 2 tsp. sea salt
This is after the first rise

DIRECTIONS:
  In a small saucepan, bring the water to a boil.  Put the oats into a heatproof bowl and pour the water over the oats.  Add the butter and molasses.  Let the mixture cool to warm {105 degrees-115 degrees}
By hand, in a large bowl, dissolve the yeast in the warm oat mixture and let stand for 5 minutes.  Using a wooden spoon, stir in the 3 cups of the flour and the salt, mixing well.  Add the remaining 2-3 cups of flour as needed to make a soft dough.
Using a plastic pastry scraper {or a plastic spatula}, scrape the dough out of the bowl and onto a floured work surface.  Knead until it is smooth and elastic, dusting the work surface wit flour to keep the dough from sticking, 5-7 minutes.  
Form the dough into a ball and transfer it to a lightly oiled bowl.  Cover the bowl with plastic wrap and let the dough rise in a warm draft free spot until it doubles in bulk, about 1 hour.  
Butter 2 {9 by 5 inch} loaf pans.  Punch down the dough and, using the scraper, scrape it onto a clean work surface.  Cut it in half with a sharp knife.  For each half, evenly flatten the dough with the heel of your hand.  Roll the top third down onto itself and seal it by pushing it gently with the hell of your hand. Continue rolling and sealing the dough until you have an oval log.  Place the logs, seam side down, in the prepared loaf pans.  Press on them to flatten them evenly into the pans.  Cover loosely with a kitchen towel and let them rise in a warm, draft free spot until they double in size, about 45-60 minutes.  
Position a rack in the middle of the oven.  Preheat the oven to 375 degrees.  Mist the top of the loaves with water.  Sprinkle oats on top generously.  Bake until they are golden brown and sound hollow when tapped on top, about 40-45 minutes.  Remove from oven and pans.  Let cool on rack.

Getting ready to shape the loaves

not perfectly shaped, but will do just fine for me!

ready for the oven...be sure to press down a little on the oats after sprinkling them on

fresh out of the oven...I can never resist cutting into it right away!!

Wednesday, January 26, 2011

Day 2: No-Fuss Focaccia


This recipe was fun to make!  It really was no-fuss and tasted really good!  My kids are dippers...they've always been dippers since I started giving them food.  When Jaden my oldest, was little, he would hold up whatever food he had in his hand and would say "dip".  It was pretty darn cute!  Maybe we got him used to french-fries and ketchup too soon!  Anyway, all of that to say, they love it when we go to restaurants where they serve olive oil and balsamic vinegar with bread.  So, tonight, along with the warm focaccia, I served little saucers of olive oil, balsamic vinegar, a little minced garlic, and salt.  If you had only seen Jaden trying to lick up the last of the sauce on his plate...it somehow doesn't seem so cute anymore!  Now, if you're going to try any of these bread recipes that I'm making this week, you HAVE to try this one.  It's ridiculously good and easy!

NO-FUSS FOCACCIA {adapted from King Arthur Flour}


INGREDIENTS:
  • 1 1/2 cups warm water
  • 3 Tbsp. olive oil {plus additional for drizzling}
  • 1 1/4 tsp. salt
  • 3 1/2 cups King Arthur Unbleached All-Purpose Flour
  • 1 Tbsp. instant yeast {I used Perfect Rise yeast}
TOPPING:
  • 1 Tbsp. fresh oregano, finely chopped
  • 1 Tbsp. fresh thyme, finely chopped
  • 1 Tbsp. fresh rosemary, finely chopped
  • 1 Tbsp. coarse sea salt
DIRECTIONS:
  1.  Lightly grease a 9"by13" pan, and drizzle 1 to 2 tablespoons olive oil in the bottom.  
  2.  Combine all of the ingredients, and beat at high speed with an electric mixer for 60 seconds.
  3.  Scoop the sticky batter into the prepared pan, cover the pan, and let it rise at room temperature for 60 minutes, till it becomes puffy.
  4.  While the dough is rising, preheat the oven to 375 degrees.
  5.  Gently poke the dough all over with your index finger. 
  6.  Drizzle it lightly with olive oil, and sprinkle with coarse sea salt and chopped herbs. **You can use 
      any fresh or dried italian herbs you'd like.  Just be sure to decrease amount of dried herbs.
  7.  Bake the bread till it's golden brown, 35-40 minutes.  
  8.  Remove it from the oven, wait 5 minutes, then turn it out of the pan onto a rack.  Move to cutting 
      board and cut into chunks or strips.  Serve warm or at room temperature.  To keep leftovers fresh, wrap in foil and reheat in the foil at 350 for 15 minutes.


Tuesday, January 25, 2011

Bread Week! Day 1-Cinnamon Bread


Not sure what made me decide to bake bread this week.  It's like summer in January...not cold at all!  I feel like most bread making gets done when it's cold and rainy out, but oh well!  My goal this week is...Bread making, without the machine, 3 days this week.  Yes, good old-fashioned bread-making without my bread machine.  Now, I have never been super motivated to make bread.  I've probably made a handful of loaves with my bread machine in the past 11 years.  But for some reason, I'm challenging myself to see what I come up with!  The first recipe comes from the book Artisan Bread in Five Minutes a Day.  I don't have the book, but I think I might actually buy it after I made this bread.  I found the recipe HERE.  You have to make the buttermilk dough first, which makes a lot of dough.  I found out the hard way. I think I was supposed to only use a large chunk of dough to make one loaf, but ended up using all of the dough and had to cut it into two loaves.  So, I didn't double the cinnamon filling...which I should have.  Use this bread for toast or even cut it thick for French Toast...YUM!
I really think anyone could make this bread.  Don't think you have to be an expert, I'm definitely not!


Buttermilk Bread Dough {Adapted from Artisan Bread in Five Minutes a Day}


INGREDIENTS:
  • 2 Cups lukewarm water {between 100 and 110 degrees}
  • 1 cup lukewarm buttermilk {between 100 and 110 degrees, I highly recommend heating on stove}
  • 1 1/2 Tbsp. yeast
  • 1 1/2 Tbsp. salt
  • 1 1/2 Tbsp. sugar
  • 6 1/2 cups unbleached all purpose flour
DIRECTIONS:
  Mix the water and buttermilk together, making sure that they are between 100 and 110 degrees {use a candy thermometer if you have one}.  Whisk in the salt and sugar, then sprinkle the yeast on top, letting it develop {get a little foamy} for a few minutes.  Pour the yeast mixture into a large bowl or your stand mixer and mix in all of the flour in one addition.  YOu do not have to knead the bread, but use a wooden spoon {or dough hook if you're using you stand mixer} to make sure the flour is thoroughly incorporated.  Place the container in a warm place with a loose fitting cover and let rise for two hours.  After the dough has risen you are ready to bake, but the authors recommend letting it chill in the fridge first to make the dough easier to work with {I didn't}.


Cinnamon Bread {Adapted from Artisan Bread in Five Minutes a Day}
**Filling amounts are for ONE loaf of Buttermilk Bread**

INGREDIENTS: {SEE NOTE BELOW}
  • 1 1/2 pounds of buttermilk bread dough {about the size of a cantaloupe}
  • 1 1/2 tsp. ground cinnamon
  • 3/4 cup sugar {Next time I will use Brown Sugar!!}
  • 3/4 cup raisins, chopped {kids don't like raisins, so I left them out}
  • 1 egg beaten with 1 Tbsp. water for egg wash
  • Butter for the pan
DIRECTIONS:
  Butter a 9" by 4" bread pan, bottom and sides, and set aside.  Roll out the dough to a rectangle approx. 18" long and 9 " wide.  If the dough is not stretching well, let it rest for 10 minutes and continue to roll.  Mix the cinnamon, sugar and raisins together.  Brush the egg wash over the surface of the dough and sprinkle the sugar mixture evenly over the egg wash.  Roll the dough up, using a bit of egg wash to seal up the ends and the seam.  Place the roll in your bread pan and let sit in a warm place for at least an hour.  20 minutes before baking, heat your oven to 375 degrees.  Bake the bread for 35-40 minutes until nice and golden on the outside.  Let cool slightly before serving {I never do}.  Tastes amazing fresh out of the oven with butter!  Enjoy!

NOTE:  If you want to make two loaves, then double the filling mixture, and roll your rectangle out to 18" long and 12" wide.  Once you've rolled up your dough, cut in half and place in two buttered bread pans.  Also, next time I would put a little egg wash on top of the bread before it goes in the oven, and sprinkle with a little extra cinnamon-sugar mixture.  
**If you don't want to make two loaves, then use the extra dough to make rolls for dinner or a loaf of buttermilk bread for sandwiches.

Friday, January 21, 2011

Zucchini Cupcakes with Maple Cream Cheese Frosting


I really like trader joe's for a lot of things, but sometimes I just want to buy one jalapeno or two zucchinis...not six!  They've actually started selling a lot more "single" items, like tomatoes and bell peppers, but when it comes to some things, they still sell bulk.  Which brings me to my abundance of zucchini and what to do with it.  I came across this recipe the other day and honestly, it was the frosting that sold me!  I mean come on, what doesn't taste good with cream cheese frosting slathered on it?
Two out of my three kids ate them up no problem.  They are really good fresh out of the oven even without the frosting...

Zucchini Cupcakes {slightly adapted from here}


INGREDIENTS:

  • 1 1/2 cups all-purpose flour
  • 1/2 tsp. salt
  • 1/2 tsp. baking soda
  • 1 1/2 tsp. cinnamon
  • 1/2 cup granulated sugar
  • 1/2 cup brown sugar
  • 1 stick unsalted butter, melted
  • 2 eggs, room temp.
  • 1 tsp. pure vanilla extract
  • 1/4 cup plain yogurt
  • 1 cup zucchini, finely grated
1.  Pre-heat oven to 325 degrees.  Line a standard size muffin pan with 12 paper liners.  In a medium bowl, whisk together flour, baking soda, salt, and cinnamon.  Set aside.  In a large bowl, whisk together the sugars and butter.  Add in eggs, one at a time incorporating well after each addition.  Stir in vanilla, yogurt and zucchini.
2.  Fold dry ingredients into the zucchini mixture, and divide evenly among muffin liners.  Bake for 20-25 minutes, or until a toothpick inserted in the center comes out clean.  Let cupcakes cool in pan for about 10 minutes, then remove to wire rack.  

Maple Cream Cheese Frosting:
  • 1 stick unsalted butter, at room temp.
  • 8 ounces cram cheese, at room temp.
  • 2 cups organic powdered sugar {It actually has a nice maple flavor to it}
  • 3 Tbsp. pure maple syrup
  • 1 tsp. pure vanilla extract
Mix all ingredients together with an electric mixer until smooth.  Makes a nice amount of frosting, so be sure to refrigerate any leftovers!

Thursday, January 20, 2011

Chile Verde


There's nothing like a big pot of chile verde that's been simmering all day.  The spices, peppers, and browned meat smell so wonderful!  I'm a huge fan of anything that is covered in salsa verde.  The flavors are so intense, especially when the sauce is made fresh.  Now don't get me wrong, chile verde can definitely be made with salsa from the jar...I've done it many times.  But if you're in the mood for some authentic chile verde then give this recipe a try.  Just serve some flour or corn tortillas on the side to keep it simple, or roll it in a burrito, or enchiladas.  It's such a great filling for just about any mexican dish.  Now, if you don't want to use pork, I think chicken would work out just great too!  This recipe has been modified slightly from Simply Recipes.


Chile Verde {serves 8}


tomatillos, garlic, pasilla peppers ready to go in the oven


INGREDIENTS FOR SALSA VERDE:  
  • 10 tomatillos, husks removed then rinsed
  • 2 pasilla peppers
  • 1-2 jalapenos 
  • 1 Tbsp. fresh oregano
  • 1 bunch cilantro
  • 5 garlic cloves, unpeeled
  • salt to taste
  • 1 Tbsp. cumin
INGREDIENTS FOR PORK:  
  • 4 lb. pork roast, trimmed of fat and cut into 2 inch cubes
  • salt
  • freshly ground pepper
  • canola oil
  • 1 white onion, chopped
  • 2 garlic cloves, minced
  • 1-2 cups chicken stock
DIRECTIONS:

Peel and rinse tomatillos.  Cut in half and place cut side down on a foil-lined baking sheet.  Place un-peeled garlic and pasilla peppers on baking sheet as well.  Broil in oven 5-10 minutes, or until tomatoes and peppers are nicely blackened and soft.  Once peppers have cooled slightly remove the blackened skin.  Discard stem and seeds from peppers.  Peel garlic...the skin will come off nicely!  Place tomatillos, peppers, garlic, jalapeno, cilantro, oregano, and salt in blender.   I used about 2 tsp. salt.  Pulse until blended thoroughly.  Set aside.  
Cut pork into 2 inch cubes and season with salt and freshly ground pepper.  Heat a couple tablespoons of oil in large pot.  In batches, brown meat on all sides.  Move browned meat to plate and continue with the rest of the meat.  Be sure not to crowd the pot with the meat, otherwise it will not brown properly.  Once all meat is done and removed, add onions, minced garlic, 1 tsp. cumin, a little salt and pepper.  Soften onions and garlic for about 5 minutes.  Put meat back into pot, along with salsa verde and enough chicken stock to cover the meat.  I only added about 1 cup of chicken stock.  Bring to boil, then simmer on low for 2-3 hours.  Meat should be nice and tender.  Serve with warmed tortillas.

Meat and sauce getting ready to simmer

All done simmering...about 3 hours


Friday, January 14, 2011

Edna Valley Orange Martini


Oh, I love this time of year, when the oranges are so ripe and juicy that when you try to eat one, it just soaks your hands with juice!  There's nothing like the oranges that are grown out in Edna Valley.  They might not be very large or very easy to peel, but oh my, are they the most flavorful-juiciest oranges I have ever tasted!  Which is why they make the perfect juice for this drink.  The tartness of this Martini is what gives it that extra something and the champagne tops it off wonderfully.  Of course, you can use any oranges in this drink...I just happen to have a huge supply of these oranges.  But, if you can, try to find oranges with lot's of juice and a little bit of tartness to them.


EDNA VALLEY ORANGE MARTINI


INGREDIENTS: 
  • 2 parts Vodka
  • 3 parts freshly squeezed orange juice
  • 1 part triple sec
  •  Prosecco Champagne {or any other kind you like}
DIRECTIONS:
Add vodka, orange juice, and triple sec to cocktail shaker.  Add ice cubes and shake vigorously.  Strain into chilled martini glass then top off with some champagne.
ENJOY!     

Tuesday, January 11, 2011

Hummus


One of my long-time friends passed this recipe on to me.  It was a staple in his house and it is now one in ours too!  I know hummus is available at just about every grocery store around, but honestly, if you want to save a little money and treat yourself, you should definitely make this!  My kids absolutely LOVE it...especially when I buy flat bread and grill it for them.  I almost always double the recipe just to have a lot around, but it does make a good amount with the regular recipe.
Give it a try!

HUMMUS {adapted from my friend Mo}

INGREDIENTS:

  • 1 can garbanzo beans, drained and rinsed
  • 2 cloves garlic
  • 1/3 Cup lemon juice {freshly squeezed}
  • 2 Tbsp. Tahini {sesame seed paste, found at local grocery stores or at a Mediterranean store}
  • 2-3 Tbsp. extra virgin olive oil

DIRECTIONS:
Put garlic in food processor; blend.  Add beans, drizzle tahini, then add juice.  Pulse until smooth, scraping down sides a couple of times.  While food processor is going, drizzle in the extra virgin olive oil one tablespoon at a time until everything comes together and is smooth and creamy. 
Enjoy with flat bread, pita bread or pita chips.  

Sunday, January 9, 2011

Black and White Cookies


I'm SO glad I decided to try this recipe!  I've seen these made...mostly on t.v. featured at bakeries in New York.  They have always looked amazing, but kind of a task with 2 icings to make.  But I was in the mood the other day for a nice BIG cookie and so I stumbled upon this recipe from King Arthur Flour.  It gave a nice little description of these cookies and where they originated...New York City!  Apparently they are very common to find in the deli's around NYC.  Well, these big and beautiful cookies have definitely become one of our new favorites, with the white icing having a slight lead over the chocolate...

Black and White Cookies {adapted recipe from King Arthur Flour}

INGREDIENTS FOR COOKIES: {Makes 2 dozen large cookies}

  • 1 cup unsalted butter, room temperature
  • 1 cup granulated sugar
  • 1 1/2 tsp. salt
  • 1 Tbsp. baking powder
  • 1 tsp. grated lemon rind
  • 2 tsp. vanilla extract
  • 3 large eggs, room temperature
  • 4 1/2 cups All-Purpose Flour {I did use King Arthur brand}
  • 1 Cup milk {regular or low-fat; NOT non-fat}
  • *If you use salted butter, reduce the salt in the recipe to 1 tsp.
VANILLA ICING:
  • 3 1/3 cups confectioners sugar
  • 3 Tbsp. light corn syrup  
  • 3 Tbsp. hot water
  • 1/2 tsp. Vanilla exract {I used the clear vanilla extract, which keeps the icing white; Wilton's brand}

CHOCOLATE ICING:
  • 2 2/3 Cups confectioners sugar
  • 3 Tbsp. light corn syrup
  • 1/2 tsp. Vanilla extract
  • 1/4 cup hot water {increase hot water by tablespoons if icing becomes too thick}
  • 3/4 cup semisweet or bittersweet chocolate chips, melted
DIRECTIONS:
  1.  Preheat oven to 400 degrees.  Line 2 baking sheets with parchment paper.  
  2.  To make the cookies:  Beat together the butter, sugar, salt, baking powder, lemon, and vanilla till well combined.
  3.  Beat in the eggs one at a time, beating well after each addition.
  4.  Stir in the flour alternately wit the milk, beginning and ending with the flour.  Do this gently; do not beat.
  5.  Using a muffin scoop or a 1/4-cup measure, drop the dough onto the prepared baking sheets.  **The dough will be sticky, so you'll probably have to use a spoon to help get the dough out of the scoop.  With wet fingers, flatten/spread the dough to a 3"-diameter circle.  Leave 2 inches between each cookie; they'll spread.
  6.  Bake the cookies for 10-12 minutes, until they're set, and are very light golden brown around the edges.  If there's no sign of brown, that's OK!  Cookies baked for 10 minutes will be very moist.  Cookies baked for 12 minutes will be drier, and more "authentic".  
  7.  Remove the cookies from the oven, and cool them right on the pan.  As they cool, prepare the icing.  
  8.  To make the vanilla icing:  Whisk together the confectioners sugar, corn syrup, and hot water.  For a nice vanilla flavor, add the vanilla; if you're not using "clear vanilla extract", you may want to omit the vanilla to make the whitest icing.
  9.  Spread the icing over half of each cookie.  Place them on a rack to set while you make the chocolate icing.  
  10.  To make the chocolate icing:  Combine the confectioners sugar, corn syrup, vanilla, hot water, stirring until smooth.  
  11.  In the microwave, or in a pan set over very low heat, melt the chocolate.  If you're melting in the microwave; heat for 1 minute, stir, then heat additional 20 seconds, stir, and repeat as necessary.  
  12.  Add the melted chocolate into the sugar mixture, stirring till well combined.  **If you need to adjust the icing to be more spreadable, add 1 Tbsp. of hot water at a time to reach the desired consistency.  Just be careful not to make the icing too runny!
  13.  Spread the icing on the uncovered half of each cookie.  You'll have a generous amount of icing, so don't be afraid to pile it on.  
  14.  Set the cookies back on the rack, and allow them to rest for about 30 minutes, till the icing is set.  THIS IS THE HARDEST PART...WAITING!
  15.  For best storage, wrap each cookie individually, in plastic wrap, and store at room temp.

Saturday, January 1, 2011

French Onion Soup


Pure comfort food...that's exactly what this soup is to me!  It's got the perfect top, full of ooey gooey cheese and crusty bread.  Now, the process is not quick, but it's definitely easy.  Once you get the onions in the pot, you can pretty much leave them for a while and then come back to wonderfully caramelized goodness!  I suppose you can probably use any type of onion, but I chose the sweet onions.  Now you'll notice I got a little too bread happy and shoved 2 pieces of bread in...I like bread and cheese!  I'm sure your bread rounds will look much nicer than mine!
A nice caesar salad goes really well with this soup.

FRENCH ONION SOUP {my version of Alton Brown}
{serves 4}


INGREDIENTS:

  • 5 sweet onions {vidalia}
  • 2 Tbsp. butter
  • kosher salt
  • 2 Tbsp. sherry
  • 1 Cup red wine
  • 2 Cups beef broth
  • 2 Cups chicken broth
  • thyme sprigs and Bay Leaf
  • freshly ground black pepper
  • 1 loaf crusty french or sourdough baguette
  • 1/2 cup gruyere cheese, shredded
DIRECTIONS:
 Slice onions in half lengthwise then finely slice again into half moons.  Melt butter in pot over medium-low heat; add a layer of onions and sprinkle with a little salt.  Continue layering onions and salt until all onions are in the pot.  Do not stir onions until they have all sweated down, about 15-20 minutes.  After that stir occasionally until all onions are a dark caramelized color, which should take about 45 minutes to an hour.  At this point I left them on the stove top and came back ever now and then to stir.  Don't worry about burning.  Add the sherry and wine and cook down until most liquid has absorbed.  Add beef broth, chicken broth, a couple thyme sprigs and a bay leaf.  Bring to slight boil, reduce heat to simmer; about 15-20 minutes.  
Meanwhile, heat your broiler and get out a baking sheet. Shred the cheese and cut bread rounds to fit the oven-safe soup bowls or ramekins you will be using.  Toast bread rounds and set aside.  Season soup with more salt and freshly ground pepper as desired.  Don't forget to remove the thyme sprigs and bay leaf!!  Ladle soup into the oven-safe bowls, float the toasted bread rounds on top, and cover those suckers with LOTS of cheese!  Place bowls on the baking sheet and put under broiler and broil until cheese is bubbly and melted; about 5 minutes.  Watch carefully!!

LinkWithin

Related Posts with Thumbnails