Wednesday, September 22, 2010

Quinoa-Stuffed Peppers with Basil Sauce


Ok, so I've never made stuffed peppers before!  When I think of stuffed peppers, I kind of get turned off because they make me think of ground beef and rice.  I guess that's why I've never made them...until now!  Oh, when I saw this recipe I wanted to make these, or have Giada make them for me, instantly!
Yes, I gave it away, it's another Giada recipe!  The kicker though, is the Basil Sauce that goes over these peppers just before serving...OMG!  This sauce is so versatile, it could literally be used alongside anything...chicken, fish (we had Salmon with our peppers and poured some over the Salmon), Steak, pasta, etc.
Super easy dish that can be a main dish or a side.  Like I said, we grilled some Salmon and it made for the perfect meal!  Here's how I adapted her recipe below.

Here's my note on Quinoa if you're not sure what it's all about:  Quinoa is a tiny ancient grain...similar in texture to Couscous.  It's high in protein AND Wheat and Gluten Free.  A perfect choice if you have any sensitivities or allergies to wheat or gluten.  My kids really like it!

Quinoa-Stuffed Peppers with Basil Sauce {Makes 4 }


INGREDIENTS:


Filling:
  • 1 cup Quinoa {Rinsed throroughly}
  • 2 cups water
  • 1/2 tsp. ground cumin
  • 1 cup canned garbanzo beans, rinsed and drained
  • 1/4 cup oil-packed sundered tomatoes, chopped
  • 1 packed cup chopped baby spinach leaves
  • 1/2 cup {4 oz.} crumbled feta cheese
  • 1/4 cup extra-virgin olive oil, plus more for drizzling
  • Kosher salt and freshly ground black pepper
  • 4 large bell peppers {I used red, orange and yellow}
  • Hot water, as needed
Sauce:

  • 1 packed cup fresh basil leaves
  • 1/2 cup {about 4 ounces} creme fraiche
  • 3 Tbsp. extra-virgin olive oil
  • 1 Tbsp. water
  • 1 garlic clove, coarsely chopped
  • 2 tsp. fresh lemon juice
  • 1/4 tsp. sugar
  • 1/4 tsp. salt, plus extra, as needed
  • 1/4 tsp. freshly ground pepper, plus extra, as needed


DIRECTIONS:
  1. Preheat oven to 400 degrees.
  2.  Filling:  in a medium saucepan, bring the chicken broth, cumin and quinoa to a boil over medium-high heat.  Cover the pan and reduce heat to low, for 10-15 minutes or until all liquid has absorbed.  Put the quinoa in a large bowl and add the bean, sun-dried tomatoes, spinach, feta and 1/4 cup olive oil.  Season with salt and pepper, to taste.  Stir until all the ingredients are combined.  
  3. Slice the tops off the peppers and remove all the ribs and seeds.  If necessary, cut a very thin slice from the base to help the peppers stand up.  Stuff the peppers with the filling and drizzle the tops with olive oil.  Put the peppers in an 8 inch square or oval baking dish.  Fill the baking dish with 3/4 -inch hot water and bake until the filling is golden and the peppers are cooked through, about 55-60 minutes.  NOTE:  If the filling begins to brown too quickly, cover the pan with foil.
  4.  Sauce:  In a blender, combine the basil, creme fraiche, olive oil, water, garlic, lemon juice, sugar, salt and pepper.  Blend until smooth.  Adjust he seasoning with salt and pepper, to taste.  
  5.  Remove the peppers from the oven and arrange on serving plates.  Spoon the sauce around the peppers and serve!
Here's the quinoa up close...it's so cute!

Nice big peppers

pretty simple ingredients

oh, forgot one...love these things!


Just gave a nice drizzle of olive oil and now for the oven

Monday, September 20, 2010

Family recipe...Lasagna for a crowd


Although I can't claim this recipe as my own, I can claim to be in the lineage of some amazing cooks!  Like I've said before, my grandma, my great-aunt and my mom have all played a huge roll in my love for food and cooking.  As young as I can remember my mom was making this lasagna recipe.  It's always been a HUGE hit in our family and extended family...oh, and with our cats too!
A funny story behind this lasagna:  one day my mom had made lasagna for dinner and took it out of the oven to let it cool.  My dad had just arrived home after a long days work and was really looking forward to his big piece of lasagna.  Well, there must have been a point when no one was looking, so our cat decided he would literally jump into the lasagna...with ALL FOUR PAWS!  Once we came in the room, we heard the commotion and (us kids) knew it wasn't good!  All I have to say was there were not-so-pretty words and Mr. purrbody (his name should have been Garfield) flying through the air.  It wasn't a very pleasant evening in our home and honestly I can't even remember what we had for dinner that night.


Lasagne {Mangano Family recipe}

INGREDIENTS FOR SAUCE:  
{I save about 2 cups of the sauce to heat up & pour over pieces of lasagna...yes, I love this sauce!}
  • 2 lbs. ground sirloin
  • 2 cloves garlic, minced
  • salt 
  • 1 can {12 oz} tomato paste
  • 1 large can {32 oz} whole tomatoes
  • 1 large can {32 oz} crushed tomatoes {I use about 3/4 of the can}
INGREDIENTS FOR FILLING:
  • 1 container {16 oz} Ricotta Cheese
  • 1/2 cup fresh grated parmesan cheese
  • 2 eggs
  • 1/4 cup fresh parsley, chopped
  • 1 tsp.salt 
  • 1 tsp. pepper
REMAINING INGREDIENTS:
  • 16 oz. Mozzarella Cheese, shredded
  • shredded parmesan cheese {optional}
  • 3/4 box lasagna noodles


DIRECTIONS:
1.  Fill a large stock pot with water and cook noodles according to package.  **I like to drain, then lay them out on a parchment-lined baking sheet to cool while I'm prepping the other ingredients.
2.  Heat a large saucepan to medium-high heat.  Add ground sirloin and cook, breaking up meat with spoon.  Season with salt while the meat is browning.  Once meat has browned, add minced garlic cloves and cook for 2 minutes, to release the garlic flavor.  Add tomato paste, whole tomatoes and 3/4 of the crushed tomatoes.  Stir and break up the large tomatoes; bring to boil.  Once bubbling, reduce to low simmer for 25-30 minutes.  Season with more salt to taste.  
3. While sauce is simmering, make filling.  In a medium bowl, combine eggs, ricotta, 1/2 cup grated parmesan, 1/4 cup fresh parsley, salt & pepper.  Mix thoroughly and set aside.
4.  Spray a 9 by 13 pan with cooking spray.  Layer 1/2 lasagna noodles, 1/2 ricotta mixture, 1/2 sauce, 1/2 shredded mozzarella & some shredded parmesan {optional}.  Repeat layers, finishing with mozzarella.  Bake in pre-heated 350 degree oven for 30-40 minutes or until golden brown and bubbly.

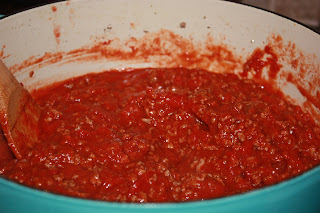
This sauce is perfection all by itself...
                                    
Ricotta Mixture

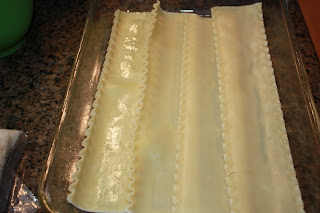
first layer of noodles...I use 4

All ready for the oven


My favorite part....the corner piece!

Saturday, September 18, 2010

Chicken Corn Chowder


There's nothing like a good corn chowder recipe and this one has by far become one of my favorites!  
It actually became quite the discussion the other night because my husband decided that it wasn't thick enough to be called a chowder, but my thought is that if it's chunky and has milk in it, then it's considered a chowder.  So, I looked up the definition and it gave me this: "A thick soup containing fish or shellfish, especially clams, and vegetables, such as potatoes and onions, in a milk or tomato base."
So, it looks like we're both partially correct!  Anyway, this chowder was really easy to make because it uses frozen corn and store bought rotisserie chicken.  I found this recipe on whipped the blog who adapted it from Bon Appetit (Oct. 2003).

Here's my version below.


Chicken Corn Chowder


INGREDIENTS: {Makes 6 main dish servings}

  • 6 bacon slices, chopped
  • 1 Tbsp. butter
  • 1 small onion, chopped
  • 1 orange or red bell pepper, diced
  • 1/4 cup all purpose flour
  • 6 cups chicken stock 
  • 2 cups 1/2-inch cubes banana or butternut squash (I used banana squash)
  • 1 extra large russet potato, peeled and cut into 1/2-inch cubes
  • 1-2 crookneck yellow squash, cut into 1/2-inch cubes
  • 1 Tbsp. fresh thyme, chopped
  • 1 16-ounce bag frozen corn kernels
  • 1 cup half & half {or whole milk}
  • 2 cups shredded chicken {from store bought rotisserie chicken}
  • salt & pepper to taste
DIRECTIONS:
  Cook bacon in a large pot over med-high heat until crisp.  Using slotted spoon, transfer bacon to paper towels to drain.  *Set aside for garnish. Pour off all but 1/4 cup drippings from pot.  Add butter to pot; melt over med-high heat.  Add onions and 1/2 cup of bell peppers.  Saute until onions are soft, about 5 minutes.  Add flour; stir about 1-2 minutes to cook off the raw flour taste.  Mix in broth, stirring frequently to throughly incorporate.  Add squash, potatoes, and thyme; bring to boil.  Reduce heat to low and simmer uncovered until squash and potatoes are tender, about 10 minutes.  Add corn, half & half, and 1/2  cup bell peppers, and chicken.  Simmer until corn is tender, about 5-10 minutes.  Season with salt & pepper to taste.  Ladle chowder into soup bowls, sprinkle with bacon & serve!
Ok, so that's the recipe and I think it's pretty darn good how it is, but if you want to try thickening it up to make more of a "chowder" like consistency, I would suggest these things:
1.  mix together 1 Tbsp. flour & 1 Tbsp. water; add to pot while simmering the corn.
OR
2.  add 1/2 to 1 cup shredded cheddar cheese the last couple minutes of simmering time.


All the veggies...lot's of orange going on here!

The "meat" to the chowder


simmering & smelling so good

Thursday, September 16, 2010

Peanut Butter Chocolate Chip Cookies


The frightening thing about these cookies...one is never enough!  Something about that peanut butter, chocolate chip combination makes these big guys irresistible.  Oh, and if you like big, soft cookies, then again, you'll LOVE these!  They don't last very long in our home...

Peanut Butter Chocolate Chip Cookies {Fresh Everyday by Sara Foster}

INGREDIENTS: {Makes about 2 dozen 3-inch cookies}
  • 8 Tbsp. {1 stick} unsalted butter, softened
  • 3/4 cup creamy peanut butter {I really like Trader Joe's creamy organic with no sugar}
  • 1 cup packed light brown sugar
  • 1 large egg
  • 1 tsp. pure vanilla extract
  • 1 1/2 cups all-purpose flour
  • 1 tsp. baking soda
  • 1/4 tsp. salt
  • 1 cup semisweet chocolate chips
DIRECTIONS:
  1. Pre-heat oven to 350 degrees and line two baking sheets with parchment.  I like to just re-use the first baking sheet, but if you want to save on time, go ahead and use two.
  2. Cream the butter, peanut butter, and brown sugar together in a large bowl with an electric mixer on high speed until fluffy.  Add the egg and vanilla and mix until all the ingredients are combined
  3. In a separate bowl, stir the flour, baking soda, and salt together.  Stir the flour mix into the peanut butter mix until the flour is no longer visible.  Stir in the chocolate chips.
  4. Here comes the part that makes these cookies BIG!  Scoop the dough with a 1/4-cup measure or large scoop and drop onto the prepared coo sheet, leaving 3 inches between the cookies.  I like to gently flatten the cookies with the palm of my hand, but the recipe calls for using a fork to make the pattern of a traditional peanut butter cookie.  Do what you like!
  5. Bake the cookies on a center rack for 15-17 minutes, rotating the pans halfway through for even baking, until the cookies are lightly golden brown.  {I like to undercook these just a little, so they stay soft}.  Let the cookies cool on the baking sheet for 5 min. before transferring them to a wire rack.  

Simple ingredients

The mixer at work!

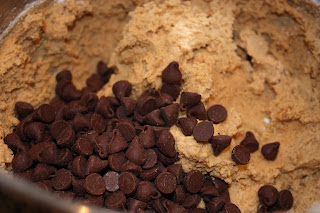
My favorite part...chocolate!!!


Wednesday, September 15, 2010

Chicken Soup with Orzo Pasta


This past weekend was cold and foggy...it seriously felt like winter!  With two out of the three kiddos being sick, I figured it would be a perfect weekend to have some soup around.  The last time I made chicken soup I didn't feel like it had much flavor to it, so this time I decided to roast my own chicken to make some hearty Chicken Stock.  It really wasn't difficult to make at all and it was well worth the time!
Also, one of my new favorites is Orzo pasta.  It's such a cute, tiny little pasta that I knew the kids would like it!  It's actually pretty versatile too.  A couple weeks back I browned it in a little butter then added some chicken broth, let it simmer and served it like rice.  It was GOOD!
Anyway, here's my version of Chicken soup...pretty simple, but it definitely satisfies!

Here's the recipe for chicken stock, but if you want to skip this part, go right ahead! 
Chicken Stock:
  • 1 whole roasting chicken
  • olive oil or melted butter
  • sea salt & pepper
  • 1/2 lemon
  • fresh thyme, sage & parsley sprigs (or whatever you have on hand)
  • 1 onion cut in half
  • 2 ribs celery, roughly chopped
  • 2 large carrots, roughly chopped
  • whole peppercorns (about 1 tsp.)
  • Large stock pot
  • Chicken Base (I used "Better than Boullion")
*Rinse chicken and pat dry.  Be sure to remove everything from the cavity first!  Have a large roasting pan ready...you can set it on a rack over the roasting pan if you have one.  Rub chicken all over with olive oil or butter and season all over with salt & pepper.  Place the lemon half and the herb sprigs into the cavity of the chicken.  Place the onion, carrots, celery and peppercorns in the bottom of roasting pan. Heat oven to 425 degrees, place chicken in oven then decrease heat to 375 degrees.  Roast for about 2 to 2 1/2 hours or until a thermometer reads 180 degrees.  Remove all meat from chicken and set aside.  Remove as much skin as you can and place the carcass in a large stock pot.  Add the roasted veggies to the pot and fill the pot with enough water to cover the carcass.  Add to the pot 1 Tbsp. of chicken base (I bought a kind called "Better than Boullion".   Bring pot to boil and let simmer for 2-3 hours.  Wait to season with more salt until it's been boiling for at least an hour.  Strain a couple of times and either use stock immediately or refrigerate.  Skim off fat then place in ziploc bag to freeze for later use.


Chicken Soup with Orzo Pasta

INGREDIENTS:
  • 2 cups shredded chicken (the roasted chickens from the store work great too!)
  • 2 large carrots, finely diced
  • 2 celery ribs, finely diced
  • 1/4 cup fresh parsley, chopped
  • 3/4 cup Orzo pasta
  • 8 cups chicken stock (homemade or store-bought)
  • 1 cube chicken boullion
  • salt & pepper to taste
DIRECTIONS:
   Heat chicken stock to a simmer in large soup pot.  Add carrots, celery and boullion and let cook for 10 minutes.  Add Orzo, chicken. parsley, salt & pepper to taste.  Cook Orzo until plump...about 6 minutes. 
Serve & enjoy! 


Ingredients


homemade chicken stock

Monday, September 13, 2010

Daisy's Journey

Well, the first couple weeks of school have started off with sickness! My little kindergartner was down and out last week and this week I've got my 2nd grader home.
I always feel so bad when they get these fevers that just don't seem to quit! Tyler is one of those kids who doesn't like to be sick, so he's trying all he can to prove to me that he's fine, but those eyes don't lie! I'm sure he'll be back to school this week and back with his friends!
I was browsing a friends blog this morning and was reminded of a little girl who's been having the fight of her life at such a young age. Thinking of her puts all things into perspective!
Her name is Daisy and today is a BIG day for her as she has surgery to remove a tumor in her little body.

Daisy's tumor shrank from the size of a large grapefruit to the size of a slice of a small tangerine! Praise the Lord!!! - britt merrick (9/3/10)


I wanted to share her prayer link and the video of her journey...
What a beautiful girl and an amazing family!

Wednesday, September 8, 2010

Mushroom, Goat Cheese & Leek Tart

Oh, this was so incredibly good! My mom and I got together one Sunday afternoon a few weeks back and cooked together. It's always so much fun being in her kitchen & cooking with her! I used to love watching and helping my mom cook as a little girl and now that I'm older, I still love helping her in the kitchen! So we figured out our menu and got down to business.
The recipe for this tart came from Williams-Sonoma and it makes an amazing appetizer.

Mushroom, Goat Cheese & Leek Tart

INGREDIENTS:
  • 3 Tbsp. unsalted butter
  • 3 lbs. leeks, white parts and 1 inch of pale green parts, thinly sliced
  • 2 tsp. fresh thyme leaves
  • 1 bay leaf
  • 1/2 cup chicken stock
  • 1 tsp. salt
  • 3/4 tsp. freshly ground pepper
  • 1/3 cup creme fraiche
  • 3 oz. soft goat cheese, crumbled
  • 1/2 lb. cremini mushrooms, cleaned & sliced
  • flour for dusting
  • 1 sheet puff pastry, thawed to room temp.
DIRECTIONS:
In a fry pan over med-high heat, melt 2 Tbsp. butter until it foams. Add the leeks and saute until translucent, 4-5 min. Add the thyme, bay leaf, stock, 1/2 tsp. salt and 1/2 tsp. pepper. Reduce heat to low, cover and simmer until the leeks are nearly tender, about 15 min. Uncover and cook, stirring occasionally and being careful not to let the leeks brown, until almost all the liquid has evaporated, about 10-15 min. more. Remove and discard bay leaf.


Transfer the leeks to a bowl. Stir in the creme fraiche and goat cheese until well mixed.

I wiped out the same fry pan and heated it up to med-high heat again. Add the remaining 1 Tbsp. butter until it foams. Add the mushrooms, the remaining 1/2 tsp. salt and the remaining 1/4 tsp. pepper and saute until the mushrooms are soft and have released their juices, 3-5 min.

Pre-heat oven to 400 degrees. Lina a large rimmed baking sheet with parchment paper.
Most store bought puff pastry dough already comes in the shape of 10 by 12 inches, but if for some reason yours doesn't, roll out the dough to 10 by 12 inches. Transfer dough to baking sheet. Spread the leek mixture to within 1 inch of the edge of the dough, and fold the edges of the dough over the filling to make a tart.

Bake until the crust puffs and both the crust and the leeks are golden, about 15 min. Scatter the mushrooms over the leeks and bake for 5 min. more.
Let the tart stand for 5-10 min. Cut into bite-size pieces and serve warm.


Monday, September 6, 2010

Shrimp Tacos with Poblano-Avocado Salsa

What a great weekend!
Drove up to Shaver Lake for a fun, but super relaxing weekend with some great friends.
We ate WAY too much, but I think it had to do with that mountain air! Since I have food
on the mind, I thought I'd share a recipe that is all about summer grilling!
We've been grilling like crazy this summer and the last couple meals from the grill have been really easy! A couple weeks ago I barbecued some baby-back ribs for my son's campout party and a couple days after that I grilled up these shrimp tacos. They were delicious! I didn't want to skimp on the shrimp, so I went ahead and bought the large prawns (uncooked), then had the daunting task of peeling all of those suckers! Once they were all cleaned up, the prep for this dinner was super simple! Just about everything went on the grill, which made it one of those dinners where I didn't have to spend more time cleaning up then it took to prep the meal...ever had those nights??
Anyway, I know summer is pretty much officially over, but these are simple enough to make on the grill or on a stove-top grill pan. Oh, and this poblano-avocado salsa would be killer with some tortilla chips! The poblano chiles don't have much heat at all and they give the salsa such great flavor! If you aren't a shrimp person, I think that a marinated flank steak would make a great substitute!


Shrimp Tacos with Poblano-Avocado Salsa (Makes about 8 tacos)
(adapted from: Webers Real Grilling Cookbook)

SALSA INGREDIENTS:
  • 1 ear corn, husked (I made 3 ears & gave my kids each some corn to eat separately)
  • 3 scallions, white and light green parts only
  • Extra Virgin Olive Oil
  • 1 medium poblano chile
  • 1 cup grape tomatoes, cut in half
  • 1 large Hass Avocado, cut into 1/4 inch dice
  • 1 Tbsp. finely chopped fresh Cilantro
  • juice from 1 lime
  • 2 cloves garlic, minced
  • 1/2 tsp. kosher salt, divided
  • 1/2 tsp. freshly ground pepper, divided
32 large shrimp (UNCOOKED), about 1 1/2 lbs. peeled and deveined
8 flour tortillas (8 inches)

DIRECTIONS:
To make the salsa: Brush the corn and scallions with olive oil. Grill the corn until browned in spots and tender, the scallions until lightly grilled, and the chile until black and blistered in spots, over direct medium heat, turning occasionally. **The corn and chile will take 10-12 min. and the scallions will take 3-4 min. Trim the root ends off scallions; finely chop the remaining parts and put them in a medium bowl. Cut the kernels off corn and add to the bowl. WHen cool enough to handle, peel off the loosened bits of skin from the chile and discard, along with the stem; finely chop the remaining parts of the chile and add to bowl. Add the remaining salsa ingredients, including 1/4 tsp. salt and 1/4 tsp. pepper. Drizzle 1 Tbsp. of olive oil into the bowl and mix thoroughly. Set aside.
Brush shrimp all over with oil and season with the remaining 1/4 tsp. salt and 1/4 tsp. pepper. Grill over direct high heat until the shrimp are firm to the touch and just turning opaque in the center, 2-4 minutes, turning once. Grill the tortillas over medium heat just until warm (30-60 seconds).


Corn, scallions and Chile just off the grill

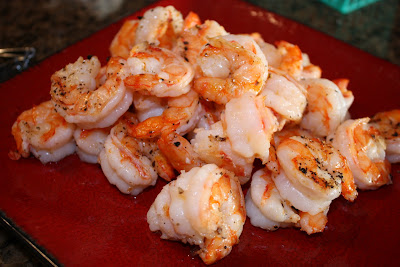
Juicy shrimp

Thursday, September 2, 2010

9 Years Old...Happy Birthday Jaden!


BIRTHDAY BOY!


9 years ago today I became a mommy and my life forever changed!
Jaden Andrew came into this world kicking and screaming and I knew I was in for it!
Boy has he grown up so quickly...much faster than our other two kids. I think it has something to do with being the first born! Everyone was waiting for him to talk, walk, ride a bike, etc. In a way maybe we pushed him to grow up so fast and now I'm praying it would just slow down!
He has such a sweet heart and has always commanded center stage (at home). I love this picture because it truly depicts him...busy trying new things. I remember the day I took this picture too. I heard some singing and strumming coming from his room so I grabbed the camera and I found him, with his little ukulele in his lap and all of his little instruments around him signing his heart out. I thought, whoa, a one man band! Always been such a silly boy with a strong passion to conquer whatever comes his way.
My prayer has always been that he would grow in the grace and knowledge of Christ's love for him and to be confident of who he is in Christ.
Kind of fitting that the mascot at his school is the Conqueror..."Yet in all these things we are more than conquerors through Christ that loved us." (Rom. 8:37)

LinkWithin

Related Posts with Thumbnails