Thursday, October 28, 2010

shredded tri-tip taquitos


 I don't know why I don't make these more often.  They make for a super simple dinner and my kids absolutely love them!  I've made them before with shredded chicken and they are just as good!  I'm actually not much of a beef person, but there are a few kinds of meat that I like slow cooking so they get really tender and easy to use in many different ways!  The nice thing about making the meat this way, is you could make it the day before, shred it up, then just re-heat the meat and roll up your taquitos just before dinner time the next day.  I served them with lot's of sides for my kids to dip the taquitos in...sour cream, guacamole, and refried beans sprinkled with cheese.  A great quick meal!

INGREDIENTS FOR MEAT:
  • 2-3 lbs. tri-tip roast {or any other meat you like}
  • garlic salt
  • black pepper
  • 1 jar {12-15 oz. salsa}
DIRECTIONS:
  Place tri tip in slow cooker or a large dutch oven.  Season all over with garlic salt and black pepper.  Pour salsa on top of meat.  If you are using slow cooker, cover and heat on LOW for 10 hours or HIGH for 5-6 hrs.  If you are using a dutch oven; cook at 350, covered, for 1 hr. or until it shreds easily.  

INGREDIENTS FOR TAQUITOS:
  • canola oil
  • corn tortillas
  • shredded tri-tip
DIRECTIONS:
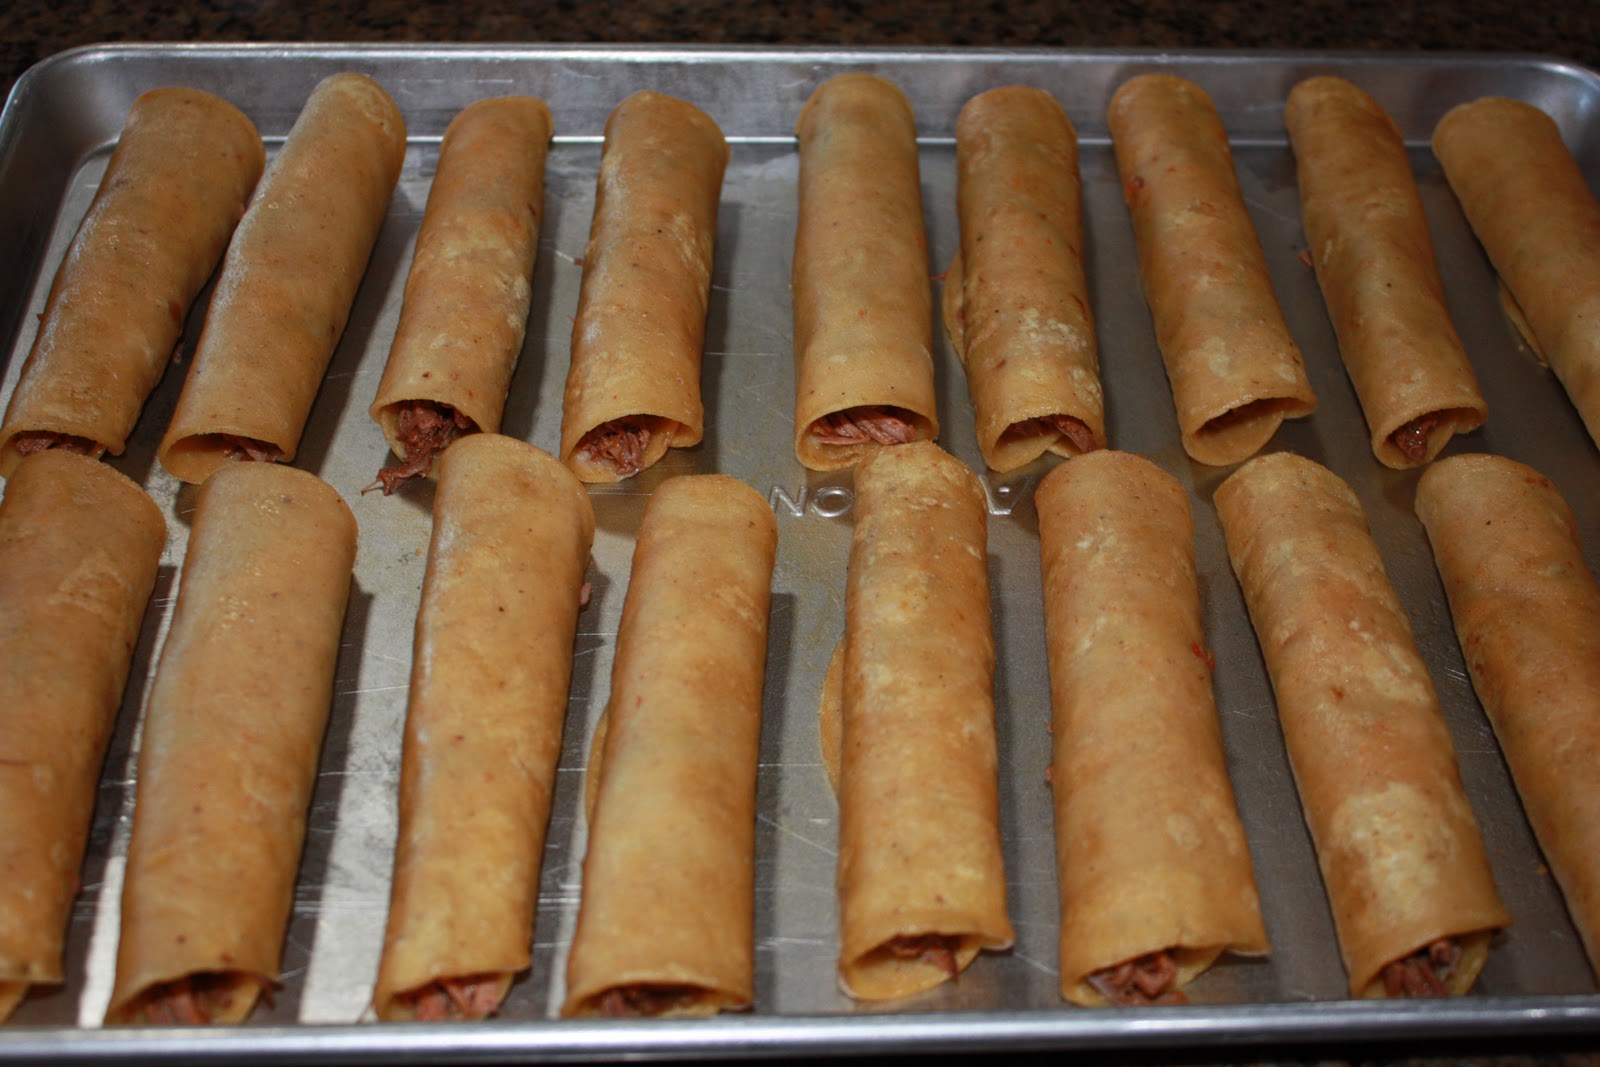
  Heat a large skillet over medium heat.  Add a small amount of oil and in batches, lightly soften tortillas {until pliable} and stack on paper towel lined plate.  Once all the tortillas are softened, place about 2 Tbsp. of meat near one side of tortilla.  Roll up tightly and place seam-side down on a large greased baking sheet.  Heat oven to 400 degrees and cook in oven for 15 minutes, or until golden brown and crispy.  Serve warm!   

ACCOMPANIMENTS:
  • sour cream
  • guacamole
  • refried beans {try refried black beans, they're good!}
  • shredded cheese


All rolled up!

Tuesday, October 26, 2010

Rice Pilaf with Mushrooms and Green Onions


  We love rice pilaf in this house!  The kids devour it and so do I!  It's one of the easiest side dishes to make, but I do admit, it has one draw back...lot's of butter!  You could definitely scale it down if you like, but I've tried and it just doesn't taste the same to me.  Well, I decided to get creative and add some mushroom and green onions to the rice pilaf.  Anything with mushrooms in it makes me happy, and this did the job!

Rice Pilaf with Mushrooms and Green Onions

INGREDIENTS: {serves 6-8}
  • 6 Tbsp. butter
  • 2 cups long grain rice
  • 1 cup thin, cut vermicelli
  • about 4 cups chicken broth
  • salt and pepper to taste
  • 1 cup button mushrooms, chopped
  • 3 green onions, sliced
  • 2 Tbsp. butter {to saute mushrooms and onions}
DIRECTIONS:
  Heat a large pot to medium-high heat.  Add butter and melt until foamy.  Pour in vermicelli and cook until golden brown, about 5 minutes.  Add rice and stir together for another minute.  Pour in chicken broth and season with salt and pepper to taste.  Bring to boil then simmer with lid on for 15-20 minutes.  Meanwhile in a skillet, melt 2 Tbsp. butter and add chopped mushrooms and onions.  Saute for about 5 minutes or until soft.  When rice is done, add mushrooms and onions to the rice pot and stir to combine.  Season with more salt and pepper if desired.  Enjoy!


There's that sizzling butter!

I like a nice brown color to the vermicelli

Sunday, October 24, 2010

Pan Roasted Brussels Sprouts with Crispy Prosciutto


  Last year I discovered a love for brussels sprouts.  I know...eeeewww, right?  Well, that's what I thought before I tried them prepared similar to this at one of our favorite restaurants.  Honestly, I had never tried them up until last Fall because I had always thought they were a frightening vegetable!  They're actually really tasty and would make a perfect side dish to one of your Fall dinners.  Try them and you will thank me...hopefully!

Brussels Sprouts with Crispy Prosciutto {Serves 4-6}

INGREDIENTS:

  • 1 Tbsp. Olive Oil
  • 1 lb. brussels sprouts, outer leaves removed and halved lengthwise
  • 3 oz. thin Prosciutto, roughly chopped
  • 1/4 to 1/2 red onion, thinly sliced
  • white balsamic vinegar
  • Kosher Salt 
  • freshly ground black pepper

DIRECTIONS:
  In a pot of boiling water, cook brussels sprouts for 5 minutes then drain.  In a large fry pan, heat olive oil over medium-high heat.  Cook prosciutto pieces until crispy and remove to plate.  Add onion slices and saute until soft, about 5-7 minutes.  Add brussels sprouts to the pan and cook along with the onion for about 5 minutes more or until brussels sprouts begin to brown.  Reduce heat to medium-low then add about a couple swirls {about 2 Tbsp. or so} of the white balsamic vinegar the last 2 minutes of cooking.  Season with salt and pepper, add prosciutto, and stir to combine.  


Wednesday, October 20, 2010

Artichoke Gratinata


  Artichokes are one of my most favorite vegetables!  I love everything about an artichoke...especially the heart!  I remember my mom used to make fried artichoke hearts when I was little and they were amazing!  So, my mom and I planned a big dinner a while back and found this side dish from our Giada Cookbook Giada's Kitchen.  It was extremely easy and we all enjoyed it!  The picture above was taken just before it went in the oven...then we ate it all up before I could get a finished picture!

Artichoke Gratinata {adapted from Giada De Laurentiis, Giada's Kitchen}
{Serves 4}

INGREDIENTS:

  • 3 Tbsp. olive oil
  • 2 garlic cloves, minced
  • 1 lb. frozen artichoke hearts, thawed
  • 2 Tbsp. chopped fresh flat-leaf parsley
  • 3/4 tsp. salt
  • 1/4 tsp. freshly ground black pepper
  • 1/8 tsp. red pepper flakes
  • 1/4 cup chicken broth
  • 1/4 cup white wine {she uses Marsala in her recipe}
  • 1/4 cup half and half or heavy cream
  • 2 Tbsp. unsalted butter
  • 1/3 cup plain breadcrumbs
  • 1/3 cup freshly grated Parmesan cheese
DIRECTIONS:
  Preheat the oven to 450 degrees.  Warm the olive oil in a skillet over medium-high heat.  Add the artichoke hearts, parsley, salt, pepper, and red pepper flakes and saute until the artichoke hearts are starting to brown at the edges, about 3 minutes.  Add the chicken broth and wine and simmer for 3 minutes.  Add the cream and heat 1 minute more.  Transfer the artichoke mixture to a 1 1/2 quart baking dish {or you could use individual gratin dishes}.  
Melt the butter in the same skillet used to cook the artichokes.  Add the bread crumbs and stir to coast with the butter.  Stir in the Parmesan, then sprinkle the bread-crumb mixture over the artichokes.  Bake until the top is golden, about 10 minutes.  


Who Knew? Thanks Tillamook!

Who Knew that one of my recipes would be somewhere other than here?!?!
Well, apparently Tillamook liked my Grilled Cheese recipe and it's "post of the day"!
Kind of funny...maybe they'll send me a months worth of cheese???  Just throwing it out there!
Anyway, sorry about the lame post, but I thought it was note-worthy!

~Julie

Monday, October 18, 2010

Cinnamon-Sugar Donut Muffins


  Breakfast is almost always a battle in our home.  Trying to get all three of my kids to like what I'm serving for breakfast is never an easy task.  One kid wants one thing while the other kid wants something else and then there's always one who doesn't even want to eat at all.  I feel like a short order cook A LOT!  So, I'm constantly looking for recipes to try that will satisfy them all.  I know, I should just throw a bowl of cheerios in front of them and ignore the whines, but I really do enjoy seeing their smiling faces when they come in the kitchen and get excited about breakfast!
Well, these little muffins were definitely a winner.  They didn't take much time to make, they are actually pretty healthy, AND most importantly, everyone enjoyed them!
This particular recipe came from HERE, which I slightly adapted.

Cinnamon-Sugar Donut Muffins {adapted from bakedperfection.com}
{Makes 12 muffins}

INGREDIENTS:

  • 1 Cup whole wheat flour
  • 1 Cup all-purpose flour
  • 1 Tbsp. baking powder
  • 1/2 tsp. baking soda
  • 1/2 tsp. salt
  • 1 tsp. cinnamon
  • 2 large eggs
  • 1 cup plain low-fat yogurt
  • 2/3 cup packed brown sugar
  • 4 Tbsp. oil
  • 1 tsp. vanilla
Topping:
1/2 stick butter, melted
1/2 cup sugar
1 tsp. cinnamon

DIRECTIONS:
  Preheat oven to 400 degrees.  Line a standard muffin pan with paper cups.  Whisk flour, baking powder, baking soda, salt and cinnamon in a large bowl.  In a separate bowl, whisk together eggs, yogurt, sugar, oil, and vanilla.  Add flour mixture and mix with light strokes until the dry ingredients are just moistened.  Do not overmix!
Divide batter among the muffin cups and bake until a toothpick inserted comes out clean, 12-15 minutes.  
While the muffins are baking, melt 1/2 stick butter and place in a bowl just large enough to hold a muffin.  Combine 1/2 cup sugar and 1 tsp. cinnamon in a small, shallow bowl.  As soon as the muffins are done, dip them one at a time in the melted butter and then roll in the cinnamon sugar.  Set on a rack to cool slightly.  Serve warm!!!!

Wednesday, October 13, 2010

Pumpkin Scones with Maple Glaze


I've never been much of a scone kind of girl.  They're usually loaded with calories and fat, which I'd much rather use up on a piece of chocolate cake, or a brownie, or yes, even an occasional donut!  Then I found out that there are actually ways of making a "healthier" scone without compromising taste and flavor...who knew?!!  I found this recipe at multiplydelicious and with a little tweaking of my own, I was totally satisfied!  I happened to be going to a friends house that day, so I took some with me.  I love trying new recipes out on my friends!  This recipe is definitely a keeper!

Pumpkin Scones with Maple Glaze {makes 10-12 scones}
INGREDIENTS:

  • 2 cups whole wheat flour {or you could use 1 cup white/ 1 cup whole wheat}
  • 3 Tbsp. light brown sugar
  • 1 Tbsp. baking powder
  • 1/2 tsp. salt
  • 1 tsp. ground cinnamon
  • 1/4 tsp. nutmeg
  • 1/4 tsp. ground cloves
  • 6 Tbsp. cold unsalted butter, cut into cubes
  • 1/2 cup canned organic pumpkin
  • 2 Tbsp. maple syrup
  • 2 Tbsp. milk
  • 1 large egg
Maple Glaze:
  • 1 1/4 cup powdered sugar
  • 2 Tbsp. maple syrup
  • 2-3 Tbsp. milk
DIRECTIONS:
  Preheat oven to 425 degrees.  Line a baking sheet with parchment paper.  Combine flour, brown sugar, baking powder, salt, cinnamon, nutmeg and cloves.  Cut in butter with a pastry blender or pulse in food processor until crumbly; set aside.  In a separate bowl, whisk together the pumpkin, syrup, milk and egg. Fold pumpkin mixture into flour and stir until combined.  Don't over-mix!  At this point, if you have the time, it would be best to place the dough in the refrigerator {covered in plastic wrap} for about 10-20 minutes.  It's really sticky dough and will help with the rolling process.  If you don't have time, it will still work fine!  
Place dough onto a lightly floured surface and form it into a 1-inch thick circle.  Use a round cutter or the edge of a round glass to cut circles out.  Re-roll any extra dough and make more circles.  Place circles on prepared baking sheet.  Bake 10-15 minutes until lightly golden.  
Place the scones on a wire rack to cool.  While scones are cooling, mix glaze together by combining powdered sugar, maple syrup and 2 Tbsp. of milk in a small bowl.  Mix together and add more milk until glaze comes to a drizzling consistency.  
Once scones have cooled slightly drizzle icing over.  Serve warm!

Monday, October 11, 2010

Bacon, Apple and Cheddar Grilled Cheese Sandwiches


Ok, so your probably wondering why I'm blogging about a grilled cheese sandwich, but I have to say, this is not your ordinary grilled cheese!  My sister made this sandwich for me a while back and I instantly fell in love with it.  Honestly, I think I could eat a couple of these easily!  I made them with the Tomato Soup the other night and my son told me "Mommy, this is the best day of my life!"  I love that my kids will try new things like this sandwich.  It makes my life a lot easier at times!  Oh, and our weather here on the central coast is so wacky, that last week (when I made the soup and grilled cheese) it was pouring rain and cold, this week it's HOT!  Kind of kills that Fall weather mood.

Bacon, Apple and Cheddar Grilled Cheese Sandwiches {Makes 5 sandwiches}


INGREDIENTS:

  • Sliced Sourdough Bread {I love to use San Luis Sourdough Deli Bread}
  • 10 slices of thick cut bacon
  • 1 large green apple, thinly sliced {I used granny smith}
  • sharp cheddar cheese, sliced thick {I used Tillamook Sharp Cheddar}
  • butter 
DIRECTIONS:
  Cook Bacon until crispy, drain on paper towels and set aside.  Slice apple and cheese.  Heat griddle to medium heat.  Butter the bottom of one slice of bread.  Layer cheese, apple bacon, then a couple more slices of cheddar {this allows the sandwich to stick together}.  Place another slice of bread on top and butter the top.  Make up all of the sandwiches then place two on the griddle at a time.  Heat until golden brown then flip.  Place grilled sandwiches on cutting board, let sit for a couple minutes, then slice in half.  Enjoy that cheesy goodness!!!


I put 2 slices of bacon on each sandwich, but by all means, put on more if you like!

I think I'm ready to make these again...NOW!

Wednesday, October 6, 2010

Fresh Tomato-Leek Soup


Somehow I've had a little more time this week than normal...that's why the recipes just keep comin'!
I've been in the kitchen A LOT this week and it's been fun!  One of my friends supplied me with some beautiful tomatoes from her garden and I had already planned on making a tomato soup this week...she must have read my mind!  When trying new recipes as often as I do, there are usually quite a few flops in between the successes, but I think I've been on a roll because my kids are even giving me the thumbs up!
I always feel like it's been a successful dinner when my kids are asking for more {even when there's brownies for dessert}!
I highly suggest using fresh tomatoes, but if you don't have them, the canned ones will totally work great!  If you can, try to find "no salt added" tomatoes.
Also, I didn't peel the tomatoes because I knew I was going to puree it in the blender.  We have one of those Vita-mix blenders which will puree anything!  You could use a hand-held {immersion} blender, a food processor or a blender.  Any way you choose, it's going to come out great!  Be sure to make the crispy leeks too..they add a really fun touch and they are very addicting!  I combined a couple different recipes to come up with this one.  The first one I found here and the other one was from Barefoot Contessa's Back to Basic's.  Oh, and I'd LOVE some feedback if you happen to try any of these recipes!  Sometimes these blogs make me feel like I'm talking to myself...well, that's been known to happen, but seriously, holler back if you have suggestions or comments!

Fresh Tomato-Leek Soup {serves 4}


INGREDIENTS:

  • 1 Tbsp. butter, plus 1 tsp. {divided}
  • 2 Tbsp. extra virgin olive oil {divided}
  • 10 medium tomatoes, chopped
  • 2 leeks {1 thinly sliced into half moons and 1 thinly sliced lengthwise, only up to the light green part}
  • 3 garlic cloves, smashed
  • 2 cups chicken stock
  • 1/2 cup half and half or heavy cream
  • 1 Tbsp. sugar
  • 1/4 tsp. red pepper flakes
  • 1/4 cup fresh basil, chopped
  • 1 Tbsp. kosher salt
  • 1 tsp. freshly ground black pepper
DIRECTIONS:
  In a large stock pot, melt 1 Tbsp. butter and 1 Tbsp. olive oil over medium-low heat.  Add the sliced half moons of leeks and smashed garlic.  Cook, stirring occasionally, until softened {not browned}, about 5 minutes.  Add tomatoes, chicken stock, half and half, sugar, red pepper, salt, pepper and basil.  Bring to boil over medium-high heat, then reduce heat to low and simmer for 20-30 minutes.  Transfer soup to blender {carefully} and puree until smooth.  Season with more salt and pepper to taste.  **Garnish with crispy leeks!

Crispy Leeks:
*In a medium saucepan, heat the remaining 1 tsp. butter and 1 Tbsp. olive oil over medium heat.  Add the remaining leeks {the ones sliced lengthwise} and cook, stirring occasionally, until browned and crispy.


Only slice the leeks half way up {don't use the dark green part}

Ready for the blender


Tuesday, October 5, 2010

Butternut Squash Lasagne


To me butternut squash is all about Fall.  I really love this kind of squash in so many different ways.  It's one of those vegetables that can be made so many different ways.  I've put it in soups, made it as a side dish, and put it in pastas.  Last night I made this lasagne and it was by far, one of my favorite ways of eating butternut squash.  The sage and thyme really give it those Fall flavors when it bakes in the oven.  I'd be happy with this kind of lasagne any day!  

Butternut Squash Lasagne {adapted from Cooking Light}

INGREDIENTS FOR SAUCE:
  • 2 Tbsp. butter
  • 1/4 cup flour
  • 2 1/2 cups milk
  • 1 tsp. salt
  • 1/2 tsp. freshly ground black pepper
INGREDIENTS FOR FILLING:
  • 8 cups butternut squash, peeled and cut into 1 inch cubes
  • 1-2 Tbsp. extra virgin olive oil
  • 1/2 tsp. sea salt
  • 1/4 tsp. freshly ground pepper
  • 1 1/2 tsp. fresh thyme, chopped
  • 2 tsp. fresh sage, chopped {save 1/2 tsp. to sprinkle on top before baking}
  • 8 sheets cooked lasagne noodles
  • 1 cup grated fresh parmesan cheese
  • 2 cups mozzarella cheese, shredded
  • Extra virgin olive oil 
DIRECTIONS:
 1.  In a medium saucepan, melt butter over medium heat.   Slowly whisk in flour and let cook for 1 minute.  Add milk a little at a time, whisking constantly until all the flour mixture has absorbed.  Bring to a slight boil and let cook about 2-4 minutes or until thickened, whisking occasionally.  Add salt and pepper.  Set aside.
2.   Heat oven to 425 degrees.  Peel and chop butternut squash and add to a large bowl.  Add the olive oil, salt, pepper, thyme, and sage to the bowl. Stir to combine.  Arrange the cubed squash on a large baking sheet.  Bake for 30 minutes, stirring after 15 minutes.  
3.  While squash is cooking, cook noodles and let cool slightly on parchment paper.  
4.  Grease a 9 inch square inch baking sheet.  Spread 1/2 cup sauce on bottom of dish.  Arrange 4 noodles on top of sauce {cut noodles to fit if you want}.  Scoop half of the squash cubes on top of noodles, pour 1/2 cup sauce on top, then sprinkle with 1/2 cup parmesan and 1 cup mozzarella.    Layer the next 4 noodles, squash, 1/2 cup sauce, 1/2 cup parmesan, 1 cup mozzarella.  Sprinkle with remaining chopped sage and drizzle with a little extra virgin olive oil.  
5.  Bake at 350 degrees for 30-40 minutes or until bubbly.

here's the squash after it's been roasted...I could eat it just like this!

all layered up

just out of the oven...YUM!

Monday, October 4, 2010

It's a fresh bread kind of day!

I'm so excited!!!  Making bread without my bread machine has always seemed so daunting...until NOW!
My friend sent me this recipe from King Arthur Flour that she made a couple weeks ago with rave reviews.  It's baking as I write this and the whole house smells so wonderful and cozy!  I started the process at 9am and it's about 3:45 right now.  Not too bad for a beautiful-looking French-Style Country Bread.  Pictures to follow...


French-Style Country Bread by King Arthur Flour


Sponge Starter (Begin 2 to 16 hours ahead)
1 cup (8 ounces) cool to lukewarm water, preferably spring water (90 to 100°F)
1/2 teaspoon active dry or instant yeast
1 1/4 cups (5 1/4 ounces) King Arthur Unbleached Bread Flour
1/4 cup (1 ounce) King Arthur White Whole Wheat or Traditional Whole Wheat Flour

Dough
All of the sponge starter (above)
1 cup (8 ounces) lukewarm water, preferably spring water (l00 to 115°F)
3/4 teaspoon active dry or 1/2 teaspoon instant yeast
1 tablespoon sugar
3 3/4 to 4 cups (1 pound to 1 pound 1 ounce) King Arthur Unbleached Bread Flour
1 to 1 1/2 teaspoons salt
To Make The Sponge: Stir all of the sponge ingredients together to make a thick, pudding-like mixture. Cover with plastic wrap and leave on a counter overnight or for at least 2 to 4 hours. If you're making this in a bread machine, place the sponge ingredients inside, and turn the machine on for just a few seconds to mix the ingredients together. Turn the machine off and close the cover. Let the sponge rest for 4 hours or overnight (anywhere between 2 and 16 hours is fine, the longer the better).

To Make The Dough: Stir down the sponge with a spoon and add the water, yeast, sugar, most of the flour (hold back about 1/2 cup to use if required), and salt. Knead the dough, adding more flour as necessary, to make a soft dough, 10 to 12 minutes.

Note: You may also do this in your bread machine, using the Dough or Manual setting. After the dough has finished kneading, place it in a lightly greased bowl, and continue as directed below.

Big Tip: Mix ingredients together using up to 80% of the flour called for: it will be a loose, messy mass. Let the dough rest for 12 minutes, and you'll see it change in texture, to be come much smoother. Continue, kneading and adding additional flour as required. Overall, the dough handles better once its had time for the flour to absorb the water while resting and relaxing. By using this method, you'll tend to add less flour, and have much bigger holes in your finished bread.

Place the dough in a lightly greased bowl or plastic container, cover with lightly greased plastic wrap and a damp towel, and let it rise until almost doubled (depending on the weather, this could be l to 2 hours). If you're going out, or if you prefer, let the dough rise slowly in the fridge. If your dough has been refrigerated, allow it to come to room temperature; it'll warm up and rise at the same time. After its first rise, deflate the dough gently, but don't knock out all the air; this will create those "holes" so important to French bread. Form the dough into a round ball. Place two cookie sheets atop one another, and place a semolina- or cornmeal-dusted piece of parchment paper on top. Gently place the ball of dough on the cookie sheets, seam-side down. Cover it lightly with a tea towel, and let it rise the second time until it's puffy and about 40% to 50% larger, anywhere from 45 to 90 minutes (depending on the weather, luck, and magic). Slash or cross-hatch the bread with a sharp knife or lame. Dust it with a little flour.

Preheat your grill to High. Place the bread (on the doubled-up cookie sheets) on the grill, and close the cover. Immediately reduce the heat to Medium (400°F), and allow the bread to bake for 25 minutes, or until it's well-browned. Reduce the heat to Low, and carefully place the bread directly on the grill. Continue to bake until completely done, about 5 minutes.

For Regular (Oven) Baking: Preheat the oven to 475°F. Slash the bread, spritz water into the oven with a clean plant mister, and place the bread in the oven. Reduce the heat to 425°F and spritz with water every few minutes for the first 15 minutes of baking. Bake the bread for about 25 to 30 minutes, or until it tests done.Yield: 1 large round bread or two medium breads, 10 to 12 servings.


Sunday, October 3, 2010

Spinach Salad with Pancetta and Pine Nuts


It seems like forever since I've posted anything on here!  Sometimes I feel like I'm just trying to keep up with day to day things, that all of the "extra" things get pushed to the side.
All of the recipes I've been wanting to post are piling up and hopefully this week I'll be able to get them all up!  I'm gearing up for a big race this weekend and I'm getting super pumped!  Hoping to get lot's of rest and good food in my body to set the pace for a successful race day!
Here's the recipe for a very simple but tasty salad.  I served this salad alongside some grilled chicken sandwiches and it was really good!


Spinach Salad with Pancetta and Pine Nuts {serves 4}

SALAD INGREDIENTS:

  • 1 bag organic baby spinach, rinsed well
  • 1/4 cup diced pancetta
  • 1/4 cup pine nuts, toasted
  • 1/2 large red onion, sliced
  • salt and freshly ground pepper
  • 1 Tbsp. balsamic vinegar
  • 1 {6 oz.} package soft goat cheese, crumbled
DRESSING INGREDIENTS:
  • 1/2 cup extra virgin olive oil
  • 1/4 Colavita Balsamic Glace {it's a balsamic reduction that is sweet}
  • 3 Tbsp. seasoned rice vinegar
  • 1 tsp. sugar
  • salt and freshly ground pepper to taste

DIRECTIONS:
  Rinse spinach well and set aside in large bowl.  Heat a medium skillet to medium and saute pancetta until cooked through {about 5 minutes}.  Remove pancetta with a slotted spoon to a paper towel-lined plate and quickly place sliced red onion in same pan.  Add a little olive oil if needed, season onions with salt and pepper and saute until onions are caramelized {about 5-10 minutes}.  Remove onions, toss with 1 Tbsp. balsamic vinegar, and set aside.
For dressing, whisk all ingredients together in a small bowl and set aside.  **If you can't find the balsamic glace, don't worry...just use balsamic vinegar.
Combine the pancetta, pine nuts and onions in the bowl with the spinach.  Pour dressing on top and toss.  Crumble goat cheese on top of salad and toss gently.  Enjoy!

LinkWithin

Related Posts with Thumbnails