Tuesday, August 30, 2011

Chewy Chocolate Chip Cookie Bars


It looks like we're finally getting down the back to school routine.  Funny how easily we settle back into our routines and honestly it's for the better!  Things run so much smoother in our home when the kids know what to expect and when they have little time for being bored or arguing with one another.
My early mornings are the hardest though...so thankful for strong coffee!

Here's a recipe I made from King Arthur Flour and I have to say, they were delicious, but I think I cooked them about 5 minutes too long.  I like the gooeyness of a cookie bar and I know if I had taken them out sooner they would have been gooey.  They were so good right out of the oven! Perfect with a big scoop of vanilla ice cream and some hot fudge on top :)

Chewy Chocolate Chip Cookie Bars {recipe adapted from King Arthur Flour }


INGREDIENTS: {Makes about 2 dozen bars}

  • 2/3 Cup butter
  • 1 1/2 Cups brown sugar, packed
  • 3/4 tsp. salt
  • 1 1/2 tsp. vanilla extract
  • 3 large eggs
  • 2 1/4 tsp. baking powder
  • 2 3/4 Cup All Purpose Unbleached Flour
  • 2 1/2 Cups chocolate chips
DIRECTIONS:
  Preheat oven to 350 degrees and lightly grease a 9 by 13 pan.  Melt the butter, and stir in the brown sugar.  Add the salt and vanilla, stirring until combined.  Allow the mixture to cool slightly, then add the eggs one at a time, beating well after each addition.  Scrape the bowl and sides halfway through.  
Add the baking powder and flour, stirring to combine.  Stir in the chocolate chips.  Scoop the batter into the prepared pan and, with a wet spatula, or wet fingertips, spread evenly to the edges.
The recipe says to bake for 30-32 minutes, but I suggest baking for 25-30 minutes or until they're risen and they're top is shiny and golden.  A cake tester won't necessarily come out clean, but let them sit in the pan until they are almost cool, then cut and serve.  

Saturday, August 27, 2011

Nectarine Oatmeal Coffee Cake with Brown sugar Topping


Well, we got through our first two days of school!  The kids started school on Thurs. which is really foreign to me, but I have to admit, it was nice to welcome the weekend yesterday!  I now have a 4th grader, 3rd grader, and a 1st grader (sniff, sniff).  It blows my mind to think of how fast my little ones are growing and makes me realize more and more that every day with them counts!
I have bittersweet feelings when school begins, but seeing how much they enjoy their teachers, friends and school, it gives me a huge sense of relief.
Anyway, I figured I'd dust off my cooking skills and make something yummy for breakfast this morning!
I had a few nectarines on the counter and thought a coffee cake would be good and some nice thick cut bacon to go along with it!
I actually altered this recipe quite a bit.  It was originally a muffin recipe, but thought I'd pour it into a 9 inch square pan.  Then I added a brown sugar topping that made this coffee cake extra special!
A couple of tips:  use any fresh or frozen fruit you'd like...blueberries, peaches, raspberries, etc.
Also, if you'd rather make muffins, I think they would turn out great and they'd freeze well too!
Last, be sure not to mix the batter too much.  This was a very fluffy cake, but if you mix it too much it will change the texture.  Just fold lightly!

Nectarine Oatmeal Coffee Cake with Brown Sugar Topping 
{adapted from Easy Breakfast and Brunch cookbook}


INGREDIENTS: {Makes one 9-inch cake or 12 muffins}

  • 1 1/3 cups rolled oats
  • 1 1/3 cups buttermilk
  • 1 large egg
  • 1/3 cup melted butter or vegetable oil
  • 1/2 cup brown sugar, packed
  • 1 1/2 cups all-purpose flour {you can easily substitute 1/2 wheat flour}
  • 1 tsp. baking powder
  • 1/2 tsp. baking soda
  • 1/2 tsp. salt
  • 1/4 tsp. cinnamon
  • 2 almost ripe nectarines, pitted and flesh cut into large chunks 
Brown Sugar Topping:
  • 4 Tbsp. butter, cut into chunks
  • 1/4 cup flour
  • 1/2 cup brown sugar, packed
  • 1/4 tsp. cinnamon
*Mix together with fingers until it becomes a crumbly consistency

DIRECTIONS:
  Preheat oven to 425 degrees.  Grease a 9 inch baking dish {I used my pampered chef stoneware}.  
Put the rolled oats and buttermilk in a large bowl and let soak for 10 minutes.  Add the egg, melted butter, and sugar and mix well.
In a medium bowl whisk to combine the flour, baking powder, baking soda, salt and cinnamon.  Pour the flour mixture into the soaked oat mixture and stir briefly.  Quickly fold in the chopped nectarines.  The batter should look streaky...DO not over mix or the cake will become tough and dry!  
Pour the mixture into the prepared dish and sprinkle the brown sugar topping all over.  
Bake for about 20-25 minutes, checking after 20 minutes with a toothpick.  Let cool for 10 minutes then cut into large slices and serve with some crispy bacon and a big cup of coffee!


Friday, August 19, 2011

Chicken Pozole Verde


My supply of tomatillos has been a little more than I can handle lately!  I've already given huge bags to my neighbors with still many more to pick.  I think these cute little tomatillos are going to be my largest producing crop this season, which means I've been finding more recipes to try!  I absolutely love pozole soup because it's so hearty and comforting.   Instead of the typical way to make it, I found this recipe from Food and Wine that low and behold used tomatillos!  It wasn't a very difficult soup to make at all AND it made a large amount, so it heats up really well the next day.  I was also able to use my abundant supply of fresh cilantro and of course, I threw a couple of zucchini's in there too!  Enjoy!

Chicken Pozole Verde {recipe slightly adapted from  Food and Wine}

INGREDIENTS: {serves 6-8 heartily}

  • 7 cups chicken stock
  • 2 cups water
  • 4 chicken breast halves on the bone, with skin
  • 2 small zucchini, diced into small chunks
  • 1 1/2 lbs. tomatillos, husked and halved
  • 1 small onion, quartered
  • 2 pasilla chiles, cored, seeded and quartered
  • 2 jalapenos, seeded and quartered
  • 4 large garlic cloves, smashed
  • 1/2 cup chopped cilantro
  • 1 Tbsp. fresh oregano
  • salt and freshly ground pepper
  • 1 Tbsp. vegetable oil
  • three 15-oz. cans of hominy, drained
  • garnish: sour cream, diced avocado, shredded jack cheese, tortilla chips, lime wedges
DIRECTIONS:
  In a large stock pot, bring the chicken stock and water to a boil.  Add the chicken breasts, cover and simmer over very low heat until they're tender and cooked through, about 25 min.  Transfer the chicken breasts to a plate and shred the meat; discard the bones and skin. Skim any fat from the cooking liquid and set aside.  
In a blender, combine the halved tomatillos with the onion, pasilla chiles, jalapenos, smashed garlic, cilantro and oregano.  Pulse until coarsely chopped.  With the machine on, add 1 cup of the cooking liquid and puree until smooth.  Season the puree with salt and pepper to taste.  
In a large deep skillet, heat the vegetable oil until hot.  Add the tomatillo puree and cook over medium heat, stirring occasionally, until the sauce turns a deep green, about 10-12 minutes.  
Pour the green sauce int o the cooking liquid in the pot.  Add the hominy and bring to a simmer over medium heat.  Add the shredded chicken to the stew, season with salt and pepper and cook just until heated through.  Serve the pozole in deep bowls and garnish with the above items.

These things are so cute, when they're growing the outer husk looks like hanging paper lanterns!


Look at all that GREEN!!

The Hominy makes this dish...


Thursday, August 4, 2011

Fresh Boysenberry Cobbler


Not sure if I've mentioned it before, but I have a friend who grows the most amazing boysenberries I have ever seen!  They are HUGE and have the most wonderful flavor...my hands-down favorite berries are these boysenberries!  I took the kids out last week and picked a couple basket-fulls of these delicious berries, with the intent of making a cobbler.  The kids had their fair share as we were picking, probably like one for the basket and 4 for them!
Usually when I make a cobbler I use more of a pie crust type topping, but this time I searched some recipes and decided to go with more of a biscuity-type topping.  This recipe came from Williams-Sonoma and it was pretty simple.  We all enjoyed our big servings of cobbler with a nice big scoop of vanilla ice cream.  I'm actually looking forward to some more today for a mid-morning snack!  Also, I would suggest using this topping with any kind of fruit...peaches, apricots, or apples too.


Fresh Boysenberry Cobbler {recipe slightly adapted from Williams-Sonoma}


INGREDIENTS: {serves 8}
  • 2 lbs. fresh boysenberries, or any other mixed berries
  • 2 Tbsp. orange juice
  • 1/2 cup plus 3 Tbsp. sugar {use less sugar if your berries are really sweet...I used 1/4 cup sugar}
  • 2 Tbsp. cornstarch
  • 1/2 tsp. ground cinnamon
For the Cobbler topping:
  • 2 1/4 Cups unbleached all-purpose flour
  • 1/2 Cup firmly packed brown sugar
  • 2 tsp. baking powder
  • 1 tsp. salt
  • 1 tsp. baking soda
  • 6 Tbsp. chilled unsalted butter, cut into 1/2 inch pieces
  • 1 egg
  • 3/4 cup half & half {or heavy cream}
DIRECTIONS:
Preheat oven to 375 degrees.  Lightly butter a 9 by 13 baking dish.  I used an oval dish.  
In a bowl, combine the berries, juice, 1/2 cup sugar, cornstarch, and cinnamon.  Gently toss to combine and pour into the prepared baking dish.
To make the topping in a food processor, combine the flour, brown sugar, baking powder, salt, and baking soda, and pulse briefly to mix.  Add the butter and pulse until the mixture resembles coarse meal. In a small bowl, whisk the egg and cream together.  Pour the egg mixture in the processor and pulse just until the topping holds together.  
Using a large spoon, place dollops of topping evenly over the berries.  Sprinkle the 3 Tbsp. sugar over the topping.  Place the dish on a rimmed baking sheet.  Bake the cobbler until the top is golden and the berry filling is bubbly; about 35 minutes.  Transfer to a wire rack and let cool for 10-15 minutes.  Using a large spoon, scoop cobbler onto individual plates and serve with a big scoop of vanilla ice cream!


Thursday, July 28, 2011

Turkey-Vegetable Meatloaf with Balsamic Glaze


I can't believe I'm actually back blogging again!  The past few weeks have been the most jam-packed weeks...filled with baseball practices, baseball games, out-of-town baseball tournaments, oh, and a lovely week-long trip to San Diego to top it off!  It's all been great, don't get me wrong, but oh how happy I am to be HOME!  I love the feeling of my bed the first night coming home from a long trip, it's so comforting.
Anyway, now that we're home and back to reality, it means I'm back to cooking.  Here's a recipe that I've been making for quite a while and it's become one of our favorite meals.  If you're not sure about turkey meatloaf, you have to try this recipe!  All of the flavors...my favorite is all of the garlic, make it one tasty meatloaf.  I was able to use my garden staples in the meatloaf: zucchinis, fresh thyme, and fresh parsley.  Nothing like fresh herbs! 

Vegetable Meatloaf with Balsamic Glaze {recipe slightly adapted from Bobby Flay}

INGREDIENTS: {serves 6-8}
  • 2 Tbsp. extra-virgin olive oil
  • 1 small zucchini, finely diced
  • 1/2 red bell pepper, finely diced
  • 1/2 yellow bell pepper, finely diced
  • 4 cloves garlic, smashed to a paste with coarse salt
  • 1/2 tsp. red pepper flakes
  • salt and freshly ground pepper
  • 1 large egg, lightly beaten
  • 1 Tbsp. finely chopped fresh thyme {try to use fresh!}
  • 1/4 cup chopped fresh parsley
  • 1 1/2 lbs. ground turkey {90 percent lean}
  • 1 cup breadcrumbs
  • 1/2 cup freshly grated romano or parmesan cheese
  • 3/4 cup ketchup, divided
  • 1/4 cup plus 2 Tbsp. balsamic vinegar, divided
DIRECTIONS:
  Preheat oven to 425 degrees.  Heat the oil in a large saute pan over medium-high heat.  Add the zucchini, bell peppers, garlic paste, and 1/4 tsp. red pepper flakes.  Season with salt and pepper and cook until the vegetable are almost soft, about 5 minutes.  Set aside to cool.
Whisk the egg and fresh herbs in a large bowl.  Add the turkey, breadcrumbs, grated cheese, 1/2 cup ketchup, 2 Tbsp. balsamic vinegar, and the cooled vegetables; mix until just combined.
Gently press the mixture into a 9-by-5 inch loaf pan.   Whisk the remaining 1/4 ketchup {sometimes I add a little more ketchup}, 1/4 cup balsamic vinegar, and 1/4 tsp. red pepper flakes in a small bowl; brush the mixture over the top.  Bake for 1 to 1-1/4 hours.  Let rest for 10 minutes before slicing.  


My new potato-peeler helper

just had to share some pictures of my green bean crop
{they got a little big while we were away for the week}

...and my zucchini/squash crop

Wednesday, June 29, 2011

Double Chocolate-Chip Muffins


My kids love chocolate...they take after their mommy in that way!  My daughter is always asking for chocolate muffins and I'm always telling her I'll make them for her "soon".  I'm not the type of person who cringes at a chocolate muffin for breakfast.  Give me pie, cake, cookies...you name the dessert, I'll eat it for breakfast!  It's a curse, but I've learned to embrace it.
This is the first recipe I came across for chocolate muffins and it was VERY SIMPLE!  She pulled up the barstool and my little Ella helped me make them.  It's one of those recipes that can be put together and baked in less than 30 minutes.  She thoroughly enjoyed the fruits of her labor, as did I, with a nice hot Americano!

Double Chocolate-Chip Muffins {slightly adapted from Nigella Lawson}


INGREDIENTS:  {Makes 12 muffins}

  • 1 3/4 cup all-purpose flour {you could substitute half whole-wheat flour if you like}
  • 2 tsp. baking powder
  • 1/2 tsp. baking soda
  • 1/4 tsp. salt
  • 2 heaping Tbsp. good quality cocoa powder
  • 3/4 cup sugar
  • 3/4 cup chocolate chips, plus 1/4 cup for sprinkling
  • 1 cup milk
  • 1/3 cup plus 2 Tbsp. canola oil
  • 1 egg
  • 1 tsp. vanilla extract
DIRECTIONS:
  Preheat oven to 400 degrees.  Spray a 12-cup muffin tin with cooking spray and set aside.  Combine the flour, baking powder, baking soda, salt, cocoa powder, sugar, and 3/4 cup chocolate chips in a large mixing bowl.  In a small bowl, combine the milk, oil, egg, and vanilla.  Whisk to combine.  Pour the wet ingredients into the dry ingredients and stir just until mixed.  Try not to over-mix batter.   Evenly scoop batter into muffin tin and bake in preheated oven for 15-20 minutes.  


Tuesday, June 28, 2011

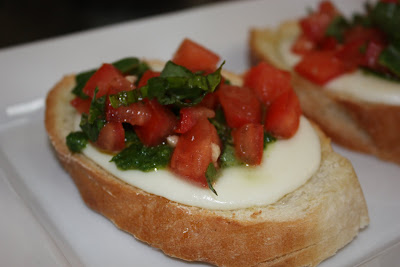
Bruschetta with homemade pesto


I decided to go simple for dinner the other night.  Salvaging through the refrigerator, I found some mozzarella and I immediately felt like bruschetta. I knew I had tons of fresh basil from my garden and I recently planted arugula, so I decided to make a pesto to go with the bruschetta.  The only bummer was that I had to buy tomatoes since my plants are taking a while.
Bruschetta can be served hot or cold, really however you like, but I decided I wanted mine warm.
This is how I made it...


Bruschetta with homemade pesto {serves 4-6 as appetizer}


INGREDIENTS FOR BRUSCHETTA:

  • 3 large tomatoes, seeded and diced
  • 2 cloves fresh garlic, minced
  • 3 Tbsp. fresh basil, torn
  • salt and freshly ground black pepper
  • homemade or purchased pesto {recipe for homemade pesto below}
  • 8 oz. mozzarella, cut into thin slices
  • 1 loaf french bread or baguette, cut into 1/2-inch thick slices
  • 2 Tbsp. olive oil, plus more for drizzling on bread
DIRECTIONS:
 Pre-heat oven to 400 degrees. Gently mix the tomatoes, minced garlic, basil, salt, pepper, and 2 Tbsp. olive oil in a small bowl and set aside.  Slice the bread and place on a foil-lined baking sheet.  Drizzle or brush with some olive oil and bake in oven for 5 minutes, or until crispy.  Remove from oven and place one slice of mozzarella on each slice of bread. Place back in oven for about 4-6 minutes, or until cheese has slightly melted.  Remove from oven and top with 1 tsp. of pesto and 1 Tbsp. of the tomato mixture.  Serve immediately.  


Homemade Pesto anyway you like
*Now arugula is a little bit on the spicier side.  If you prefer a more mild-flavored pesto, then choose basil.  I combined arugula and basil for my pesto.  Some recipes call for pine nuts or walnuts in their pesto recipes, but I decided to leave the nuts out.  Feel free to experiment!


INGREDIENTS:

  • 2 1/2 cups fresh basil OR fresh Arugula {I used 1 cup basil and 11/2 cups arugula}
  • 2 cloves garlic, peeled
  • 1/2 cup freshly grated parmesan cheese 
  • 1/4 cup pine nuts or walnuts {optional...I left the nuts out}
  • 1/4 cup extra virgin olive oil, plus more if desired
  • salt
  • freshly ground pepper
DIRECTIONS:
  Place basil or arugula, peeled garlic, and parmesan cheese in food processor.  Turn on processor and blend for 1 minute.  While processing, slowly add the olive oil and process for 1 more minute.  Season with salt and pepper to taste and pulse for a few seconds.  If the pesto seems to thick for your liking, you may add more olive oil.

LinkWithin

Related Posts with Thumbnails